There’s something about the smell of garlic and soy simmering together that just makes everything feel cozy, right? I remember my first time making this dish — it was a busy weeknight when I needed something comforting yet quick, and I stumbled upon an idea: why not turn my favorite Chinese takeout into a homemade feast? That’s how my beloved Instant Pot Cashew Chicken was born. It’s one of those recipes that feels like a warm hug after a long day, and honestly, my kids ask for it all the time. The best part? It’s dead simple to make, and leftovers taste incredible the next day. Sometimes I even double the sauce so I can spoon it over rice the next morning — no shame in breakfast leftovers when they’re this tasty! This dish combines a sweet-savory glaze with crunchy cashews and tender chicken — think of it as a healthy-ish, homemade version of your favorite takeout classic. Trust me, once you master this, it’ll be your go-to for busy nights or just when you want a little spice and sweetness in your life.
Thank you for reading this post, don't forget to subscribe!What is Instant Pot Cashew Chicken?
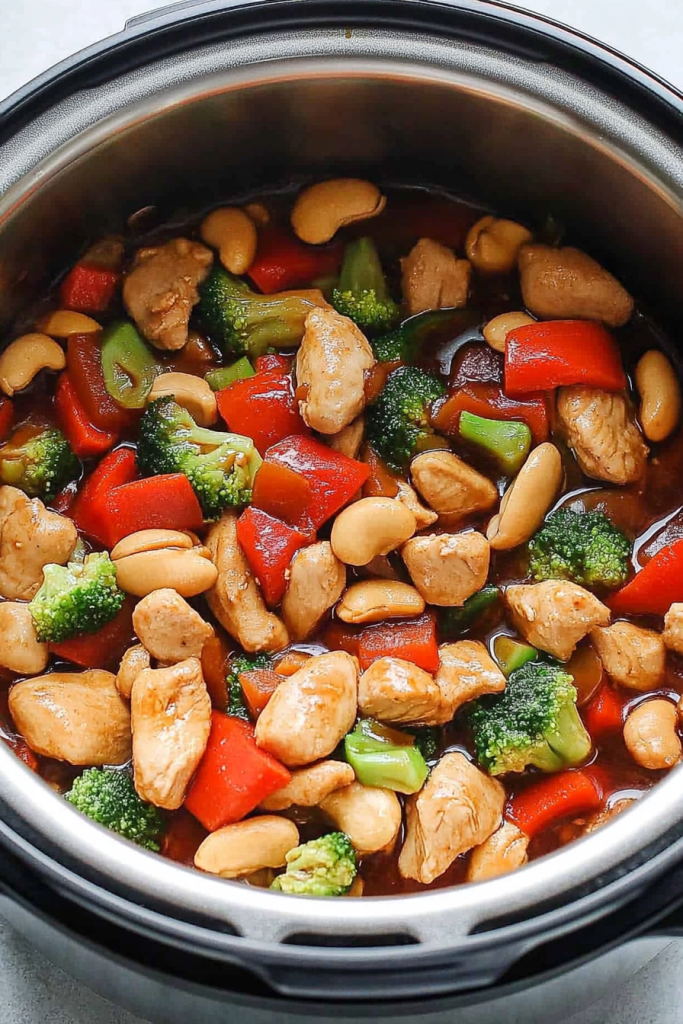
Think of Instant Pot Cashew Chicken as the lovechild of your favorite Asian takeout and a home-cooked hug. It’s essentially tender chicken pieces cooked in a tangy, slightly sweet soy-based sauce, all quickly done in the magic of an Instant Pot — no fuss, no stress. The “cashew” in the name is what makes it stand out; those crunchy, buttery nuts add the perfect texture and richness that elevates the whole dish. The best part? It’s a one-pot wonder, which means less cleanup and more time enjoying the meal. The name “Cashew Chicken” is pretty straightforward — chicken stir-fried or pressure-cooked with a savory sauce and tossed with roasted cashews at the end. It’s like a cozy dinner wrapped in a flavorful crust of garlic, ginger, and sesame oil. You can serve it over steamed rice, cauliflower rice, or even noodles — whatever floats your boat. Think of it as your new favorite weeknight hero that comes together faster than ordering delivery and tastes way better.
Why you’ll love this recipe?
Honestly, what I love most about this Instant Pot Cashew Chicken is how insanely flavorful it turns out — and how it comes together so quickly that I can almost feel smug about my dinner plans. The aroma itself is enough to draw everyone to the table: fragrant garlic, toasted sesame, and sweet soy flowing into the air. Plus, it’s super budget-friendly; most of the ingredients are pantry staples that I always keep on hand. No fancy sauces or hard-to-find ingredients needed. This dish is also incredibly versatile — I’ve thrown in bell peppers, broccoli, or even a handful of pineapple chunks when I have them, and it always tastes amazing. The textures are a total hit—the tender chicken coated in a glossy, flavorful sauce, and the crunchy cashews providing a perfect contrast. If you’re a fan of Chinese takeout but want to control what’s in your food, this recipe is a total game-changer. I always do this when I crave something rich but not overly heavy — it’s comfort food, healthy-ish, and so satisfying. Plus, it’s a lifesaver on busy nights when I need dinner done fast but still want something homemade and heartfelt. Honestly, once I made this, I never wanted takeout again.
How do I make instant pot cashew chicken?
Quick Overview
This recipe is basically a quick pressure cook, then a quick glaze, and top it off with roasted cashews. I’ve tested this countless times, and I promise it’s foolproof. The beauty of the Instant Pot is how it turns what used to take ages in a stir-fry into a swift, hands-off process. I start by sautéing garlic and ginger right in the pot for a fragrant foundation, then add chicken pieces, sauce ingredients, and a splash of broth. After a quick pressure cycle, I stir in the cashews and let everything simmer a minute to absorb those gorgeous flavors. The result? Juicy, flavorful chicken coated in a slightly sticky, sweet-savory sauce with that irresistible crunch from the cashews. Plus, cleanup’s a breeze since it’s mostly one dish, and you’ve got dinner on the table in about 30 minutes—perfect for any night when you’re short on time but craving good food.
Ingredients
For the main chicken and sauce: For the sauce: For the sauce: For the sauce: For the sauce: For the sauce: For the sauce:
- 1.5 pounds boneless, skinless chicken thighs or breasts, cut into bite-sized pieces — I prefer thighs because they stay juicy, but breasts work too!
- 3 cloves garlic, minced — fresh is best, and the smell alone makes the kitchen feel like a cozy restaurant.
- 1 tablespoon grated fresh ginger — trust me, fresh makes all the difference.
- 1/4 cup soy sauce — or tamari if you want gluten-free.
- 2 tablespoons honey or maple syrup — balance out the salty soy with some sweetness.
- 2 tablespoons rice vinegar — for that subtle tang that cuts through richness.
- 1/4 cup chicken broth or water — keeps everything moist in the pressure cooker.
- 1 teaspoon sesame oil — just a drizzle to add that distinctive aroma.
- 1 tablespoon cornstarch mixed with 2 tablespoons water — for thickening the sauce.
For the Crunch & Garnish:
- 1 cup roasted cashews — I buy raw, then toast them myself for freshness.
- Optional: sliced green onions, sesame seeds, red pepper flakes — for extra flavor and presentation.
Step-by-Step Instructions
Step 1: Preheat & Prep Pan
Set your Instant Pot to sauté mode and add a tiny bit of oil. Toss in minced garlic and grated ginger, sautéing until fragrant — about 30 seconds. I do this first so the smell fills the room and my kids start lingering in the kitchen, asking if dinner’s ready!
“Made the Easy Pressure Cooker Cashew Chicken Dinner tonight and wow — perfect weeknight dinner. Will definitely make again!”
Step 2: Mix Dry Ingredients
In a small bowl, mix your soy sauce, honey, rice vinegar, and sesame oil. I like to have this ready because it makes assembling quick. It’s my shortcut to flavor happiness.
Step 3: Mix Wet Ingredients
Add the chicken to the sautéed aromatics, then pour over the sauce mixture. Give everything a good stir to coat the chicken evenly. That’s when the kitchen starts smelling irresistible!
Step 4: Combine
Pour in the chicken broth, seal the lid, and set your Instant Pot to high pressure for about 8 minutes. Remember, don’t overfill — I’ve learned the hard way. It’s better to cook in batches if you have a lot of chicken because the pressure needs room to work its magic.
Step 5: Prepare Filling
While it’s cooking, I toast the cashews in a dry skillet until golden and a little fragrant — just 3-4 minutes over medium heat. Keep an eye on them — burnt nuts are a no-go! You can also season these with a tiny pinch of salt or a dash of cayenne if you like a little heat.
Step 6: Layer & Swirl
Once the timer dings, do a quick release, open the lid, and stir the chicken to see how nicely it’s simmered. Mix the cornstarch and water, then stir it into the pot to thicken the sauce. Pop the lid back on, and let it cook for another 2 minutes on sauté mode. It’ll turn glossy and thick, just like takeout but better, I swear!
Step 7: Bake
Not actual baking here, but this step is all about finishing touches. Open the lid, stir in the roasted cashews, and sprinkle with sliced green onions or sesame seeds — if you feel fancy. This is when the aroma hits its peak, and I can’t keep my nose out of the pot.
Step 8: Cool & Glaze
Give it a few minutes to rest — I like it hot, but that sauce is much easier to serve once it’s slightly cooled. If you want a more glaze-like finish, you can simmer it down a little longer, but it’s totally optional.
Step 9: Slice & Serve
Serve over fluffy steamed rice or cauliflower rice for a lighter version. Garnish with extra cashews, green onions, or sesame seeds for that restaurant-worthy look. My favorite part? Watching everyone’s faces light up when I plate this — it’s like homemade magic in minutes.
What to Serve It With
This dish is a total chameleon. For a quick weeknight dinner, I love to serve it over jasmine or basmati rice, letting that sticky sauce soak into every grain. Sometimes I toss in a handful of frozen peas or broccoli florets during the pressure cook stage to add some veggies — a colorful, nutritious boost. When I want to make it feel a bit more special, I serve it alongside wilted bok choy or steamed scallions. And of course, a simple side of spring rolls or dumplings never hurts!
“Packed with flavor and so simple. Exactly what I wanted from this Easy Pressure Cooker Cashew Chicken Dinner!”
For brunch-style fun, I’ve even spooned this over fried eggs or tucked it into a breakfast bowl — weird but tasty! My kids especially love dipping crunchy vegetable sticks into leftover sauce — it’s basically a healthy snack upgrade. This dish works with so many sides, and leftovers reheat beautifully, making it a real lifesaver on busy mornings or when friends pop over unexpectedly.
Top Tips for Perfecting Your Instant Pot Cashew Chicken
I’ve tested this a dozen times (and yes, burned a few batches along the way), so trust me on these tricks:
- Zucchini Prep: If adding extra veggies like zucchini or peppers, slice thinly and prep ahead. A quick salt sprinkle can help draw out excess moisture from zucchini, preventing sogginess.
- Mixing Advice: Avoid overmixing once everything’s in the pot — gentle stirring preserves the tender chicken pieces and keeps the sauce glossy.
- Swirl Customization: Want more color? Add a few drops of red or yellow food coloring to the sauce or toss in chopped red chili for a fiery kick. Swirling them into the sauce just before serving creates a beautiful visual.
- Ingredient Swaps: Allergic to cashews? Try roasted almonds, walnuts, or even sesame seeds for a different crunch. Trust me, each variation will carry its own charm.
- Baking Tips: When you do the final simmer, keep the lid slightly vented to prevent sauces from becoming too thick or sticky. Also, positioning your pot on the middle rack ensures even heat distribution.
- Glaze Variations: For a citrusy twist, add a splash of orange juice or lemon zest during the finishing stage. A dash of five-spice powder adds a warm, aromatic nuance.
From my experience, it took me a few tries to perfect the sauce consistency and to find the right amount of cashews to avoid overwhelming the dish. Now, I just eyeball it and taste as I go. Oh, and don’t forget — the quality of soy and honey makes all the difference. Good, thick honey is worth seeking out, and organic soy adds a richer depth.
Storing and Reheating Tips
Leftovers? Absolutely! Store any cooled Cashew Chicken in an airtight container in the refrigerator for up to 3 days. I like to keep the cashews separate until just before serving so they stay crunchy. If you plan to reheat, microwave it on medium or warm it gently on the stove. Sometimes I add a splash of chicken broth during reheating — it helps loosen up the sauce and keeps everything tender. For longer storage, you can freeze it in portions for up to 2 months. Just make sure to defrost overnight in the fridge before reheating. Be cautious with the glaze — I prefer to add a fresh splash as I reheat to keep the sauce shiny and vibrant. Trust me, this dish still tastes amazing reheated, and if you’re really craving that crunchy cashew texture, sprinkle fresh roasted nuts right before serving to preserve their crispness.
Frequently Asked Questions
Final Thoughts
Honestly, this Instant Pot Cashew Chicken has become one of those recipes I turn to when I want something satisfying but don’t have hours to spend in the kitchen. It’s a perfect blend of sweet, savory, and crunchy, all packed into a single pot, which is right up my alley on busy nights. The first few times I made it, I couldn’t believe how much flavor came from such simple ingredients — it’s like discovering a secret culinary shortcut! My family loves that every bite melts in your mouth with a hint of garlic and a burst of nutty crunch. Plus, the flexibility to add extra veggies or swap ingredients makes it endlessly customizable. If you try it once, I bet it’ll become a staple in your weeknight rotation too. So grab your Instant Pot, some chicken, and those cashews — I can’t wait to hear how yours turns out! Don’t forget to leave a comment below with your favorite tweaks or servings — I love hearing from fellow food lovers. Happy cooking!
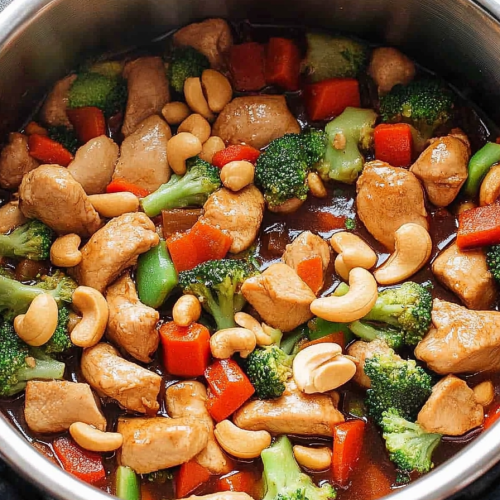
Instant Pot Cashew Chicken
Ingredients
Main Ingredients
- 0.5 cup low sodium soy sauce
- 0.33 cup maple syrup
- 1 tablespoon minced garlic
- 2 teaspoons fresh grated ginger
- 2 teaspoons white rice vinegar
- 1.5 lbs boneless (skinless chicken breast, cut into 1-inch chunks)
- 1.5 tablespoons olive oil
- 2 large red peppers (diced)
- 4 cups broccoli florets
- 1 tablespoon cornstarch
- 0.25 cup water
- 1 cup raw (whole cashews)
Instructions
Preparation Steps
- First, prepare stir fry sauce. In a medium bowl, mix together soy sauce, maple syrup, minced garlic, grated ginger, and white rice vinegar. Set aside.
- Next, prepare chicken breast by slicing into 1-inch chunks.
- Turn on the Instant Pot's sauté feature. Heat 1.5 tablespoons of olive oil.
- When olive oil is fragrant, add diced chicken breast and cook for 1 to 2 minutes to brown.
- Turn off the sauté feature and add stir fry sauce. Toss.
- Cover Instant Pot and turn the valve to seal. Cook on manual high pressure for 4 minutes.
- While the chicken is cooking, prepare vegetables. Dice 2 large red peppers and cut broccoli into bite-sized florets. Set aside.
- Next, prepare a slurry. In a small bowl, whisk together 1/4 cup of water and 1 tablespoon of cornstarch. Set aside.
- Once the Instant Pot beeps, quick release to release the steam that has built up.
- Remove top and add chopped veggies, the slurry, and raw cashews to the Instant Pot and toss everything together.
- Turn on the Instant Pot's sauté feature and cook for around 3 minutes or until sauce has thickened.
- Turn off the sauté feature and immediately cover the Instant Pot for around 5 minutes to let the veggies steam and fully cook.
- Remove lid and assess how cooked the veggies are. If they need to continue cooking, put the top back on to continue steaming. Remember, no one likes overcooked veggies!
- Serve over your favorite grain.


