Honestly, I can’t tell you how many times these Thumbprint Cookies have saved me on busy mornings or when I just needed a little hug in cookie form. I remember growing up, my grandma used to make these during the holidays, and the smell of warm butter, sugar, and vanilla always seemed to fill the whole house with happiness. They’ve become a family favorite over the years, and I swear, everyone who bites into one asks for the recipe. They’re such a charming little treat – buttery, with a tender crumb, topped with a generous dollop of jam or preserves in the middle. It’s sort of like a more sophisticated childhood cookie, but trust me, once you make these, they’ll become a staple in your kitchen too. This recipe is so straightforward that even if you’re new to baking, I promise you’ll get perfect cookies every time. Plus, they’re a sweet little project that tastes like heaven—like biting into a bite of nostalgia. You won’t believe how quick they are to whip up, and the best part? They disappear within minutes at my house – no joke! Just wait until you try them, I’m confident they’ll become your go-to treat too.
Thank you for reading this post, don't forget to subscribe!What is a thumbprint cookie?
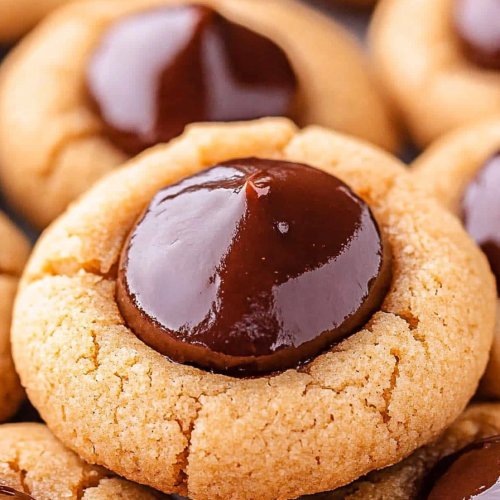
Think of Thumbprint Cookies as little buttery or crumbly cookies with a charming little indentation in the middle, filled with jam or some kind of fruity preserve. Their name comes from the fact that you create that signature ‘thumbprint’ by gently pressing your finger into the soft dough before baking. They’re also sometimes called “Nut Thumbprint Cookies” if nuts are added to the dough, but honestly, I prefer them classic and simple. The cookie itself is kind of like a melt-in-your-mouth kind of thing—tender, sweet, and rich, almost like a shortbread but with a slightly more tender texture. The filling adds a burst of fruity sweetness that balances up that buttery base perfectly. It’s essentially a cookie you can dress up or down, depending on what jam or preserves you choose. They’re popular during holidays, but I always keep a batch around because they’re equally perfect for a casual afternoon tea or a quick dessert. And depending on your mood, you can spice things up by swapping out the jam for lemon curd, Nutella, or even a drizzle of chocolate after they bake.
Why do you love this movie?
What I love most about Thumbprint Cookies is their cozy, homey vibe — they just scream comfort. The flavor? Oh, it’s a perfect balance of buttery richness and fruity tang that makes my taste buds do a little happy dance. Plus, these cookies are so simple to make, they really do come together in under 30 minutes, start to finish. I’ve made them countless times, and each batch is like a little celebration, especially when I get to fill those indentations with my favorite raspberry jam or apricot preserves. They’re budget-friendly, too, because all you need are pantry staples—flour, butter, sugar, and whatever jam is in the fridge. And because you can personalize the filling, they’re versatile enough for breakfast (think: a sweet start to your day), tea time, or even a cute party treat. My kids ask for these all the time, and honestly, I don’t mind — I’d choose these over a store-bought cookie any day. What I really adore is how forgiving they are — a little overbaking and you get a golden, slightly crisp exterior with a soft, melt-in-your-mouth center. Plus, the smell alone, while baking, is enough to make everyone come running to the kitchen. That warm, slightly caramelized aroma—ugh, I could live on it.
How do I make thumbprint cookies?
Quick Overview
This recipe is a lovely little project that’s foolproof once you get the hang of it. You start with a simple dough—creamy, buttery, and tender—that you roll into balls and gently press your thumb or the back of a teaspoon into the center to make that iconic well. Bake until lightly golden, then fill the indentations with your favorite jam or spread. The final touch? A quick glaze or dusting of powdered sugar if you want, but honestly, the jam itself provides enough sweetness. These cookies are perfect when you want to impress without stress, and I promise, they’ll become part of your cookie repertoire after just one batch.
Ingredients
For the Main Batter:
– 1 cup (2 sticks) unsalted butter, softened—go for good quality, it makes all the difference
– ¾ cup powdered sugar—gives the cookie that delicate sweetness and tenderness
– 2 teaspoons vanilla extract—because vanilla makes everything better
– 2 cups all-purpose flour—preferably unbleached for richer flavor
– ½ teaspoon salt—just enough to balance the sweetness
For the Filling:
– About ¼ cup of your favorite jam or preserves—strawberry, raspberry, apricot, or even a mixed fruit spread
– Optional: a splash of liqueur or lemon zest to jazz it up
For the Glaze (Optional):
– Powdered sugar mixed with a little milk or lemon juice to get a smooth drizzle or glaze
– Or just sprinkle with powdered sugar for a simple, elegant finish
Step-by-Step Instructions
Step 1: Preheat & Prep Pan
Set your oven to 350°F (180°C). Line a baking sheet with parchment paper—nothing sticks, and cleanup is a breeze. I always do this first to keep everything smooth and stress-free since these cookies are delicate, and the last thing you want is sticking.
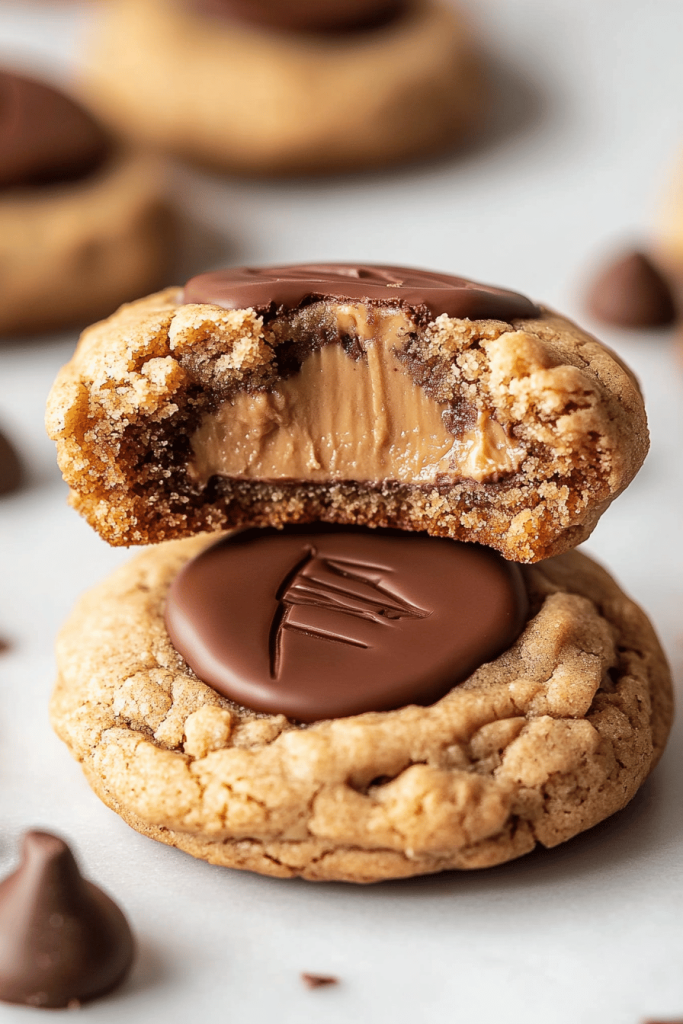
“Packed with flavor and so simple. Exactly what I wanted from this Easy Peanut Butter Thumbprint Cookies!”
Step 2: Mix Dry Ingredients
In a small bowl, whisk together the flour and salt. Sifting isn’t necessary but helps ensure there are no lumps, especially if your flour or powdered sugar has been sitting around. Set aside.
Step 3: Mix Wet Ingredients
In a large bowl, beat the softened butter and powdered sugar until light and fluffy—about 2-3 minutes. I usually use a hand mixer for this because it really aerates the dough. Add vanilla and mix again until combined. The dough texture will look creamy but crumbly—perfect for shaping.
Step 4: Combine
Gradually add the dry ingredients into the wet mixture, mixing on low. The dough should come together easily, not sticky but pliable enough to roll into balls. If it’s too sticky, chill it for 10-15 minutes; if it’s too crumbly, a teaspoon of milk can help.
Step 5: Prepare Filling
Stir your jam to loosen it up if needed. This makes filling the indentations easier and neater. If you’re feeling adventurous, mix in a splash of liqueur or lemon zest for extra flavor pop.
Step 6: Layer & Swirl
Take small amounts of dough (about a tablespoon), roll into balls, and place on your prepared baking sheet. Gently press your thumb into each ball—don’t push too hard or the dough will crack. Fill the well with about half teaspoon of jam—don’t overfill, or it’ll leak out during baking.
Step 7: Bake
Pop into the oven and bake for 12-15 minutes, until the edges are just turning golden. Keep a close eye because every oven bakes a bit differently. The cookies should feel firm but still soft to the touch; they harden a bit as they cool.
Step 8: Cool & Glaze
Let the cookies sit on the baking sheet for 5 minutes before transferring to a wire rack to cool completely. Once cooled, drizzle with a simple glaze or dust with powdered sugar. I love a little extra sweet crunch, so I sometimes sprinkle a tiny bit of salt on top—yum!
Step 9: Slice & Serve
Serve these cookies at room temperature with a glass of milk, a hot cup of tea, or as a sweet finish after a hearty meal. They also make adorable gifts wrapped in pretty paper or tins — everyone loves a homemade treat with a personal touch.
What to Serve It With
These thumbprint cookies are versatile enough for any occasion, but I especially love serving them during coffee dates or holiday gatherings. For breakfast, pair them with a strong cup of black coffee or a chai latte—the buttery, crumbly texture is just divine with a hot drink. If you’re hosting brunch, these cookies add a homemade, cozy touch that everyone will appreciate. They also make delightful after-dinner treats with a drizzle of chocolate or a dollop of Whipped Cream for a fancy twist.
“Made the Easy Peanut Butter Thumbprint Cookies tonight and wow — perfect weeknight dinner. Will definitely make again!”
And let’s be real — my family requests these for cookie exchanges, school bake sales, or just as an afternoon pick-me-up. They’re such a crowd-pleaser—and the filling options are endless. I’ve even tried lemon curd instead of jam for a tart kick, and trust me, it’s sensational. Pair these cookies with a hot cup of your favorite herbal tea or a cold glass of milk — they’re equally good with either.
Top Tips for Perfecting Your Thumbprint Cookies
After making these dozens of times, I’ve learned a few tricks to get them just right every time. First, don’t skip chilling the dough if it feels too sticky; it makes shaping so much easier and prevents spreading during baking. When pressing into the dough, keep your finger or thumb clean and slightly floured if needed—just enough to prevent sticking but not so much that you lose that perfect indentation. If your jam is too thick, microwave it for 10 seconds or so to loosen it up. The swirl or pattern in the jam doesn’t matter much, but I love creating little concentric circles or just filling the well generously for maximum jam goodness.
In terms of ingredient swaps, I’ve tested coconut oil instead of butter, and while it adds a different flavor, the cookies still turn out tender and lovely. Gluten-free flours work, but I recommend a blend to mimic the texture of regular flour—just be prepared for a slightly different crumb. I’ve also learned to bake these on the middle rack for even heat distribution; moving them too high or low can affect how they turn out. And if you want to make them extra special, add chopped nuts or a splash of almond extract in the dough for a nutty twist. The possibilities are endless!
Storing and Reheating Tips
The beauty of thumbprint cookies is that they keep well — making them perfect for baking ahead of time. Once cooled, store them in an airtight container at room temperature for up to a week. I like to line the container with parchment paper to prevent sticking and keep them fresh. For longer storage, you can refrigerate them for up to two weeks or freeze them for up to three months; just make sure to wrap each cookie well to prevent freezer burn. When ready to serve, let frozen cookies come to room temperature before glazing or filling with jam — they taste just as fresh. If you add the jam or glaze ahead of time, I recommend doing so just before serving to keep the jam from getting soggy or the glaze from melting. Trust me, a little planning pays off when you want that perfect cookie moment!
Frequently Asked Questions
Final Thoughts
There’s something special about a cookie that’s both simple and a little nostalgic. Thumbprint Cookies bring back warm family memories for me, but I also love how versatile they are—perfect for special occasions, casual afternoons, or just when I need a sweet little pick-me-up. The best part? They’re straightforward enough that a beginner can nail them right away, and they’re guaranteed to impress everyone with their charming presentation and delightful flavor. I encourage you to experiment with different jams and maybe throw in a splash of liqueur or a dash of spice to make them your own. Once you try these, I bet they’ll become part of your cookie rotation, too. Happy baking, and I can’t wait to hear how yours turn out! Don’t forget to leave a comment with your favorite filling variation — I love trying new twists myself!
thumbprint cookies
Ingredients
Main Ingredients
- 0.5 cup unsalted butter
- 0.5 cup granulated sugar
- 0.5 cup brown sugar
- 0.75 cup peanut butter
- 1 large egg
- 1.5 teaspoons vanilla extract
- 1.5 cups all-purpose flour
- 0.666 cup semi-sweet chocolate chips
- 0.333 cup heavy cream
Instructions
Preparation Steps
- Preheat the oven to 350°F and line baking sheets with parchment paper.
- Cream together butter, white sugar, and brown sugar until light and fluffy.
- Mix in peanut butter until well combined.
- Beat in egg and vanilla until smooth.
- Gradually mix in flour until just combined.
- Using a 1.5 tablespoon scoop, form dough into balls and place on baking sheets with 1.5 inches apart.
- Bake for 10-14 minutes until cookies are golden and cracked.
- Remove from oven and press thumb into center of each cookie to create a well.
- Allow cookies to cool for 5 minutes before transferring to a wire rack.
- Prepare ganache by heating heavy cream and pouring over chocolate chips. Let sit for 5 minutes.
- Whisk until smooth, then pipe or spoon ganache into the center of each cookie.
- Let the ganache set before serving. Enjoy your delicious thumbprint cookies!


