
You know those days? The ones where you’re staring into the pantry, desperately craving something sweet, but the thought of a full-blown cake or even a batch of regular cookies feels like way too much effort? Yeah, I have those days a lot. And that’s exactly when these Nutella cookie sandwiches become my absolute hero. They’re not just cookies; they’re little pockets of joy, a perfect balance of soft, chewy cookie and that ridiculously addictive hazelnut-chocolate goodness. Honestly, if you love those classic Chocolate Chip Cookies but want to add a serious upgrade, or if you’re just a devoted fan of all things Nutella, then you’ve landed in the right spot. These are the kind of treats that make you feel like you’ve accomplished something amazing, even if you only spent about an hour from start to finish. They disappear faster than you can say “more, please!” at my house, especially when the little ones spot them on the counter.
Thank you for reading this post, don't forget to subscribe!What is Nutella sandwich?
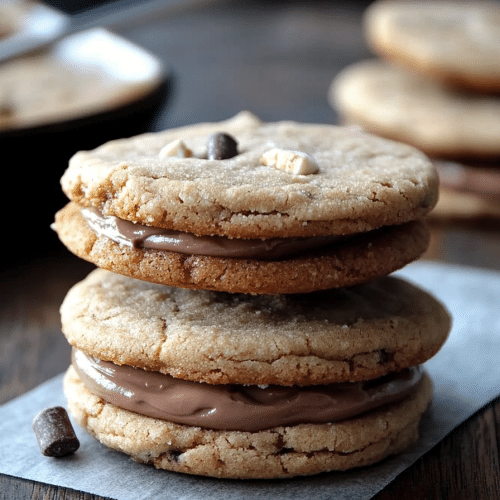
So, what exactly are we talking about here? Think of your favorite soft, Chewy Cookie – maybe one with slightly crisp edges and a wonderfully tender center. Now, imagine slathering a generous amount of creamy, dreamy Nutella between two of those cookies. That’s pretty much it! It’s an elevated cookie experience, turning a simple treat into something a bit more special. The name itself, Nutella cookie sandwiches, tells you everything you need to know: it’s a delightful construction of two perfectly baked cookies embracing a luscious filling of that iconic hazelnut spread. It’s not a complicated concept, but oh boy, is it a winner. It’s essentially taking a beloved classic and giving it a decadent, crowd-pleasing twist that’s just begging to be devoured.
Why you’ll love this recipe?
There are so many reasons why I keep coming back to this recipe, and I just know you’ll fall in love with them too. First off, the flavor is just out of this world. You get the comforting, familiar taste of a well-made cookie, but then that wave of rich, nutty, chocolatey goodness from the Nutella hits you, and it’s pure bliss. It’s that perfect symphony of textures and tastes that just makes your taste buds sing. And let’s talk about simplicity! I’ve tested this recipe more times than I can count, and it’s surprisingly straightforward. Even if you’re not a seasoned baker, you can absolutely nail this. The ingredients are pantry staples for the most part, making it incredibly cost-effective. You don’t need any fancy gadgets or obscure items. What I truly adore, though, is the sheer versatility. These aren’t just for dessert; they’re fantastic with a morning coffee, perfect for packing in lunchboxes (if they make it that long!), and an absolute lifesaver when unexpected guests pop by. They feel indulgent without breaking the bank or demanding hours in the kitchen, which, let’s be honest, is the dream for most of us busy home cooks.
How do you make Nutella cookie sandwich?
Quick Overview
The magic of these Nutella cookie sandwiches lies in their straightforward approach. You’ll whip up a simple, tender Cookie Dough, bake them until they’re just right – golden around the edges and soft in the middle – and then bring them together with a generous spread of Nutella. The whole process is surprisingly quick, meaning you can satisfy those cookie cravings in no time. It’s a recipe designed for maximum deliciousness with minimum fuss, and that’s a win-win in my book.
Ingredients
For the Main Batter:
You’ll need about 1 cup (2 sticks) of unsalted butter, softened to room temperature – this is super important for getting that perfect creamy texture. Then, grab 1 ½ cups of granulated sugar, which gives them that lovely sweetness and helps with browning. Two large eggs are next, acting as the binder. For that wonderful vanilla flavor that just makes everything better, get 2 teaspoons of pure vanilla extract. In a separate bowl, whisk together 3 cups of all-purpose flour, 1 teaspoon of baking soda (this is what makes them chewy!), and ½ teaspoon of salt to balance the sweetness. I always recommend using good quality ingredients here; it really does make a difference in the final taste.
For the Filling:
This is the star of the show, folks! You’ll need about 1 to 1 ½ cups of your favorite Nutella. If you find your Nutella is a bit too stiff right out of the jar, you can warm it ever so slightly in the microwave for about 15-20 seconds, just until it’s a little more spreadable. Be careful not to overheat it! Some people like to add a tablespoon or two of powdered sugar to the Nutella if they want a slightly sweeter filling, but I usually find it perfect as is.
For the Glaze:
This is optional, but I think it really elevates them. You’ll need ½ cup of powdered sugar, about 1 to 2 tablespoons of milk (or even cream for extra richness!), and ½ teaspoon of vanilla extract. You can also add a tablespoon of melted Nutella to the glaze for an extra hazelnut kick!
“The Easy Nutella Cookie Sandwiches Delight turned out amazing. My kids asked for seconds. Saving this one!”
Step-by-Step Instructions
Step 1: Preheat & Prep Pan
First things first, get your oven preheated to 350°F (175°C). This is a pretty standard temperature for most cookies, and it ensures they bake evenly. While the oven is doing its thing, line your baking sheets with parchment paper. I cannot stress enough how much I love using parchment paper. It prevents sticking, makes cleanup a breeze, and helps the Cookies Bake up beautifully without burning on the bottom. Make sure you have enough baking sheets ready, as you’ll likely bake in batches.
Step 2: Mix Dry Ingredients
In a medium-sized bowl, go ahead and whisk together the flour, baking soda, and salt. Give it a good whisk so everything is evenly distributed. This step might seem minor, but it’s crucial for ensuring your baking soda and salt are incorporated properly throughout the dough, leading to consistent cookie texture and rise. You don’t want a pocket of salt in one cookie and no lift in another!
Step 3: Mix Wet Ingredients
In a larger bowl, cream together the softened butter and granulated sugar until the mixture is light and fluffy. This usually takes a few minutes with an electric mixer, or a bit longer if you’re doing it by hand (which I sometimes do when I’m feeling energetic!). Then, beat in the eggs one at a time, making sure each egg is fully incorporated before adding the next. Finally, stir in the vanilla extract. You want this mixture to be smooth and well-combined – it’s the base for our delicious cookies.
Step 4: Combine
Now, it’s time to bring the wet and dry ingredients together. Gradually add the dry ingredients to the wet ingredients, mixing on low speed (or stirring gently with a spatula) until just combined. The key here is NOT to overmix! Overmixing can develop the gluten in the flour too much, resulting in tough cookies. Stop mixing as soon as you no longer see streaks of dry flour. The dough will be soft and a little sticky, and that’s exactly what we want for chewy cookies.
Step 5: Prepare Filling
While the dough chills for a bit (which is optional but recommended for easier handling), prepare your Nutella filling. If it’s very stiff, you can gently warm it as I mentioned earlier. Just make sure it’s spreadable but not runny. If you’re adding powdered sugar or extra Nutella to the glaze, have those ready too!
Step 6: Layer & Swirl
Take about 2 tablespoons of Cookie Dough and roll it into a ball. Place it on the prepared baking sheet, leaving about 2 inches between cookies because they will spread. Using the bottom of a glass or your palm, gently flatten the dough ball slightly. Then, dollop about 1 to 2 teaspoons of Nutella onto half of the flattened cookie dough circles. Place another flattened cookie dough circle on top, and gently press the edges together to seal. You can also just make cookie rounds, bake them, and then spread Nutella on one and top with another. For the swirl effect, you can take spoonfuls of dough and Nutella and swirl them together before baking if you want a more marbled look inside.
Step 7: Bake
Bake for 9-12 minutes, or until the edges are lightly golden brown and the centers are still soft. They will continue to cook slightly as they cool on the baking sheet. Keep an eye on them, as oven temperatures can vary. I usually start checking around the 9-minute mark. The goal is soft, chewy cookies, not hard, crispy ones. Trust your instincts here!
Step 8: Cool & Glaze
Let the cookies cool on the baking sheet for about 5 minutes before carefully transferring them to a wire rack to cool completely. This is crucial! If you try to move them too soon, they might fall apart. Once they are completely cool, it’s time for the optional glaze. Whisk together the powdered sugar, milk, and vanilla extract until smooth. If it’s too thick, add a tiny bit more milk; if it’s too thin, add a bit more powdered sugar. Drizzle or spread the glaze over the cookie sandwiches. Let the glaze set for about 15-20 minutes before serving.
“I don’t know if I’ve ever eaten a better Easy Nutella Cookie Sandwiches Delight. The rub alone is wonderful, but the sauce??? Over the top!”
Step 9: Slice & Serve
If you made them as sandwich cookies, they’re ready to go! If you baked them as individual cookies and are assembling them now, this is the time to spread that glorious Nutella. For the Best Flavor and texture, I like to serve these slightly warm or at room temperature. They’re incredibly decadent as is, but you can also serve them with a cold glass of milk or a hot cup of coffee for the ultimate treat. Enjoy!
What to Serve It With
These Nutella cookie sandwiches are so versatile, they fit into almost any occasion! For a lazy weekend morning, I love serving them with a steaming mug of coffee. The rich, chocolatey notes of the cookie complement a dark roast perfectly. They make a quick, satisfying breakfast if you’re in a rush – just grab one (or two!) on your way out the door. For a more elegant brunch spread, I’ll arrange them on a pretty tiered stand alongside fresh fruit and maybe some mini quiches. They add a touch of sweetness and decadence that brunch guests always appreciate. A chilled glass of sparkling cider or a light mimosa pairs wonderfully. As a dessert, well, they’re just divine! They’re perfect for an after-dinner treat, especially when paired with a scoop of vanilla bean Ice Cream or a glass of dessert wine. For cozy evenings in, there’s nothing better than curling up on the couch with one of these and a warm cup of hot chocolate. My family also loves them for movie nights – they’re easy to hold and share (or not share!). Honestly, they’re a hit no matter how you serve them.
Top Tips for Perfecting Your Nutella Cookie Sandwiches
I’ve made these Nutella cookie sandwiches so many times, and through trial and error, I’ve picked up a few tricks that really help make them spectacular. First off, when it comes to the dough, don’t overmix it! Seriously, this is the most common mistake. Once you combine the wet and dry ingredients, stop as soon as you don’t see any more dry flour. Overmixing develops the gluten, and instead of a tender cookie, you’ll end up with something a bit tough. I learned this the hard way years ago! For that perfectly chewy texture, make sure your baking soda is fresh. If it’s old, your cookies might not spread or rise properly. For the Nutella filling, consistency is key. If it’s too stiff, it’s hard to spread; too runny, and it oozes out everywhere. A quick 15-20 second zap in the microwave usually does the trick, but watch it closely! If you’re going for the swirl effect in the dough, don’t over-swirl. You want distinct ribbons of Nutella, not a uniform brown color. For baking, I always recommend using an oven thermometer if you have one. Ovens can be notoriously inaccurate, and getting the temperature just right is crucial for perfect cookies. Bake until the edges are golden but the center still looks a tiny bit soft – they’ll firm up as they cool. This is the secret to that irresistible chewy texture! If you want to experiment with ingredient swaps, I’ve tried using a mix of all-purpose flour and Almond Flour for a nuttier base, and it works beautifully, though you might need a touch more liquid. And for the glaze, a little trick I learned is to make it a bit thicker than you think you need, then thin it out with milk drop by drop until it reaches your desired drizzling consistency. This prevents it from getting too runny.
Storing and Reheating Tips
Let’s talk about keeping these delicious treats fresh. If you’ve managed to have any leftovers (which is rare in my house!), they’re best stored at room temperature in an airtight container. They’ll stay wonderfully soft and chewy for about 3-4 days. Make sure they’re completely cool before sealing them up, otherwise, you’ll end up with condensation and soggy cookies. If it’s particularly warm or humid where you are, or if you want them to last a bit longer, you can store them in the refrigerator. They’ll last up to a week this way, though they might become a little firmer. To bring them back to their soft glory, just let them sit at room temperature for about 30 minutes before enjoying, or give them a very short zap in the microwave (about 5-10 seconds) – just enough to take the chill off. Freezing these is also a great option if you want to make a big batch. Wrap each cookie sandwich tightly in plastic wrap, then place them in a freezer-safe bag or container. They can be frozen for up to 3 months. To thaw, just unwrap them and let them come to room temperature. If you’ve glazed them, the glaze might get a little sticky upon thawing, but they’ll still be delicious! For the Best Flavor, I usually add the glaze just before serving after they’ve thawed or are brought to room temp, rather than freezing them with the glaze already on.
Frequently Asked Questions
Final Thoughts
So there you have it – my absolute favorite Nutella cookie sandwiches! I really hope you give these a try. They’re more than just a sweet treat; they’re a little bit of comfort, a burst of happiness, and a reminder that sometimes, the simplest things can be the most magical. The combination of that tender, chewy cookie and the rich, creamy Nutella filling is just unbeatable, and I guarantee they’ll become a go-to in your recipe repertoire too, just like they have in mine. If you love this recipe, you might also enjoy my classic Chocolate Chip Cookies or my decadent brownies. They both share that same homemade goodness that just makes you feel good. I can’t wait to hear what you think! Please leave a comment below and let me know how your Nutella cookie sandwiches turned out, or share any fun variations you tried. Happy baking, everyone!
Nutella cookie sandwiches
Ingredients
For the Chocolate Chip Cookies
- 2.25 cups all-purpose flour
- 0.5 teaspoon baking soda
- 1 cup unsalted butter 2 sticks, softened
- 0.5 cup granulated sugar
- 1 cup packed light brown sugar
- 1 teaspoon salt
- 2 teaspoons pure vanilla extract
- 2 large eggs
- 12 ounces semisweet chocolate chips 1 bag
For the Nutella Cream Cheese Filling
- 8 ounces cream cheese 1 package, softened
- 1 cup powdered sugar
- 0.5 cup white chocolate chips melted
- 0.5 cup Nutella
Instructions
Prepare the Cookies
- Preheat your oven to 350°F (175°C). Line three baking sheets with parchment paper and set aside.
- In a small bowl, sift together the all-purpose flour and baking soda. Set this dry mixture aside.
- In a large mixing bowl, combine the softened butter, granulated sugar, and packed light brown sugar. Beat on medium speed with an electric mixer until the mixture is light and fluffy.
- Add the salt, pure vanilla extract, and large eggs to the butter mixture. Continue to beat on low speed until all ingredients are thoroughly combined.
- Gradually add the sifted flour mixture to the wet ingredients, mixing until just combined. Be careful not to overmix.
- Fold in the semisweet chocolate chips until evenly distributed throughout the dough.
- Drop rounded tablespoons of cookie dough onto the prepared baking sheets, ensuring they are spaced about 2 inches apart.
- Bake for 8 to 10 minutes, or until the edges of the cookies are golden brown. The centers may still appear slightly soft.
- Remove the baking sheets from the oven and let the cookies cool on the sheets for 2 minutes before transferring them to a wire rack to cool completely. Ensure cookies are fully cooled before filling.
Make the Nutella Cream Cheese Filling
- While the cookies are cooling, prepare the Nutella Cream Cheese Filling.
- In a medium-sized mixing bowl, combine the softened cream cheese and powdered sugar. Beat with an electric mixer on medium speed until the mixture is smooth and creamy.
- Add the melted white chocolate chips and Nutella to the cream cheese mixture. Continue to mix until all ingredients are thoroughly combined and the filling is uniform.
- For best results, let the filling sit in the refrigerator for 10 minutes to allow it to firm up slightly before assembling the sandwiches.
Assemble the Cookie Sandwiches
- Once the cookies are completely cool, spread a generous amount of the Nutella Cream Cheese Filling onto the flat side of half of the cookies.
- Gently place the remaining cookies on top of the filled halves, pressing down slightly to create a sandwich. Repeat with all cookies.
- Refrigerate the assembled cookie sandwiches for at least 20 minutes to allow the filling to stiffen slightly, which makes them easier to handle and eat.
- Serve the Nutella cookie sandwiches at room temperature for the best texture and flavor. Store any leftovers in an airtight container in the refrigerator.


