There are some recipes that just feel like a warm hug, aren’t there? The ones you pull out when you need a guaranteed win, or when you just want to make someone’s day a little bit brighter. For me, that’s always been jalapeno poppers. I can still remember the first time I tried to make them myself. I was maybe ten, and convinced I was a culinary genius. Let’s just say the first batch was… interesting. But over the years, through trial and error (and a whole lot of taste-testing!), I’ve landed on this version, and it’s become an absolute staple in my kitchen. It’s the kind of appetizer that disappears faster than you can say “spicy and cheesy,” and honestly, it’s my secret weapon for game nights and holiday gatherings. Forget those sad, soggy versions you sometimes find; these jalapeno poppers are crispy, creamy, perfectly spiced, and ridiculously addictive. They’re everything you want in a bite-sized flavor explosion, and way easier to make than you might think!
Thank you for reading this post, don't forget to subscribe!What are jalapeno poppers?
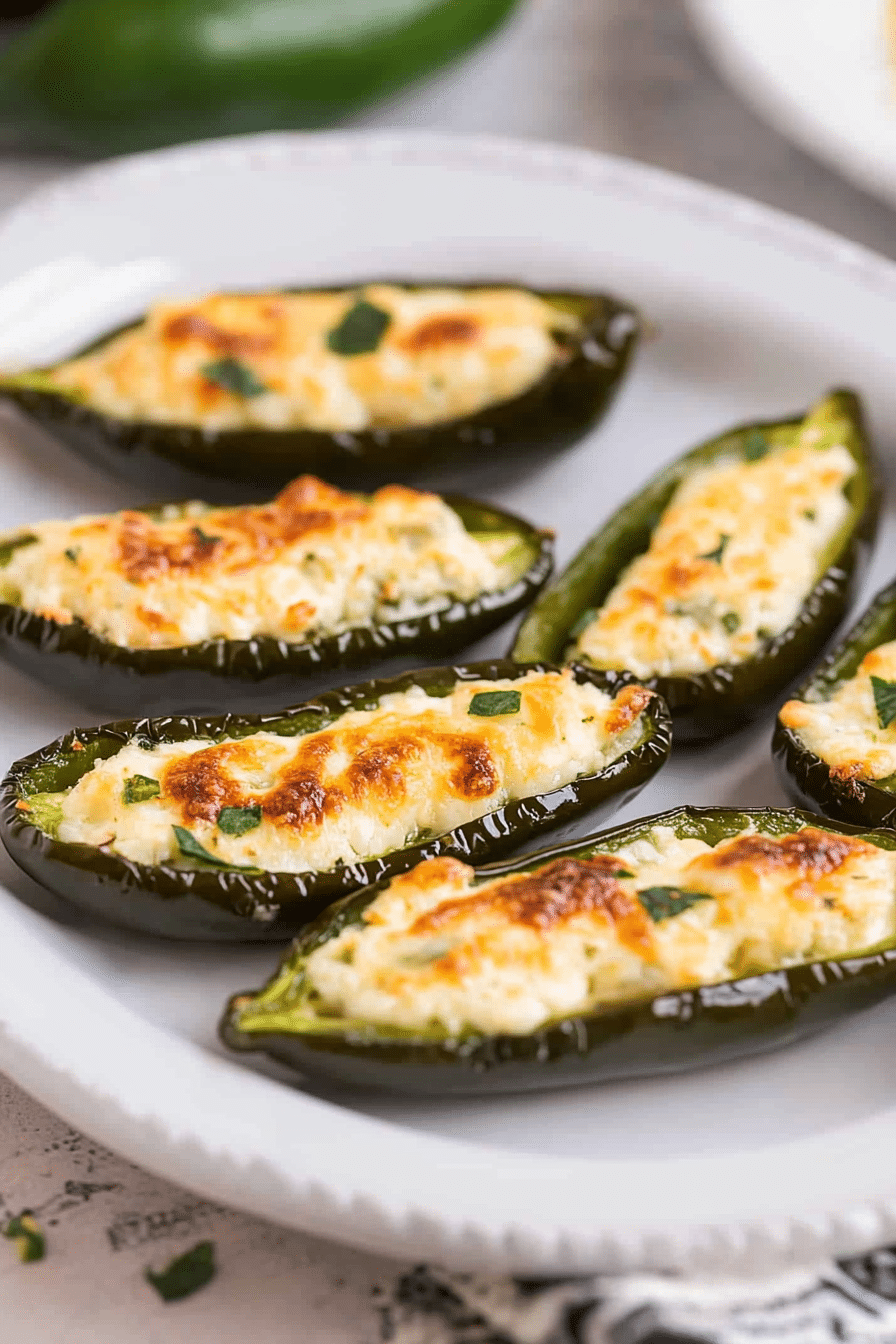
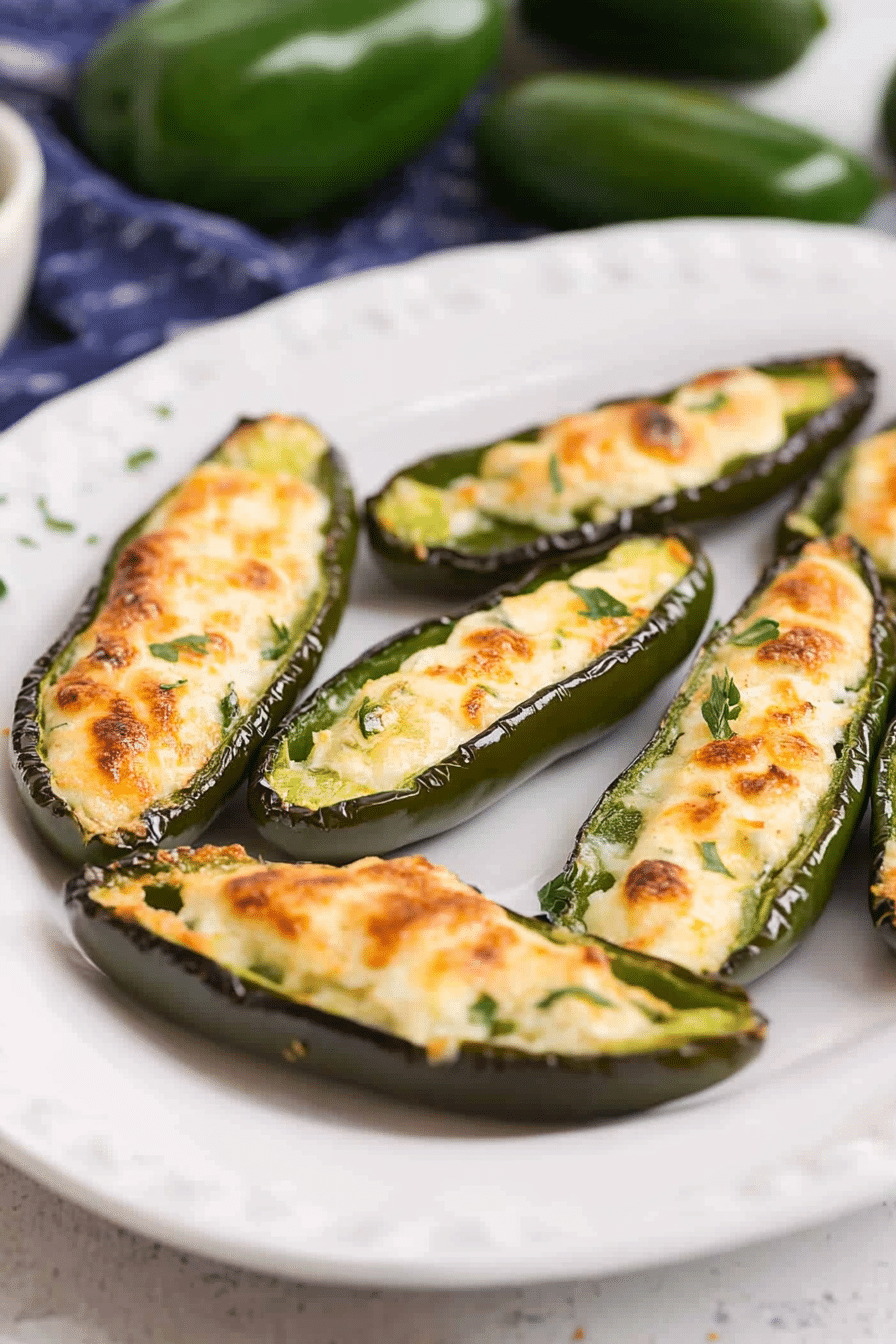
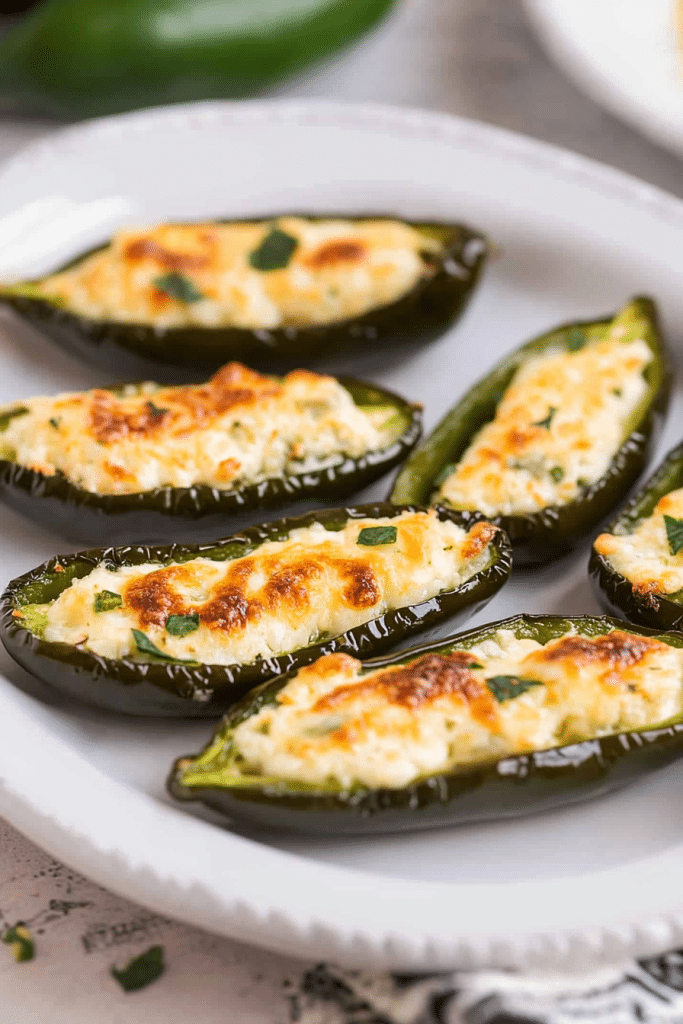
So, what exactly are we talking about when I say jalapeno poppers? At its heart, it’s a glorious combination of a fresh jalapeno pepper, usually halved and seeded, stuffed with a creamy, cheesy filling, and then breaded and fried (or baked for a slightly lighter take). Think of them as little flavor bombs, a perfect balance of spicy heat from the pepper, rich creaminess from the cheese, and a satisfying crunch from the coating. The name itself is pretty straightforward, right? They’re literally poppers made with jalapenos! But the magic lies in the details – the type of cheese you use, how you prepare the pepper, and that all-important crispy coating. They’ve become a pub and appetizer classic for a reason; they hit all the right notes: savory, spicy, creamy, and crunchy. They’re the kind of food that makes you close your eyes in pure bliss after the first bite. It’s not just food; it’s an experience!
Why you’ll love this recipe?
Okay, let me tell you why this particular recipe for jalapeno poppers is the one you’ll keep coming back to. First off, the flavor is just out of this world. You get that initial kick from the jalapeno, but it’s perfectly tempered by the rich, creamy cheese filling. It’s not so spicy that it overwhelms everything else; it’s a delightful warmth that tingles your taste buds. Then there’s the texture. We’re talking about a super crispy, golden-brown exterior that gives way to that soft, cheesy center. It’s pure comfort food in every single bite. And the best part? It’s surprisingly simple to make! I know sometimes appetizers can feel like a lot of fuss, but I’ve streamlined this process so you can whip up a batch without breaking a sweat. Even if you’re not a seasoned baker, you can totally nail this. Plus, it’s incredibly budget-friendly. Jalapenos and cream cheese are usually pretty inexpensive, making this a fantastic option when you’re hosting a crowd without wanting to spend a fortune. What I love most about these jalapeno poppers, though, is their sheer versatility. They’re perfect for game day, but they also dress up a holiday spread beautifully. They’re a fantastic alternative to more complex appetizers when you’re short on time but still want to impress. Honestly, they’re just a joy to make and even more of a joy to eat. My family devours them every time!
How do you make jalapeno poppers?
Quick Overview
The process for these jalapeno poppers is pretty straightforward and totally manageable, even on a weeknight. We’ll start by prepping the jalapenos, then whip up a simple but incredibly flavorful cheese filling. Next, we’ll bread them to get that amazing crunch, and finally, bake them until they’re golden and bubbly. It’s a foolproof method that guarantees delicious results every time. The key is in the simple steps, and before you know it, you’ll have a platter of these irresistible bites ready to go. Trust me, the payoff is so worth it!
Ingredients
What are the Jalapenos?
12-15 medium fresh jalapeno peppers: Look for peppers that are firm and bright green. You want ones that feel heavy for their size, which usually means they’re nice and plump. Avoid any that look shriveled or have soft spots. If you’re sensitive to heat, you can remove more of the seeds and membranes, but I like to leave a little bit in for that signature jalapeno kick.
For the Creamy Cheese Filling:
8 ounces cream cheese, softened: This is the backbone of our creamy filling. Make sure it’s fully softened to room temperature so it mixes smoothly without any lumps. I always leave mine out on the counter for at least an hour before I start. You can also use a stand mixer or hand mixer to speed this up if you forget!
4 ounces sharp cheddar cheese, shredded: I love sharp cheddar for its bold flavor, but feel free to experiment with Monterey Jack, Pepper Jack for extra heat, or even a bit of Gruyere for a nutty depth. Shredding your own cheese from a block is always best, as pre-shredded cheese can sometimes have anti-caking agents that affect the texture.
2 ounces Parmesan cheese, grated: This adds a salty, umami punch that really elevates the filling. Freshly grated is always preferred here for the best flavor.
1 clove garlic, minced: A little bit of fresh garlic goes a long way in adding aroma and flavor. Make sure it’s finely minced so you don’t get big chunks.
1/4 teaspoon smoked paprika: This gives a subtle smoky depth that complements the cheese and jalapeno perfectly. It’s a secret weapon in this recipe!
Salt and freshly ground black pepper, to taste: Seasoning is key! Taste your filling before stuffing the peppers and adjust as needed. Remember that cheese can be salty, so start with a little and add more if necessary.
“Packed with flavor and so simple. Exactly what I wanted from this Easy Jalapeno Poppers holiday starters!”
For the Crispy Coating:
1/2 cup all-purpose flour: This helps the egg wash adhere to the poppers.
2 large eggs, beaten: These are our binder. Make sure they’re fully beaten until the yolk and white are well combined.
1 cup panko breadcrumbs: Panko breadcrumbs give you that extra-crispy texture that regular breadcrumbs just can’t match. I find them to be a total game-changer for anything you want to get nice and crunchy.
1/4 cup grated Parmesan cheese: Mixing some Parmesan into the breadcrumbs adds another layer of savory flavor and helps them get beautifully golden.
Step-by-Step Instructions
Step 1: Preheat & Prep Pan
First things first, let’s get our oven ready and our baking sheet prepped. Preheat your oven to 400°F (200°C). While it’s heating up, line a large baking sheet with parchment paper. This is a lifesaver for cleanup, and it ensures your jalapeno poppers don’t stick. If you don’t have parchment paper, you can lightly grease the baking sheet, but parchment is definitely my preferred method for a no-fuss experience.
Step 2: Mix Dry Ingredients
In a shallow dish or bowl, combine the panko breadcrumbs and the additional 1/4 cup of grated Parmesan cheese. Stir them together well. This is where all that delicious crunch comes from. Make sure the Parmesan is evenly distributed throughout the breadcrumbs for consistent flavor and crispiness.
Step 3: Mix Wet Ingredients
In a separate shallow dish, whisk together the 2 large eggs until they’re well combined and slightly frothy. You want the yolks and whites fully incorporated so they can act as a proper binder for the breadcrumbs. I usually just use a fork for this; it’s simple and effective.
Step 4: Combine
In a medium bowl, combine the softened cream cheese, shredded cheddar cheese, 2 ounces of grated Parmesan cheese, minced garlic, smoked paprika, salt, and pepper. Use a spatula or a spoon to mix everything together until it’s well combined and smooth. It might look a little shaggy at first, but keep mixing until you have a creamy, cohesive mixture. I always taste a little bit at this stage to check the seasoning. Remember, the jalapenos will add their own flavor, but you want that cheese filling to be perfectly seasoned on its own.
Step 5: Prepare Filling
Now it’s time to get those jalapenos ready for their cheesy destiny! Carefully slice each jalapeno pepper in half lengthwise. Use a small spoon to gently scrape out the seeds and membranes. This is where most of the heat comes from, so if you prefer milder poppers, be sure to scrape thoroughly. If you like it spicier, leave some of the white membrane intact. Be careful not to puncture the sides of the pepper. Once they’re seeded, you can rinse them briefly under cold water and pat them dry with a paper towel.
Step 6: Layer & Swirl
Spoon the cheese mixture evenly into each jalapeno half. Don’t be shy with the filling! You want a generous amount to balance out the heat of the pepper. Once you’ve filled all the halves, it’s time for the fun part: breading! Take each filled jalapeno half and dredge it lightly in the all-purpose flour, shaking off any excess. Then, dip it into the beaten eggs, letting any excess drip off. Finally, press the egg-coated jalapeno into the panko and Parmesan mixture, ensuring it’s well coated on all sides. Make sure that filling stays put!
Step 7: Bake
Arrange the breaded jalapeno poppers, filling-side up, on the prepared baking sheet. Make sure they aren’t touching each other too much, as this helps them get crispier all around. Bake in the preheated oven for 18-22 minutes, or until the jalapenos are tender and the coating is golden brown and crispy. Keep an eye on them during the last few minutes, as ovens can vary, and you don’t want them to burn.
Step 8: Cool & Glaze
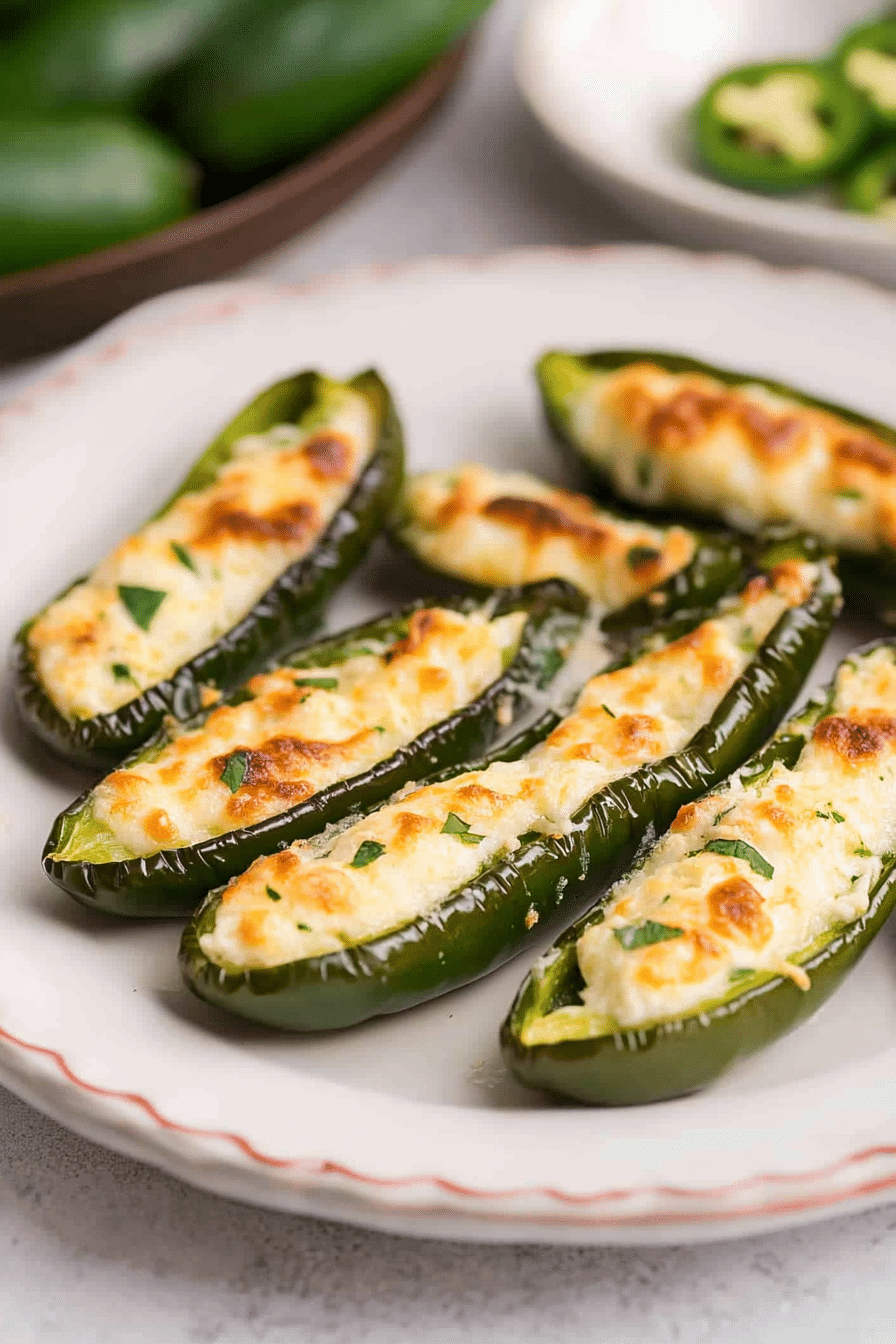
Once they’re perfectly golden and bubbly, carefully remove the baking sheet from the oven. Let the jalapeno poppers cool on the baking sheet for about 5-10 minutes. This is important! They are molten hot right out of the oven, and letting them cool slightly makes them much easier (and safer!) to handle. If you’re adding any kind of glaze or sauce, this is the time. Some people like a drizzle of honey or a spicy sriracha mayo. I often just serve them as is, because they’re so flavorful!
Step 9: Slice & Serve
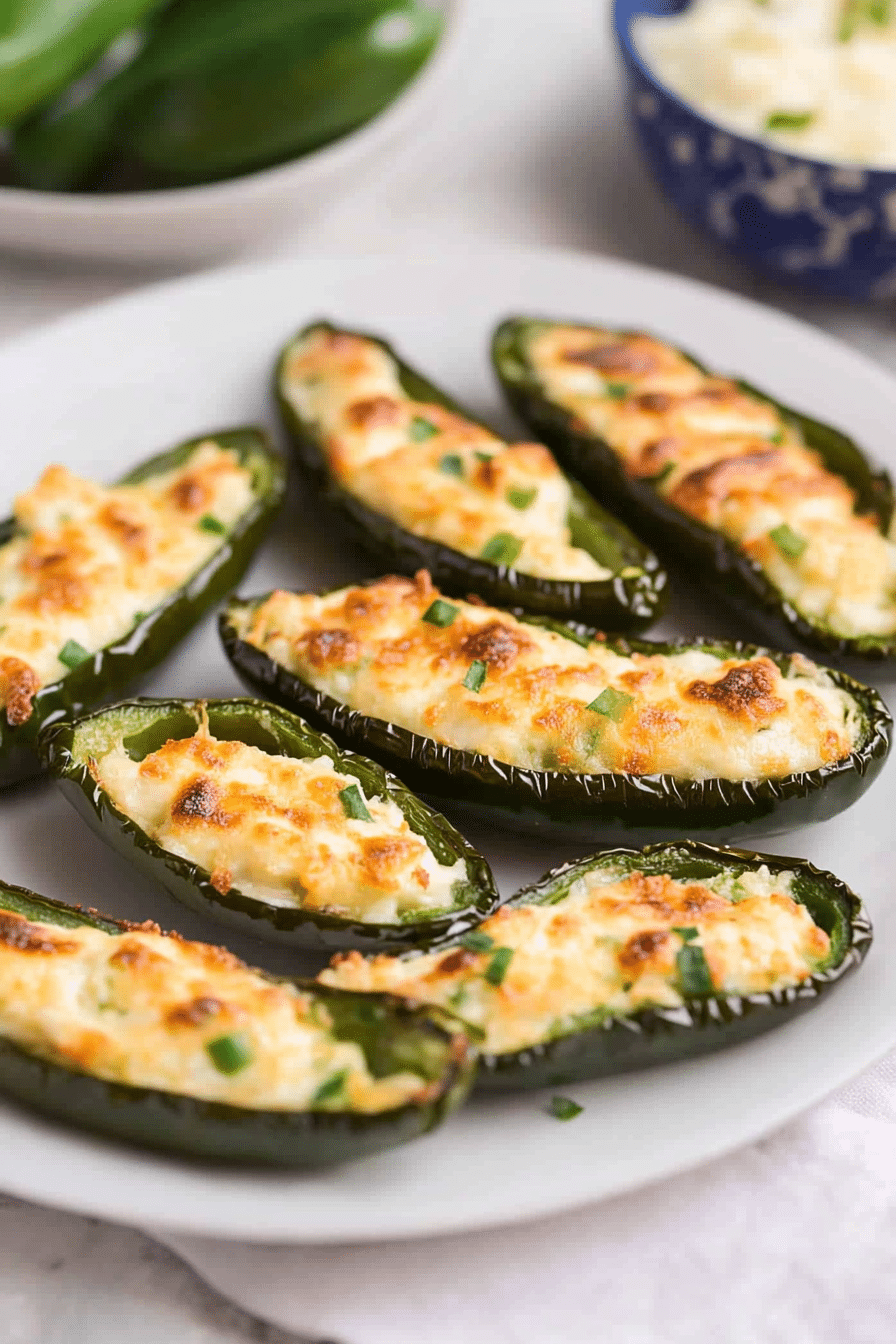
Serve your delicious jalapeno poppers warm. They are truly at their best when they’re fresh out of the oven and still warm, but they’re still pretty darn good at room temperature if you have any leftovers (which is rare in my house!). Arrange them on a platter and watch them disappear. They’re the perfect appetizer for any occasion, and I can guarantee they’ll be a hit!
What to Serve It With
These jalapeno poppers are fantastic on their own, but they also play really well with a variety of other dishes, depending on the occasion. For a casual breakfast or brunch, I love serving them alongside some fluffy scrambled eggs and crispy bacon. They add a little spicy kick to the morning that’s surprisingly delightful. For a more elaborate brunch spread, they’re a great addition to a charcuterie board or a buffet alongside mini quiches and fruit salad. When we’re having a barbecue or a cookout, these are always a must-have. They pair perfectly with burgers, ribs, or pulled pork sandwiches. The cool, creamy texture of a dollop of sour cream or a side of ranch dip is also a fantastic contrast to the heat of the poppers. For a festive gathering, I often serve them as part of a larger appetizer spread, alongside some chicken wings, mini meatballs, and a fresh salsa. They add that touch of something special without being overly complicated. Honestly, they’re just so versatile, and they always seem to disappear first!
“The Easy Jalapeno Poppers holiday starters turned out amazing. My kids asked for seconds. Saving this one!”
Top Tips for Perfecting Your Jalapeno Poppers
I’ve made these jalapeno poppers more times than I can count, and I’ve picked up a few tricks along the way that really make a difference. For the jalapenos themselves, I always make sure to really get in there and scrape out those seeds and membranes thoroughly if I want a milder flavor. It’s all about control! If you’re sensitive to spice, don’t be shy about removing them. On the flip side, if you *love* the heat, leave a little bit of that white pith in there – that’s where the real fire lives!
When it comes to the cheese filling, don’t rush the softening of the cream cheese. Lumpy cream cheese is the enemy of a smooth, dippable filling. I learned this the hard way early on! Also, don’t be afraid to season generously. The cheese mixture needs to stand up to the spicy pepper and the crispy coating. Tasting and adjusting is key. My kids actually love helping with this part, carefully spooning the filling into the jalapeno halves. It’s a fun way to get them involved in the kitchen.
For the coating, using panko breadcrumbs is non-negotiable for me. They just give you that superior crunch that you can’t get with regular breadcrumbs. And mixing that extra Parmesan into the panko? That’s a flavor booster that’s totally worth it. Make sure you get a good, even coating of the flour, egg, and breadcrumbs on each popper. This is what prevents the filling from oozing out and gives you that beautiful golden crust.
If you’re baking these, as I usually do to keep things a bit lighter, make sure your oven is properly preheated. A hot oven is crucial for getting that coating crispy rather than soggy. I also find rotating the baking sheet halfway through helps ensure even browning. And for those of you who are adventurous, try adding a pinch of cayenne pepper to the cheese filling for an extra layer of heat, or maybe some finely chopped cooked bacon for a smoky, savory twist. I once tried adding a little bit of finely diced red bell pepper to the filling, and it added a nice sweetness and color. Don’t be afraid to experiment! The key is to have fun and make it your own.
Finally, a word on baking time. Ovens can be so different! I always look for that gorgeous golden-brown color and a slight tenderness in the jalapeno itself. You don’t want them to be mushy, but you also don’t want them to be hard. A toothpick inserted into the jalapeno flesh should go in with just a little resistance. Trust your eyes and your senses!
Storing and Reheating Tips
One of the best things about these jalapeno poppers is how well they store, though honestly, they rarely last long enough to need storing in my house! If you do happen to have any leftovers, you can keep them at room temperature for about 2 hours, but after that, they really should be refrigerated to maintain freshness and safety. For refrigeration, the best way is to let them cool completely first, then store them in an airtight container or a zip-top bag. They’ll stay delicious in the fridge for up to 3 days. I’ve found that they retain their crispiness pretty well if stored correctly. Just make sure to seal the container tightly to prevent them from drying out or absorbing other odors from the fridge.
When it comes to reheating, there are a couple of ways to go. My preferred method is to reheat them in the oven. Place them on a baking sheet in a single layer and bake at around 350°F (175°C) for about 5-10 minutes, or until they’re heated through and the coating is crispy again. This really brings back that fresh-from-the-oven texture. If you’re in a real pinch and just need them warmed up quickly, you can try the microwave, but be warned, they won’t be as crispy – they’ll be softer. Air frying also works wonders if you have one! Just pop them in the air fryer basket at about 375°F (190°C) for 3-5 minutes, keeping an eye on them. For freezer instructions, it’s best to freeze them *before* baking. You can place them on a baking sheet in a single layer until frozen, then transfer them to a freezer-safe bag. Bake them directly from frozen, adding a few extra minutes to the baking time. If you are freezing already baked poppers, they will be softer upon reheating, but still tasty!
Frequently Asked Questions
Final Thoughts
So there you have it – my go-to recipe for the most amazing jalapeno poppers! I truly believe this recipe strikes the perfect balance between spicy, cheesy, and crispy, and it’s become such a cherished part of our family’s snacking repertoire. It’s the kind of dish that brings people together, sparking conversations and creating happy memories around the appetizer table. Whether you’re hosting a big game day party, a holiday get-together, or just craving a delicious homemade snack, these jalapeno poppers are sure to be a hit. They’re proof that sometimes, the simplest ingredients and a little bit of care can result in something truly spectacular. If you give this recipe a try, I would absolutely love to hear about it! Let me know in the comments how yours turned out, or if you discovered any fun variations. Happy baking, and happy snacking!