
You know those nights? The ones where the clock is ticking, the kids are practically vibrating with hunger, and the thought of a complicated meal makes you want to just order pizza? Yeah, I’ve been there. A LOT. And that’s precisely why this easy focaccia Bread Recipe became my absolute go-to. It’s not just bread; it’s a little slice of heaven that’s shockingly simple to whip up. I remember the first time I tried making focaccia, expecting it to be this elaborate, time-consuming ordeal. Turns out, it’s way more forgiving than I ever imagined. In fact, this version is so fuss-free, it makes my grandmother’s classic challah feel like a culinary Everest. If you’ve ever been intimidated by baking bread, or just need a reliable, crowd-pleasing recipe that tastes like you slaved over it for hours, you’ve found your match. This easy focaccia bread recipe is my secret weapon, and I’m so excited to share it with you!
Thank you for reading this post, don't forget to subscribe!What is Focaccia bread?
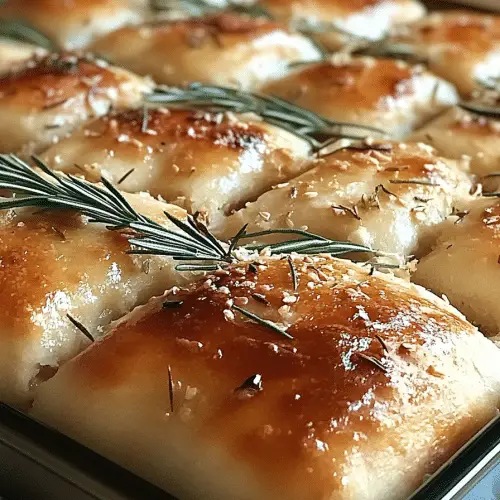
So, what exactly is this magical bread we’re talking about? At its heart, focaccia is an Italian flatbread, kind of like a rustic, delicious cousin to Pizza Dough. Think of it as a wonderfully chewy, slightly crisp bread that’s been drizzled generously with olive oil and dimpled all over. The dimples are key – they’re like little wells that catch all that gorgeous olive oil, making every bite incredibly flavorful. It’s traditionally baked in a rectangular or oval shape. The name itself, “focaccia,” comes from the Latin word “focus,” meaning hearth, which hints at its ancient origins of being baked on a hearth. It’s simple, it’s humble, but oh boy, is it delicious. It’s the kind of bread that doesn’t need much to shine – a bit of olive oil, maybe some herbs, and that’s it. It’s got this wonderful airy crumb inside with a satisfyingly crisp crust, especially around the edges. It’s essentially the perfect canvas for all sorts of delicious toppings, or just fantastic on its own.
Why you’ll love this recipe?
Let me tell you, there are a million reasons why this easy focaccia Bread Recipe has earned a permanent spot in my recipe binder. First off, the flavor is just out of this world. The crust gets this beautiful golden-brown color and a satisfying crunch, while the inside stays wonderfully soft and airy, thanks to the magic of olive oil and a good rise. The aroma that fills your kitchen while it’s baking? Pure bliss. It’s like a warm hug. Then there’s the simplicity. Seriously, if you can stir ingredients together, you can make this bread. There’s no fancy kneading techniques required, no proofing for hours in a warm spot (though it does benefit from a good rest). It’s incredibly forgiving, which, if you’re a new baker, is a lifesaver. And let’s talk about cost-efficiency. Flour, yeast, water, olive oil – these are all pantry staples that don’t break the bank. Compared to the price of good quality artisanal bread at the bakery, this is a steal. What I love most, though, is its sheer versatility. This isn’t a one-trick pony. You can serve it as a side to practically any meal, use it for epic sandwiches, dip it in soup, or even enjoy it as a base for quick pizzas. It’s the ultimate blank canvas for your culinary creativity. It’s truly a recipe that keeps on giving, and the minimal effort involved for such a spectacular result is honestly a marvel.
How do you make Focaccia bread?
Quick Overview
This is the kind of recipe that makes you feel like a baking wizard without any of the actual hard work. You’ll basically mix up a simple dough, let it rest and get beautifully bubbly, stretch it into a pan, top it with glorious Olive oil and some optional goodies, and then bake it until golden. That’s it! The magic happens with minimal intervention, relying on good ingredients and a little bit of patience for the dough to do its thing. It’s surprisingly hands-off, which is exactly what I need on a busy weeknight. The result is a loaf of focaccia that’s tender on the inside, crispy on the outside, and absolutely bursting with flavor.
Ingredients
For the Main Batter:
1 ½ cups warm water (around 105-115°F – think comfortably warm bath water, not hot!)
2 ¼ teaspoons active dry yeast (that’s one standard packet)
1 teaspoon granulated sugar (this helps wake up the yeast)
3 ¾ cups all-purpose flour, plus more for dusting (I like King Arthur or Bob’s Red Mill, they tend to be reliable)
1 ½ teaspoons fine Sea Salt (don’t skimp on the salt, it’s crucial for flavor!)
For the Olive Oil Bath & Toppings:
⅓ cup good quality extra virgin olive oil, plus more for greasing the pan and drizzling (use your favorite – the flavor really comes through!)
Flaky Sea Salt, for sprinkling (Maldon is divine if you can find it, but any flaky salt will do)
Optional Toppings: Fresh rosemary sprigs, thinly sliced garlic cloves, cherry tomatoes (halved), olives (pitted and halved), a sprinkle of red pepper flakes, or even a dusting of grated Parmesan cheese. Get creative!
Step-by-Step Instructions
Step 1: Preheat & Prep Pan
First things first, grab a 9×13 inch baking pan. You can use a metal, glass, or ceramic one – they all work. Generously grease the bottom and sides of your pan with about 2 tablespoons of Olive oil. You want it nice and slick so the focaccia doesn’t stick and can get that lovely crispy bottom. Set this aside for now.
“The easy focaccia bread recipe turned out amazing. My kids asked for seconds. Saving this one!”
Step 2: Mix Dry Ingredients
In a large bowl, whisk together the flour and fine sea salt. Make sure they are well combined. This ensures the salt is evenly distributed throughout the dough, which is super important for flavor. You don’t want a bite that’s bland and another that’s overly salty, right?
Step 3: Mix Wet Ingredients
In a separate medium bowl or a large liquid measuring cup, combine the warm water, active dry yeast, and sugar. Give it a gentle stir and let it sit for about 5-10 minutes. You should see it get foamy and bubbly on top. This tells you your yeast is alive and kicking! If it doesn’t get foamy, your yeast might be old, or the water was too hot or too cold, and you’ll need to start over with fresh yeast and properly warmed water.
Step 4: Combine
Now, pour the foamy yeast mixture into the bowl with the flour and salt. Using a sturdy spoon or a rubber spatula, mix everything together until just combined. The dough will be very sticky and shaggy – it’s more like a thick batter than a traditional bread dough. Don’t be tempted to add more flour to make it less sticky at this stage; that’s part of what makes focaccia so wonderfully tender! Just scrape down the sides of the bowl and stir until there are no dry pockets of flour left. That’s it. No kneading required!
Step 5: Prepare Filling
This is where you can really have some fun and make it your own! If you’re using fresh rosemary, gently strip the leaves from the woody stems. If you’re using cherry tomatoes or olives, halve them. If you’re using garlic, slice it thinly. Having everything prepped and ready to go before the dough is ready to be dimpled makes the whole process smooth and enjoyable.
Step 6: Layer & Swirl
Scrape the very sticky dough into your prepared, oiled baking pan. It will likely spread out a bit on its own. Use your oiled fingertips to gently coax the dough towards the edges of the pan, but don’t worry if it doesn’t reach all the way. Cover the pan loosely with plastic wrap or a clean kitchen towel and let it rest in a warm place for at least 30 minutes, or up to an hour. During this time, the dough will puff up and get nice and airy. Once it’s risen, uncover it and drizzle another 2 tablespoons of olive oil over the top. Now comes the fun part: use your oiled fingertips to gently press down into the dough, creating those signature dimples all over the surface. Don’t be shy! Then, artfully arrange your chosen toppings over the dough. Drizzle another tablespoon or two of olive oil over everything, and finish with a generous sprinkle of flaky sea salt.
Step 7: Bake
Preheat your oven to 425°F (220°C). Place the pan in the preheated oven and bake for 20-25 minutes, or until the focaccia is deeply golden brown and has a lovely, crisp crust. The exact time can vary depending on your oven, so keep an eye on it. You’re looking for that beautiful, rich color and a firm, springy texture when you gently poke the center.
Step 8: Cool & Glaze
Once baked, carefully remove the focaccia from the oven. While it’s still warm, you can optionally brush a little extra olive oil over the top for an even glossier finish and to enhance that lovely olive oil flavor. Let the focaccia cool in the pan for at least 10-15 minutes before attempting to remove it. This allows it to set up properly. If you want to remove it from the pan to cool on a wire rack completely, you can, but I often just slice it right from the pan. The residual heat will help it finish cooking through and achieve that perfect texture. For this particular recipe, there isn’t a separate glaze in the traditional sense; the olive oil bath and the final drizzle of olive oil *are* the glaze, giving it that signature sheen and flavor.
Step 9: Slice & Serve
Once it’s cooled enough to handle (but still warm is best!), use a sharp knife or a pizza cutter to slice your beautiful focaccia into squares or rectangles. Serve it warm for the Absolute Best experience. The aroma and texture are unparalleled when it’s fresh out of the oven and still a little warm.
“New family favorite! This easy focaccia bread recipe was so flavorful and ridiculously easy. Crowd-pleaser for sure.”
What to Serve It With
This easy focaccia Bread Recipe is so versatile, it practically begs to be paired with something delicious. For breakfast, I love cutting a piece and toasting it lightly, then topping it with a poached egg and a sprinkle of chili flakes. It’s also fantastic alongside a strong cup of coffee, especially when topped with a little honey. For brunch, it’s a showstopper served warm alongside scrambled eggs, crispy bacon, and a fresh fruit salad. You can even cut it into smaller squares and serve it as an elegant accompaniment to a mimosa or bloody mary. As a dessert? Hear me out! Drizzle it with a little honey or maple syrup, maybe add some fresh berries and a dollop of mascarpone cheese. It’s surprisingly decadent and a perfect way to end a meal. And for those cozy snack times, this focaccia is pure comfort. It’s amazing dipped in a hearty tomato soup or a creamy minestrone. My family also loves it simply with some good quality butter. I’ve even made mini pizzas on top of focaccia slices for a quick weeknight dinner that everyone devours. It’s truly the best way to elevate any meal, from the simplest to the most festive.
Top Tips for Perfecting Your Focaccia Bread
Over the years, I’ve learned a few tricks that make my focaccia consistently amazing. First, when it comes to the zucchini prep (though this recipe doesn’t use zucchini, I’m applying the general principle here!), if you were to add vegetables, always blot them dry thoroughly to avoid soggy bread. For mixing, remember that sticky dough is your friend here! Resist the urge to add too much extra flour. Overmixing can develop gluten too much and make your focaccia tough, so just mix until it’s combined. The key to that beautiful, rustic look is in the dimpling. Don’t be afraid to really get in there with your oiled fingers and create those indentations. It’s not just for looks; it helps the olive oil and toppings adhere beautifully. If you’re experimenting with swirl customization for other breads, remember to keep your fillings slightly thicker than a liquid so they don’t seep out too much during baking. When it comes to ingredient swaps, if you’re out of all-purpose flour, bread flour can work, but you might get a slightly chewier result. For the olive oil, while extra virgin is ideal for flavor, a good quality olive oil or even a mild vegetable oil can be used in a pinch, though the flavor won’t be as pronounced. Baking tips are crucial! Always preheat your oven fully. If you find your focaccia is browning too quickly on top before the inside is cooked, you can loosely tent it with foil. Some ovens run hotter than others, so always do the ‘tap test’ – the bottom should sound hollow when tapped, and the top should be golden brown and springy to the touch. For glaze variations, while I don’t use a traditional glaze on this focaccia, you could experiment with brushing on a garlic-herb butter right after it comes out of the oven for an extra punch of flavor, or even a simple drizzle of balsamic glaze for a sweet and tangy finish. These little tweaks have really elevated my focaccia game, and I’m sure they’ll help yours too!
Storing and Reheating Tips
Storing this delicious focaccia is pretty straightforward, but how you do it can impact its freshness. At room temperature, it’s best enjoyed the day it’s made. If you have leftovers, you can keep it in an airtight container or wrapped tightly in plastic wrap for up to 2 days. The crust might soften a bit, but the inside will remain wonderfully soft and chewy. For refrigerator storage, place cooled focaccia in an airtight container or bag. It will last for up to 4-5 days, though the texture can become a bit firmer. To reheat, a few minutes in a toaster oven or a warm conventional oven (around 300°F or 150°C) until warmed through is perfect for reviving that lovely crisp crust. For freezer instructions, it’s best to freeze slices or smaller pieces rather than a whole loaf, as they thaw more quickly and evenly. Wrap each piece tightly in plastic wrap, then place them in a freezer-safe bag or container. It should stay good in the freezer for up to 3 months. Thaw at room temperature, or gently reheat from frozen in a toaster oven or oven. For glaze timing advice, if you plan to freeze your focaccia, it’s best to add any glazes or finishing drizzles *after* reheating. The olive oil drizzle that’s part of the baking process is fine to leave on, as it’s integrated into the bread itself.
Frequently Asked Questions
Final Thoughts
Honestly, this easy focaccia bread recipe is more than just a recipe to me; it’s a culinary comfort blanket. It’s that reliable friend you can always count on when you need something delicious and impressive with minimal fuss. The way it transforms simple pantry staples into something so incredibly satisfying is truly heartwarming. Whether you’re serving it as a humble side dish or making it the star of your next appetizer spread, it always gets rave reviews. It’s proof that you don’t need to be a professional baker to create incredible bread at home. So, if you’ve been on the fence about making your own bread, or if you’re just looking for a foolproof, delicious focaccia, please give this one a try. I promise you won’t be disappointed. It’s a recipe that truly brings people together, filling your home with the most amazing aroma and your bellies with pure joy. I can’t wait to hear how yours turns out and what delicious toppings you decide to use!
easy focaccia bread recipe
Ingredients
Main Ingredients
- 3.5 cups all-purpose flour
- 1.5 teaspoons active dry yeast
- 1.5 teaspoons sugar
- 1 teaspoons salt
- 1.25 cups warm water
- 3 tablespoons olive oil plus more for greasing
- 1 teaspoon flaky sea salt for topping
- 0.5 teaspoons rosemary dried, optional for topping
Instructions
Preparation Steps
- In a small bowl, combine warm water, sugar, and yeast. Let it sit for 5-10 minutes until foamy.
- In a large bowl, whisk together flour and salt.
- Pour the yeast mixture and 3 tablespoons of olive oil into the flour mixture. Mix until a shaggy dough forms.
- Turn the dough out onto a lightly floured surface and knead for 8-10 minutes until smooth and elastic. Alternatively, use a stand mixer with a dough hook for 5-7 minutes.
- Lightly grease a clean bowl with olive oil. Place the dough in the bowl, turning to coat. Cover with plastic wrap or a damp towel and let it rise in a warm place for 1-1.5 hours, or until doubled in size.
- Grease a 9x13 inch baking pan with olive oil. Gently punch down the dough and press it into the prepared pan, spreading it evenly to the edges.
- Cover the pan and let the dough rise for another 30-45 minutes, or until puffy.
- Preheat oven to 425°F (220°C).
- Drizzle the top of the dough with a little more olive oil. Use your fingertips to create dimples all over the surface of the dough.
- Sprinkle with flaky sea salt and dried rosemary (if using).
- Bake for 20-25 minutes, or until golden brown and the internal temperature reaches 200°F (93°C).
- Let cool in the pan for a few minutes before transferring to a wire rack to cool completely. Slice and serve.


