The scent of coffee wafting through my kitchen always takes me back to Sundays at grandma’s house, where a tray of bite-sized treats waited near the percolator. I’ll grab one with a napkin tucked into my sleeve, and before I know it I’m trading stories about school, old friends, and the week’s small triumphs. That’s the magic of easy coffee truffles: they’re sophisticated enough to feel like a little celebration, but simple enough you can pull them together in the time it takes to brew a fresh pot. I always end up sneaking one as I’m clicking off the last few tasks of the day, and somehow they disappear faster than I expect. If you’ve got a cup of coffee in hand and a friend at the table, you’ve got the perfect moment to say, “Let’s dive into something chocolatey and cozy.” This is the kind of recipe that travels well in the fridge or a lunchbox, and it’s a lifesaver on busy nights. My kids actually ask for seconds, and honestly, I’m not arguing with that kind of demand.
Thank you for reading this post, don't forget to subscribe!What is easy coffee truffles?
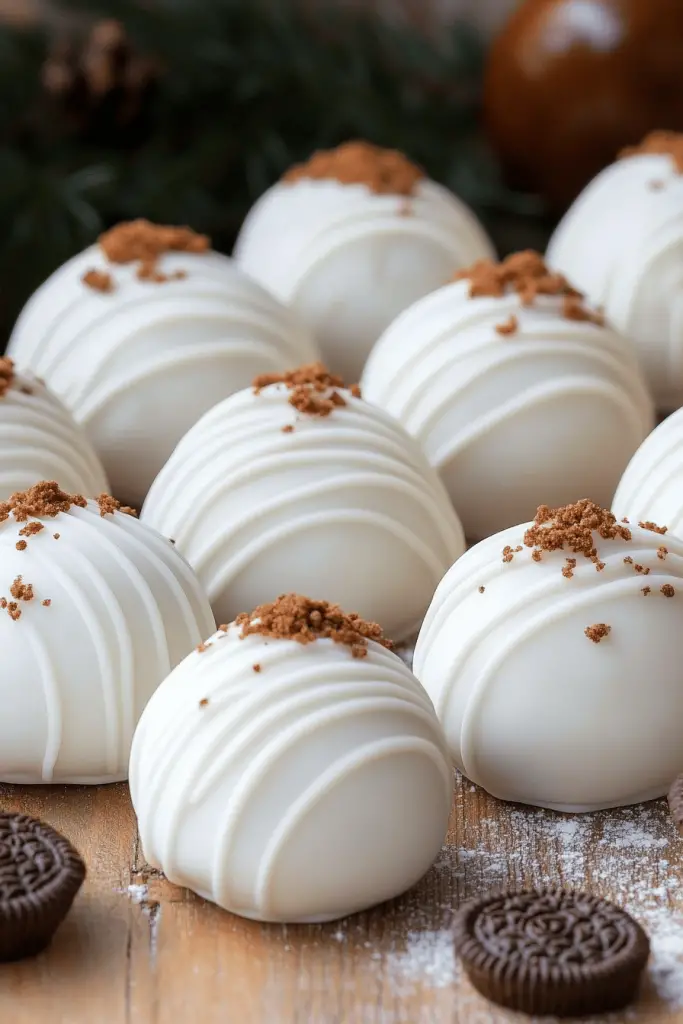
Think of easy coffee truffles as little espresso-kissed bites that deliver big flavor with barely any fuss. It’s essentially a no-bake confection built from a simple blend of crushed cookies or biscuit crumbs, a creamy binder, and a glossy chocolate coat. The name says it all: they’re quick, they’re refined, and they taste like they came from a bakery counter rather than your mixing bowl. I love how the coffee note threads through every bite—enough to wake you up, but not so strong that dessert becomes a jolt. If you’ve ever fallen in love with a coffee-flavored ganache or a tin of fancy chocolates, you’ll recognize the vibe: smooth, velvety, and a touch of Chocolate Crunch. It’s basically adult hot chocolate in a portable, elegant form—perfect for gifting, potlucks, or a quiet moment with a mug and a good movie.

Why you’ll love this recipe?
What I love most about this easy coffee truffles recipe is how approachable it feels. You don’t need fancy equipment or a long list of hard-to-find ingredients. It’s the kind of dessert that rewards you for a little patience and a willingness to dip your spoon into a pot of melted chocolate. The flavor is deeply coffee-forward without being bitter, and the chocolate shell cracks beautifully as you bite into the creamy center. It’s also incredibly forgiving: you can adjust sweetness, switch cookies for nut-free options, or swap in a pinch of spices for a cozy twist. This is one of those recipes that shines at room temperature, straight from the fridge, or even lightly chilled after the glaze sets. What I appreciate most is its versatility—when friends pop by or I need a quick gift, these little truffles always impress without demanding a long, stressful process. It’s a small batch that feels like a big, thoughtful gesture every time.
Flavor-wise, the contrast between the crisp chocolate shell and the creamy, coffee-scented center is where the magic happens. The texture is everything: a gentle snap on the outside, a velvety melt as you roll the truffle around your tongue, and a lingering coffee aroma that lingers after the last bite. They’re also budget-friendly if you shop smart: crusts, cream cheese, and chocolate all come together in ways that you can stretch with pantry staples. I’ve even tested this with almond milk and a touch of Coconut Cream to lighten the center, and let me tell you, it still holds its chocolatey, coffee-kissed charm. This recipe is a friendly gateway to making more complex truffles later on, should you want to take the plunge into ganache and more intricate fillings. It’s a little escape in a bite-sized package.
How do I make a delicious coffee truffle?
Quick Overview
In a nutshell, you’ll crush cookies, bind them with a creamy coffee-kissed layer, shape the mixture into small rounds, chill them until firm, then coat with glossy melted chocolate. The result is a dozen or so truffles that taste like a grown-up treat but come together in one breezy afternoon or a relaxed evening. The most important thing is flavor balance: a sturdy chocolate coating, a soft center with a gentle coffee note, and a coating that doesn’t overpower the palate. The method is forgiving, especially if you’re not aiming for perfect spheres—imperfectly round truffles still look irresistible when dusted with cocoa or finished with a light swirl of White Chocolate. If you’re short on time, you can skip the center filling and simply roll the creamy mixture into balls, then coat. It’s still delicious and a total crowd-pleaser.
Ingredients
For the Main Batter:
- 1 cup finely crushed digestive biscuits or graham crackers (about 8–9 cookies) — you want a fine crumb for a smooth texture
- 4 oz (115 g) cream cheese, softened — this is your glue, so don’t skip it
- 2–3 tablespoons strong espresso or coffee concentrate (adjust to taste)
- 2 tablespoons unsalted butter, melted — optional but adds silkiness
- 2–3 tablespoons confectioners’ sugar (to taste)
- Pinch of fine sea salt — enhances the chocolate and coffee notes
For the Filling:
- 2 tablespoons cream cheese, softened
- 1 teaspoon instant espresso powder dissolved in 1 teaspoon hot water
- 1/2 teaspoon vanilla extract
- Optional: a tiny pinch of cinnamon or cardamom for warmth
For the Glaze:
- 8 oz (225 g) semi-sweet or dark chocolate, chopped or chips
- 1–2 tablespoons light corn syrup or neutral oil (for a glossy finish, optional)
- 2 teaspoons butter (for extra gloss, optional)
- Unsweetened cocoa powder or finely crushed coffee beans for coating accents
Step-by-Step Instructions
Step 1: Preheat & Prep Pan
Set your fridge to a steady chill and line a baking sheet or plate with parchment. You’ll be rolling and setting the truffles here, so give yourself a clean, flat surface. If you have a shallow tray with sides, that’s perfect for easier space management while you roll. I always start by lining up bowls—cookie crumbs, Cream Cheese, coffee, and a small dish of cocoa powder—so I’m not scrambling mid-process. This is where having a little mise en place truly saves the day. For best results, chill the cookie crumbs briefly in the freezer for 10 minutes before mixing; it helps them bind more easily with the cream cheese.
Step 2: Mix Dry Ingredients
In a medium bowl, whisk together the finely crushed cookies, salt, and confectioners’ sugar. The goal is a homogeneous crumb with no visible sugar grains. If your crumb is a touch coarse, give it a quick pulse in a food processor to smooth it out. This step matters because a uniform crumb ensures a smooth bite and prevents crumbly truffles. The cookies’ flavor sets the foundation, so use a good-tasting biscuit or cracker that pairs well with coffee.
Step 3: Mix Wet Ingredients
In a separate bowl, beat the softened Cream Cheese until it’s smooth and creamy. Stir in the melted butter (if using) and the espresso or coffee concentrate. The coffee should be strong but not overpowering; you’re aiming for a coffee kiss, not a coffee punch. Taste the mixture and adjust with a touch more sugar if you like sweeter truffles. The texture should be creamy, not runny; if your mixture feels too soft, drop it back into the fridge for 10–15 minutes to firm up a touch.
Step 4: Combine
Fold the dry crumb mixture into the wet Cream Cheese mixture until it forms a cohesive dough. It should hold together when you pinch a little between your fingers. If it seems too stiff, add a teaspoon of water or cream a touch at a time. If it’s too loose, add another tablespoon of crumb. The exact amount depends on the moisture of your cookies and the humidity in your kitchen. Once it looks and feels right, cover and refrigerate for 20–30 minutes. This rest period makes shaping much easier and helps flavors meld.
Step 5: Prepare Filling
While the main dough rests, mix together the filling ingredients if you want a little surprise center. Place the softened Cream Cheese in a small bowl, stir in the espresso solution, vanilla, and optional spices. Chill for 10–15 minutes. You’ll be rolling the dough into little domes and then inserting the filling to create a subtle center. If you prefer to keep things ultra-simple, you can skip this step and roll regular balls, then coat. The decision is yours, and both approaches deliver a delicious bite.
“The easy coffee truffles turned out amazing. My kids asked for seconds. Saving this one!”
Step 6: Layer & Swirl
Once the dough is cold and easy to scoop, portion out teaspoon-sized rounds. If you’re using the filling, flatten a small disc, add a tiny dab of the espresso filling in the center, and fold the dough around it to seal. Roll between your palms to form a smooth ball. For a touch of elegance, you can swirl a little White Chocolate into the center or simply swirl melted dark chocolate into the outer coat. The key is to form neat, compact spheres so the chocolate glaze adheres evenly.
Step 7: Chill
Place the formed truffles on the parchment-lined tray and chill for at least 30 minutes. If you’re short on time, you can freeze them for about 15 minutes to firm up enough to dip. This step is crucial: chilled truffles hold their shape when coated, and a glossy glaze never hurts. I like to use a chilled tray for dipping to keep everything from melting too quickly and to get that crisp outer bite you want from a chocolate shell.
Step 8: Cool & Glaze
While the truffles chill, melt the chocolate for the glaze. Use a gentle, low heat or a double boiler to keep the chocolate smooth; stir in a splash of corn syrup or a bit of butter if you want extra gloss and shine. When the chocolate is silky, drop each truffle into the glaze, turning to coat completely. Lift with a fork or dipping tool and set back on the parchment. If you prefer a minimalist finish, dust with cocoa powder immediately after coating so the shell doesn’t harden too much. For a refined look, drizzle a thin White Chocolate line across the top after a few minutes of setting.
Step 9: Slice & Serve
Let the coated truffles set fully at room temperature, then refrigerate for at least 15 minutes to lock in the finish. If you’d rather not bite-sized spheres, you can shape them into flat discs and slice them into little rounds once set. This is a nice presentation trick for a party platter: neatly arranged circles with a cocoa dusting create a striking contrast against a white plate. When you serve, offer coffee pairings or a small nib of salt on the side to heighten the chocolate-coffee notes. These easy coffee truffles taste best slightly chilled, so keep them in the fridge until you’re ready to serve and savor the first bite with a warm mug in hand.
What to Serve It With
These little chocolate-cappuccino bites are versatile enough to pair with a bunch of moments and occasions. Here are a few ideas that feel just right.
For Breakfast: A light coffee cup alongside a tray of mini truffles makes a fancy weekend treat. Serve on a delicate plate with a tiny spoonful of Whipped Cream and a few espresso beans for color. They’re a playful twist on the usual morning pastry and a great conversation starter.
For Brunch: Set out a dessert board featuring easy coffee truffles, chocolate-dusted cookies, and a small carafe of coffee on the side. A splash of vanilla liqueur or Baileys in the coffee can elevate the whole experience for adult guests, and the truffles offer a sweet contrast to the bold coffee flavor.
As Dessert: Channel a cafe vibe by plating with a dusting of cocoa or a drizzle of caramel. A scoop of vanilla bean ice cream or a dollop of whipped cream alongside a truffle creates a little dessert trio that’s both indulgent and approachable. My family loves a tiny shard of orange zest on top for a fresh, bright finish that cuts through the richness.
For Cozy Snacks: When you need a late-night bite, a small handful of truffles with a mug of hot cocoa or tea feels like a warm hug. These are also fantastic as a small, thoughtful gift in a mason jar with a handwritten label—perfect for teachers, neighbors, or coworkers who deserve a little sweetness.
My household especially treasures these as a go-to gift during the holidays because they transport so well in a sturdy tin. A small batch like this travels beautifully and stays delicious for several days in the fridge. The trick is to keep them well-sealed so they don’t pick up other fridge odors, which is something I learned the hard way after leaving them uncovered for a hurried swap of groceries. Keep a stash ready and your friends will always feel special when you say, “I made something for you.”
Top Tips for Perfecting Your Easy Coffee Truffles
Good things come to those who test and tweak, so here are my best tips after a few dozen tiny kitchen experiments.
Chocolate Handling: Use good-quality chocolate for the glaze—it makes all the difference in shine and snap. If your chocolate seems thick, warm it gently in short bursts and stir until smooth. A splash of neutral oil or a touch of corn syrup helps keep it glossy after it sets.
Mixing Advice: Don’t overwork the dough once you combine the crumbs with the cream cheese. A light touch keeps the texture tender rather than dense. If your mixture looks a little dry, a teaspoon of cream or milk will bring it back to the right consistency.
Center Filling Customization: The coffee filling is optional, but a tiny, well-balanced center adds a delightful hidden surprise. If you’re not into filling, simply roll the dough into balls and coat. If you do fill, don’t overfill—the outer dough should still seal the center without bursting.
Swirl Customization: A swirl of white chocolate or a bit of cinnamon-sugar on top adds visual interest and a subtle flavor contrast. You can also dust the finished truffles with finely grated coffee bean pieces for a rustic look.
Ingredient Swaps: If you don’t have digestive biscuits, graham crackers work nicely. For a gluten-free option, use gluten-free cookies or finely ground almonds with a touch more cream cheese to help bind. I’ve even tested this with oat-based cookies for a nuttier, heartier bite. You’ll likely want to adjust the sugar a touch if using sweeter cookies.
“New family favorite! This easy coffee truffles was so flavorful and ridiculously easy. Crowd-pleaser for sure.”
Baking Tips: No baking required, which makes this a breeze. If your kitchen is warm, you may find the dough becomes a bit softer; refrigerate a bit longer to regain form before shaping. Likewise, if your chocolate coating begins to seize, a quick re-melt and a few drops of oil will smooth it out again.
Glaze Variations: You can finish in cocoa only for a classic look, or use a glossy ganache glaze for a shinier finish. A thin white chocolate drizzle adds a refined contrast and makes swirls more visible. If you’re in a rush, a dusting of cocoa powder is a quick, elegant alternative that still showcases the coffee flavor.
Trust me on this one: the little tricks you learn—like chilling the dough a bit longer or giving the glaze a proper coating—make a big difference in the final bite. I’ve made these countless times, and they never fail to bring a smile. They’re the kind of dessert that tastes like a celebration, even when you’re simply celebrating a Tuesday.
Storing and Reheating Tips
Here’s how I keep these easy coffee truffles at their best without turning the kitchen into a science project.
Room Temperature: If you’re serving within a couple of hours, you can keep them at room temperature in a covered container for up to 3 days. They’ll still taste fantastic, but the glaze may soften a touch in a warm room.
Refrigerator Storage: Store in an airtight container for up to 1 week. Layer with parchment between layers to prevent sticking. This is a great way to have a ready-to-go dessert for a week’s worth of coffee moments.
Freezer Instructions: For longer storage, freeze individual truffles on a tray until solid, then transfer to a freezer-safe bag or container. They’ll keep for up to 2–3 months. Thaw in the fridge or at room temperature for a few hours, then re-glaze if you want to refresh the shine.
Glaze Timing Advice: If you’re freezing or refrigerating before glazing, glaze at the end to keep the finish pristine. A catchy tip: glaze the truffles only after they have reached a proper solid state; otherwise, the coating can crack or lose its gloss as the chocolate settles.
One thing I’ve learned is that keeping a small stash in the freezer makes weeknights feel a little more luxurious. It’s amazing how a single bite of coffee-chocolate bliss can turn a rough day around. The texture holds up beautifully after freezing, which is a relief if you’re the kind who wants to serve something impressive with minimal effort.
Frequently Asked Questions
Final Thoughts
There’s something soothing about these easy coffee truffles that I keep coming back to. They’re a small, comforting ritual—a moment to breathe, savor that coffee aroma, and enjoy a chocolatey finish that feels grown-up yet cozy. If you’re new to making truffles, this is the perfect starter recipe: simple ingredients, straightforward steps, and results that look and taste like you spent hours in the kitchen. The best part is sharing them with someone you love, paired with a warm cup and a friendly conversation. I hope you’ll try this soon, tweak it to your own taste, and tell me what flavors you discover. Do you prefer a stronger coffee kick, or a hint of vanilla in the center? I’d love to hear how yours turn out—leave a comment, rate the recipe, and share any variations you came up with. Happy baking!

easy coffee truffles
Ingredients
Main Ingredients
- 8 ounces cream cheese softened
- 2 cups powdered sugar
- 3 tablespoons instant coffee powder or espresso powder
- 1 teaspoon vanilla extract
- 0.5 cup unsweetened cocoa powder for rolling
Instructions
Preparation Steps
- In a medium bowl, beat the softened cream cheese until smooth.
- Gradually add the powdered sugar, instant coffee powder, and vanilla extract. Beat until the mixture is well combined and smooth.
- Cover the bowl and chill the mixture in the refrigerator for at least 30 minutes, or until firm enough to roll.
- Once chilled, scoop out small portions of the mixture (about 1 tablespoon each) and roll them into balls.
- Place the unsweetened cocoa powder in a shallow dish. Roll each truffle ball in the cocoa powder until fully coated.
- Arrange the finished truffles on a serving platter or in an airtight container. Chill again for another 15-20 minutes before serving, or until firm.


