There’s something about the richness of chocolate combined with a cool, velvety texture that just gets me every time. I remember sitting around my grandma’s kitchen, watching her make this dreamy chocolate icebox pie while her kitchen filled with the smell of cocoa and sweet cream. To me, it’s the perfect treat—especially when I want something indulgent but don’t want to turn on the oven. This pie is essentially a no-bake marvel, with a crust that’s crunchy and buttery, and a filling that’s so smooth, it practically melts on your tongue. It’s become my go-to dessert for everything from spontaneous family dinners to quick weekend get-togethers. The best part? It’s surprisingly simple to whip up, and my kids ask for this all the time. Trust me, once you try it, it’ll become your “secret weapon” when you’re craving something decadently chocolatey and cool. Plus, this one’s a lifesaver on busy nights—you make it, chill it, and it’s done. Getting everyone around the table for a slice feels like a mini celebration every time!
Thank you for reading this post, don't forget to subscribe!What is chocolate icebox pie?
Think of chocolate icebox pie as the cool, chocolatey sibling of your classic dessert lineup. It’s an indulgent, no-bake pie that’s mostly all about that silky, fudge-like filling nestled in a crunchy crust. The name “icebox pie” comes from its traditional method—chilling in the icebox (or refrigerator) rather than baking. The concept is simple: a crust, a rich chocolate filling, and a toppings or finish that make it stand out. It’s essentially a grown-up, more sophisticated version of a pudding pie, but with a texture that’s airy, yet dense enough to satisfy even the biggest sweet tooth. Think of it as your answer to those nights when you want something cool and decadent. Perfect for summer parties, holiday gatherings, or just Tuesday when you need a little chocolate pick-me-up. And honestly, it’s so versatile—you can tweak the chocolate intensity or add personal touches like whipped cream or sea salt for a gourmet touch.
Why you’ll love this recipe?
What I love most about this chocolate icebox pie is how effortless it is, yet it looks incredibly impressive. My family always oogles it on the dessert table—no one believes it’s so easy to make! The flavor? Oh, it’s pure, rich chocolate—think dark, slightly bittersweet, with just enough sweetness to satisfy your cravings without feeling overly cloying. Plus, the texture is what gets me: creamy, smooth, and just firm enough to hold a perfect slice. This pie is a total crowd-pleaser, whether you’re serving kids (who somehow love the gooey, fudgy filling) or adults looking for a decadent end to dinner. And because it’s no-bake, you don’t have to fuss with oven temperatures or worry about undercooked crusts. Just mix, layer, and chill! It’s budget-friendly too—using pantry staples like cocoa, condensed milk, and graham crackers, you’ll be amazed at how luxurious this pie looks and tastes without breaking the bank. It’s seriously a dessert for all seasons—easy enough for a quick family treat, fancy enough for a dinner party, and oh-so-satisfying when you’re craving something sweet at night but don’t want to turn on the oven.
How do I make chocolate icebox pie?
Quick Overview
This pie comes together faster than you’d think. Start with a buttery graham cracker crust (or whatever crust you prefer), then whisk up a rich chocolate filling with condensed milk and cocoa powder. Pour that luscious mixture into your prepared crust, then pop it into the fridge to set—usually a few hours is perfect, but overnight is even better if you’re planning ahead. When it’s time to serve, top with whipped cream or shaved chocolate for that wow factor. The beauty is that there’s no baking involved, so it’s a real hands-off process that impresses every time. Trust me, once you make this once, it’ll be in your rotation forever.
Ingredients
For the Main Batter:
– 1½ cups graham cracker crumbs (or digestive biscuits for a different crunch)
– ½ cup unsalted butter, melted
– ¼ cup granulated sugar (optional, depending on the sweetness of your crackers)
For the Filling:
– 3 ½ cups sweetened condensed milk
– ¾ cup unsweetened cocoa powder
– 1 teaspoon vanilla extract
– ½ teaspoon salt (to balance the richness)
For the Glaze/Topping:
– 1 cup heavy cream
– 2 tablespoons powdered sugar
– Shaved chocolate or mini chocolate chips (for garnish)
“Packed with flavor and so simple. Exactly what I wanted from this Easy Chocolate Icebox Pie Delight!”
Step-by-Step Instructions
Step 1: Preheat & Prep Pan
Actually, no preheating is needed here! Just grab a 9-inch pie dish and give it a quick spray or a light coat of butter so the crust releases easily. Then, mix your graham cracker crumbs with melted butter and sugar, press it firmly into the bottom and up the sides of the pie dish. Use the back of a spoon or a flat-bottomed glass to smooth everything out evenly. Chill the crust in the fridge while you prepare the filling. This step creates that perfect crunchy base that balances the luscious filling.
Step 2: Mix Dry Ingredients
In a medium bowl, whisk together the cocoa powder, salt, and if using, sugar. This helps break up lumps and ensures the cocoa mixes evenly. I always do this first because cocoa can be stubborn and tend to clump—breaking it up early guarantees a smooth filling without bitter pockets.
Step 3: Mix Wet Ingredients
In a separate bowl, combine the sweetened condensed milk and vanilla. For a richer flavor, I sometimes add a teaspoon of espresso powder or a splash of bourbon—trust me, it enhances the depth of chocolate! Mix until smooth. Then, whisk in the cocoa mixture gradually until everything’s glossy and uniform. The mixture should be thick but pourable. If it feels too dense, a splash of milk can loosen it up slightly.
Step 4: Combine
Pour the wet mixture into your prepared crust. Using a spatula, gently smooth out the top, making sure it’s evenly distributed. Don’t overmix—just enough to combine. This is the moment when you might add in mini chocolate chips if you want extra pockets of gooey chocolate in every bite.
Step 5: Prepare Filling
That’s your luscious chocolate mixture! Now, if you’re feeling fancy, you can layer melted chocolate or peanut butter swirls for added flavor. But honestly, the simple version is divine on its own.
Step 6: Layer & Swirl
If you’re feeling playful, add dollops of whipped cream or melted peanut butter on top and swirl with a toothpick or skewer. For a marbled look, gently drag through the filling for a beautiful pattern. This isn’t necessary but definitely adds a lovely visual touch.
Step 7: Bake
Actually, this pie doesn’t need baking! Instead, cover it with plastic wrap or foil and let it chill in the fridge for at least 4 hours, but overnight is best. The cold allows the filling to firm up and the flavors to meld perfectly. If you’re in a rush, a few hours will do, but the longer it sits, the richer and more cohesive it becomes.
Step 8: Cool & Glaze
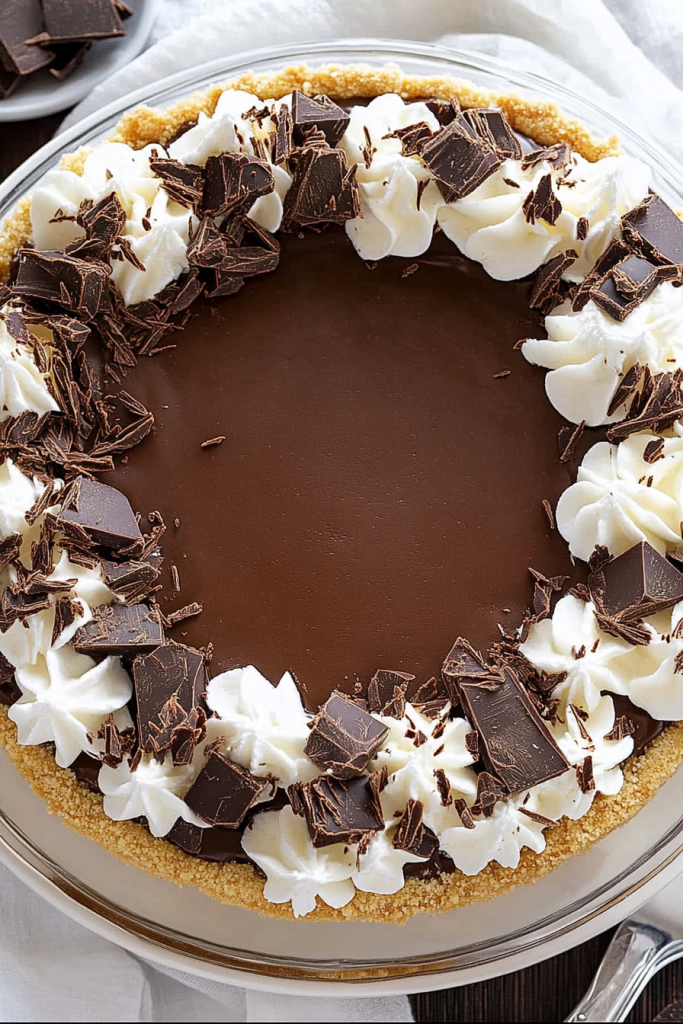
When it’s set and chilled, whip your heavy cream with powdered sugar until soft peaks form. Spread or pipe it on the top of the pie. For that finishing touch, sprinkle shaved chocolate or mini chips over the whipped cream. If you want a shiny, chocolatey top, drizzling a little warm melted chocolate after the whipped cream sets creates a beautiful contrast and extra flavor burst.
“Made the Easy Chocolate Icebox Pie Delight tonight and wow — perfect weeknight dinner. Will definitely make again!”
Step 9: Slice & Serve
Use a sharp serrated knife and wipe it clean between cuts for the neatest slices. Serve straight from the fridge for that perfect, cool bite. Everyone at my house loves a slice topped with a dollop of whipped cream and a few raspberries or a dusting of cocoa powder. It’s pretty enough for company but simple enough for a weeknight treat. Just remember: the longer it chills, the better it tastes. Patience really pays off here!
What to Serve It With
This pie is pretty much perfect all by itself, but I love pairing it with some fresh berries or a splash of coffee—think rich espresso or a frothy cappuccino—to cut through the sweetness. For brunch, serve with a scoop of vanilla ice cream or a drizzle of caramel sauce. It also makes a stunning finale to a dinner party when topped with a little whipped cream and chocolate shavings. My family often asks for it after BBQ nights, and I’ve even sliced it into smaller squares for a no-fuss potluck dessert. If you’re feeling extra indulgent, toss some crushed cookies or nuts on the whipped cream topping to add texture. Honestly, it’s such a crowd-pleaser, I can’t keep it a secret—everyone always asks for seconds!
Top Tips for Perfecting Your Chocolate Icebox Pie
Over the years, I’ve learned a few tricks that make this pie even better. First, when crusting, don’t be shy with the butter—it helps it stick together and stay crisp. I tested making the crust with almond butter once, and it actually made it even more flavorful—try it if you’re feeling adventurous! When mixing the filling, avoid overmixing because that can cause the filling to become grainy or start to crack when chilling. If you want a lighter texture, fold in some whipped cream just before pouring in the crust; it’s a nice trick for a less dense bite. Swirling toppings or doodling with melted chocolate is a favorite of mine—just go slow for a pretty marbled look. For ingredient swaps, I’ve experimented with coconut milk in place of condensed milk (not as sweet, so add a touch more sugar) and it’s surprisingly nice. When baking or chilling, always check your refrigerator temperature—too warm can make the pie runny, and too cold can cause the crust to crack outside and the filling to be too firm inside. This pie is forgiving but patience really pays off. I’ve learned to taste the filling before pouring, adjusting sugar or cocoa if I need to—small tweaks make a big difference. And don’t forget: if you add a pinch of sea salt to the whipped cream, it really enhances the chocolate flavor and elevates the entire dessert.
Storing and Reheating Tips
Since this pie is all about that cool, creamy goodness, proper storage is key. If you’re not serving it right away, cover it tightly with plastic wrap so it doesn’t absorb fridge odors—this pie can last comfortably for up to 3 days in the fridge. I like to keep it in the middle shelf, away from the door, to maintain a consistent chill. If I need to re-serve leftovers, a quick trip back into the fridge for about 30 minutes brings it back to perfect firmness. You can freeze individual slices wrapped tightly in plastic wrap and stored in an airtight container for up to a month—definitely make sure to thaw them in the fridge so they don’t get icy or soggy. When it comes to the glaze or whipped topping, I prefer adding those just before serving for a fresher look. The flavors stay vibrant, and the texture is just right—no one wants a soggy or melted topping, after all.
Frequently Asked Questions
Final Thoughts
If you’ve never tried making a chocolate icebox pie, I promise you’ll be hooked! It’s the kind of dessert that combines nostalgia with a sophisticated wow factor. The creamy, chocolatey goodness paired with that crunchy crust is irresistible—I’ve made this countless times, and it never fails to bring smiles around my table. Whether it’s a special occasion or just a Tuesday night craving, this pie is my secret to instantly elevating any meal. Honestly, the best part is how forgiving and easy it is—no baking stress, just pure, velvety chocolate happiness waiting to be enjoyed. I could go on and on, but really, you’ve got to try it for yourself. And do let me know how it turns out—I’d love to hear about your variations or any little tweaks you discover along the way. Happy baking—and I hope this chocolate icebox pie becomes as special in your kitchen as it is in mine!
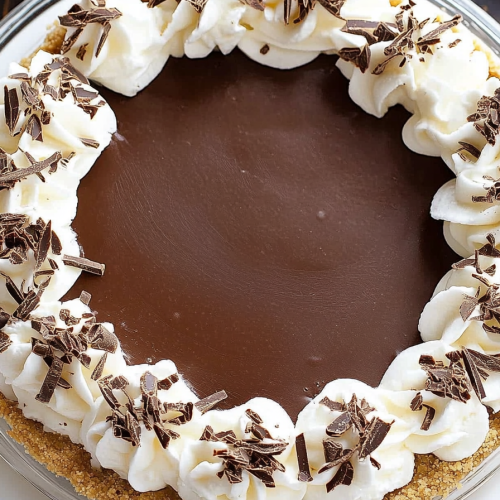
chocolate icebox pie
Ingredients
Main Ingredients
- 1.5 cups honey graham cracker crumbs
- 6 tablespoons unsalted butter
- 2 bars semisweet chocolate
- 0.25 cup hot water
- 2 tablespoons Dutch-processed cocoa powder
- 1 tablespoon vanilla extract
- 0.125 teaspoon kosher salt
- 2 cups heavy cream
- 0.25 cup confectioners' sugar
- optional chocolate curls for topping
Instructions
Preparation Steps
- Add the melted butter to the graham cracker crumbs and mix well until evenly coated.
- Press the crumb mixture into a 9-inch pie dish, evenly distributing and pressing firmly to form the crust.
- Melt the chopped chocolate in a microwave-safe bowl in 30-second intervals, stirring until smooth. Let cool slightly.
- In a small bowl, mix hot water, cocoa powder, vanilla extract, and salt until smooth.
- Combine the hot water mixture with the melted chocolate to create a ganache-like filling.
- In a large bowl, whip the heavy cream with an electric mixer on low speed, gradually increasing to medium until soft peaks form.
- Gradually add confectioners' sugar and increase mixer speed to high until stiff peaks form.
- Gently fold half of the whipped cream into the chocolate mixture until combined. Chill the remaining whipped cream for topping.
- Spread the chocolate mixture over the prepared crust.
- Refrigerate the pie for at least 2 hours until set. Top with remaining whipped cream and chocolate curls before serving.


