There’s just something about a good cherry cheesecake that makes me think of summer days, warm breezes, and the smell of fresh fruit ripening on the tree. Honestly, I’ve lost track of how many times I’ve squeezed fresh cherries just to get that perfect burst of sweetness in my cheesecake. This particular recipe is a bit of a throwback—my grandma used to make her version for Sunday dinners, and I swear, the aroma alone would draw everyone to the table. It’s so much more than just a dessert; it’s a comforting hug in every bite. And the best part? It’s surprisingly simple to whip up—no fancy equipment or ingredients needed. What I love most about this cherry cheesecake is how it balances that luscious, tangy Cream Cheese with the sweet, vibrant cherries on top. It’s a crowd-pleaser, sure, but I also sneak a small slice when it’s just me, and honestly, it’s the kind of treat that always brightens my day. Trust me when I say, this one’s a lifesaver on busy nights when I need that little extra sweetness, quick and effortless!
Thank you for reading this post, don't forget to subscribe!What is a cherry cheesecake?
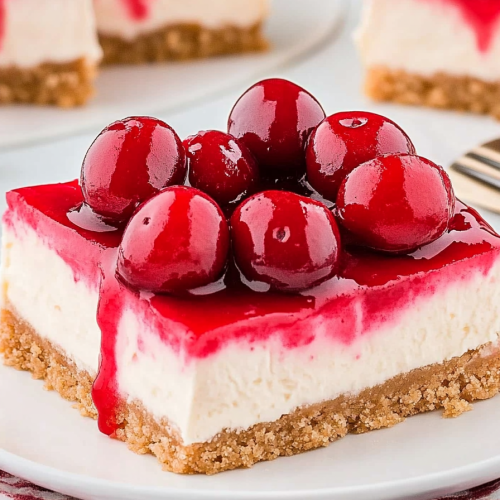
Think of cherry cheesecake as the perfect marriage between a creamy, indulgent dessert and a fresh, fruity topping. It’s kind of like a classic New York-style cheesecake—rich, smooth, and dense—but with a delightful twist. The cherry topping adds that pop of vibrant flavor, a bit of tartness, and a gorgeous, glossy finish. The name itself is pretty straightforward: it’s a cheesecake crowned with luscious cherries, often simmered with a little sugar and maybe a splash of lemon to heighten the flavors. But behind that simple label is a recipe that combines tender graham cracker crust, a velvety Cream Cheese filling, and bright, juicy cherries. Think of it as a celebration of contrasts—the silky richness of the filling and the refreshing sweetness of the cherries—coming together in one perfect bite. It’s essentially an elegant dessert that’s friendly enough for a weeknight treat and fancy enough for special occasions too.
Why you’ll love this recipe?
What I love most about this cherry cheesecake is how it manages to feel fancy but is actually so easy to make—trust me, I’ve tested it on my busiest days and it’s never let me down. The flavor? Oh, it’s divine. The tangy cheesecake paired with the sweet, slightly tangy cherries creates this incredible harmony that hits all the right notes. And the taste? It’s creamy, luscious, and just sweet enough—never overpowering. Plus, it’s like a little piece of nostalgia in every bite, reminding me of family gatherings and summer afternoons. Another thing that makes this recipe a keeper is how versatile it is. You can use fresh cherries when they’re in season or opt for frozen if you’re craving it out of season. Cost-wise, it’s pretty budget-friendly, especially since the ingredients are pantry staples like Cream Cheese, graham crackers, sugar, and cherries. Whether it’s served as a casual weekend dessert or a show-stopping finish to a dinner, it always disappears quickly—and that’s saying something! My kids actually ask for this all the time, and I can’t blame them.
How do I make a Cherry Cheesecake?
Quick Overview
This cherry cheesecake comes together in just a few steps—start with a simple graham cracker crust, then whip up a smooth, tangy Cream Cheese filling. While it bakes, you can prepare the juicy cherry topping, which is just simmered with a little sugar and lemon juice. Once cooled, layer that bright, cherry goodness right on top of the creamy cheesecake and finish with a glossy glaze or fresh cherries if you prefer a more natural look. It’s the kind of dessert that looks elegant but is honestly so fuss-free. I always do this when I want something impressive but don’t want to spend hours in the kitchen. The best part? You don’t need any special skills—just common ingredients and a little patience during the cooling stage makes all the magic happen.
Ingredients
For the Main Batter:
– 1 ½ cups graham cracker crumbs (about 10-12 crackers, crushed finely)
– ¼ cup sugar
– ½ cup unsalted butter, melted
– 16 oz (2 packages) Cream Cheese, softened
– ¾ cup granulated sugar
– 3 large eggs
– 1 teaspoon vanilla extract
– 1 cup sour cream or Greek yogurt for extra creaminess (trust me, it makes it silkier!)
For the Filling:
– 2 cups fresh or frozen cherries, pitted if fresh
– ½ cup sugar
– 1 teaspoon lemon juice
– 1 tablespoon cornstarch (or arrowroot powder for a gluten-free version)
– Optional: splash of almond liqueur for depth
For the Glaze:
– ½ cup cherry jam or preserves
– 2 tablespoons water
– Fresh cherries or mint sprigs for garnish (if you like that fancy touch!)
“New family favorite! This Easy Cherry Cheesecake Without Baking was so flavorful and ridiculously easy. Crowd-pleaser for sure.”
Step-by-Step Instructions
Step 1: Preheat & Prep Pan
Preheat your oven to 325°F (160°C). Lightly grease a 9-inch springform pan—my go-to tool for cheesecakes because it’s so easy to remove and keep the sides pretty. Wrap the outside with foil to prevent any leaks because trust me, cracked cheesecake is a heartbreak. While it preheats, crush the graham crackers into fine crumbs—my favorite trick is to pop them in a plastic bag and hit them with a rolling pin. Mix the crumbs with sugar and melted butter until everything sticks together like damp sand. Press this mixture evenly into the bottom of your prepared pan, using the bottom of a glass or measuring cup to pack it down nicely. Bake for about 10 minutes to set the crust—this step is key to a crispy, flavorful base!
Step 2: Mix Dry Ingredients
In a small bowl, combine the graham cracker crumbs and sugar; set aside. You want to make sure the crust is evenly seasoned and that the butter has coated all the crumbs well, so it holds together when baked. I always do this before moving on to the filling—it’s the foundation, after all.
Step 3: Mix Wet Ingredients
In a large mixing bowl, beat the softened cream cheese with an electric mixer until smooth and creamy—about 2-3 minutes. Add sugar gradually, then beat again until fluffy. One secret I’ve learned over the years? Make sure your cream cheese is softened enough; otherwise, you’ll end up with lumps. Next, add eggs one at a time, mixing just until combined. Remember not to overmix here—air bubbles are fine, but overworking the batter can cause cracks during baking. Finally, stir in vanilla and sour cream until everything’s silky and smooth. It should be luscious and pourable, but not runny.
Step 4: Combine
Gently fold the wet mixture into your crust-lined pan, trying not to knock out all those precious air bubbles. Pour the batter into the crust and smooth the top with a spatula. The batter should be rich and velvety—almost like creamy custard. If you see any bits of crust creeping up, don’t worry; you can clean that up later with a paper towel before baking.
Step 5: Prepare Filling
While the cheesecake is baking, make your cherry topping. Toss cherries, sugar, lemon juice, and cornstarch into a small saucepan. Bring to a simmer over medium heat, stirring regularly until the mixture thickens into a syrupy consistency. This little step unlocks all those fruity flavors and ensures your cherries stay put on top. You can add a splash of almond liqueur here if you like—trust me, it adds that sophisticated depth.
Step 6: Layer & Swirl
Once your cheesecake has baked for about 50-60 minutes—set the timer and keep an eye out for the edges to be slightly golden—you’ll notice the center may still jiggle a bit, but that’s okay. Turn off the oven and crack the door open, letting it cool gradually for an hour or so. Then, pour your luscious cherry mixture over the cooled cheesecake, spreading gently. For a pretty marbled look, I like to dollop some cherries into the batter before baking or swirl in some extra cherry compote on top. That way, every slice is a little surprise of fruit and color.
Step 7: Bake
Keep in mind, every oven is a bit different—so don’t be alarmed if your cheesecake needs a few extra minutes. You know it’s done when the edges are set but the middle still has a slight jiggle. Use a toothpick to test—insert it right into the center; it should come out clean or with just a moist crumb attached. Once baked, let it cool completely at room temperature, then refrigerate for at least 4 hours, preferably overnight. This resting period really helps everything set properly.
Step 8: Cool & Glaze
If you’re using a glaze, melt your cherry jam with water until smooth. Once your cheesecake is chilled and firm, gently spread the glaze over the top—the shine is irresistible. Alternatively, for a cleaner look, top with fresh cherries and sprigs of mint just before serving. This is the moment to decide if you want to add a dusting of powdered sugar or a dollop of whipped cream.
“The Easy Cherry Cheesecake Without Baking turned out amazing. My kids asked for seconds. Saving this one!”
Step 9: Slice & Serve
Use a sharp knife dipped in hot water to make clean cuts—it’s my little secret to perfect slices. Serve straight from the refrigerator for the best texture, or let it sit out for 10-15 minutes if you prefer it slightly softer. I love pairing it with a cup of strong coffee or a glass of bubbly at dinner. And don’t forget: the first slice is always the hardest to cut, but once you get through that, the rest practically slices itself!
What to Serve It With
This cherry cheesecake is pretty versatile—it’s equally at home as a fancy dinner finale or a weekend treat. For breakfast or brunch, I love serving a slice alongside a big cup of coffee or a glass of freshly squeezed juice. It’s also fantastic with a dollop of whipped cream or a few toasted almonds sprinkled on top for some crunch. At a casual cookout, I might serve it as-is, letting the vibrant cherries steal the show. For a more elegant presentation, try pairing it with a drizzle of chocolate or a few fresh mint leaves—these little touches make all the difference. My family has a tradition of enjoying it with a splash of hot fudge or caramel, especially when I want to turn it into a toppings bar. Whatever your occasion, this cherry cheesecake fits right in. It’s become a bit of a dessert family favorite—my kids ask for it all the time, and honestly, I don’t mind sneaking a piece after they go to bed.
Top Tips for Perfecting Your Cherry Cheesecake
Over the years, I’ve picked up a few tricks for making this recipe really shine. First, let’s talk about the crust—don’t skip the prebake step. It truly adds a crispy texture, contrasting beautifully with the soft filling. When mixing the cream cheese, make sure it’s softened enough; lumps are the enemy of perfectly smooth batter. I learned that the hard way, and now I always set my cream cheese out early. For the cherry topping, keep an eye on the simmer—if it thickens too much, just add a splash of water or lemon juice to loosen it up. When swirling cherries into the batter, use a toothpick or skewer to create pretty ribbons—it looks fancy but is super simple. If you’re feeling adventurous, swap cherries for raspberries or blueberries for a different twist. Baked cheesecake can crack if overmixed or if the oven temperature is too hot—so, keep the oven consistent and avoid opening the door too often during baking. I also recommend placing a pan of water on the rack below to create steam, which helps prevent cracks and keeps the cheesecake creamy. Lastly, don’t rush the cooling process—patience pays off when getting that silky, smooth texture. I tested this with a slightly lower oven temp and a longer bake time, and honestly, it resulted in a cheesecake that was even creamier and less prone to cracks. Oh, and for the glaze, I’ve tried everything from store-bought jam to homemade compotes—trust me, a good quality jam makes all the difference.
Storing and Reheating Tips
This cheesecake is best enjoyed within a few days, but with proper storage, it can stay fresh longer. If you’re planning to serve it later, cover it tightly with plastic wrap or keep it in an airtight container—your fridge is its best friend. It’ll last up to 4 days that way, and it still tastes divine. For longer storage, I recommend freezing slices wrapped tightly in plastic wrap, then foil—thaw in the fridge overnight before serving. Just remember, if you plan to add extra glaze or fresh fruit, do that right before serving, because moisture can make the top soggy if it sits too long. I once left a cheesecake with the glaze on it overnight, and by morning, the glaze had soaked into the edges—so, always consider timing. Reheating isn’t necessary—just slice and serve cold or at room temp—either way, it’s delicious. If you want a warm vibe, try letting a slice sit out for about 10 minutes—totally worth it for that luscious, melt-in-your-mouth feel. Just a tip—if it’s been in the fridge, let it sit out for a few minutes so it’s not too cold—it brings out the flavors better.
Frequently Asked Questions
Final Thoughts
Honestly, if you’ve never tried making cherry cheesecake at home, I hope you give this one a shot. It’s one of those dishes that makes me feel like a pro in the kitchen, but it’s really just a matter of mixing, baking, and layering with love. The combination of those creamy, tangy layers with bright, sweet cherries never fails to make my family smile—and the smell alone brings everyone to the kitchen! Plus, once you get the hang of it, you’ll find yourself experimenting with different fruits or toppings, making this recipe uniquely your own. Whether it’s for a family dinner, a holiday gathering, or just a cozy night in, this cherry cheesecake never disappoints. I love to hear how yours turns out—leave a comment or share your variations! Happy baking, and enjoy every delicious bite!
cherry cheesecake
Ingredients
Main Ingredients
- 2 cups graham cracker crumbs
- 0.5 cup salted butter, melted
- 0.5 cup brown sugar
- 16 oz cream cheese, softened
- 3.4 oz instant vanilla pudding mix
- 0.75 cup powdered sugar
- 15 oz cherry pie filling
Instructions
Preparation Steps
- In a large bowl, stir together graham cracker crumbs, melted butter, and brown sugar. Press mixture evenly into the bottom of a 8x8 inch square baking pan.
- Prepare vanilla pudding according to package instructions. Let it set for a few minutes.
- In a mixing bowl, combine softened cream cheese, prepared pudding, and powdered sugar. Mix with an electric mixer on low until smooth. Spread over the crust.
- Spread cherry pie filling evenly over the cream cheese layer. Refrigerate for at least 2 hours before serving.


