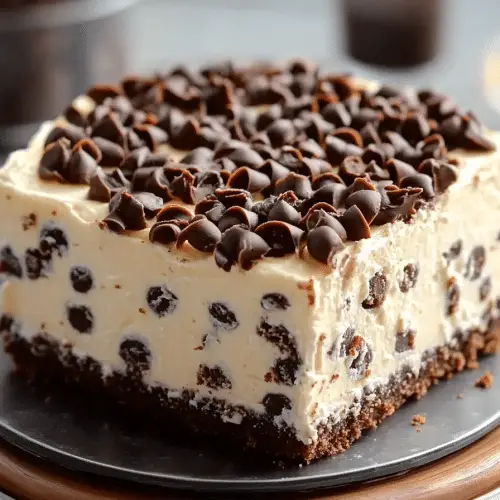
Okay, so confession time. Sometimes, I get these *intense* cravings. You know the kind? The ones that hit you mid-afternoon, or even late at night, and all you can think about is something utterly decadent, something that whispers of sunshine and Italian bakeries? That’s usually when I find myself reaching for this Cannoli Cake: Easy Cannoli Cake.. It’s not just a cake; it’s a little hug in dessert form, and honestly, it tastes *exactly* like biting into a perfectly piped cannoli, minus all the fuss and mess of filling those crispy shells. Forget complicated frosting or fiddly decorations; this cake is all about pure, unadulterated cannoli goodness swirled right into a moist, tender crumb. It’s the kind of recipe that makes you feel like a baking superstar, even on a Tuesday night. I swear, the first time I made this, my family inhaled it in about ten minutes flat. It’s a total lifesaver when company pops over unexpectedly, or when you just need a little something special to brighten your day without spending hours in the kitchen. If you’ve ever swooned over a cannoli, get ready, because this cake is about to become your new best friend.
Thank you for reading this post, don't forget to subscribe!What is an easy cannoli cake?
So, what exactly *is* this magical creation? Think of it as the best parts of a cannoli, all rolled into one beautiful, bakeable package. Instead of dealing with fried pastry shells and piping ricotta filling (which, let’s be honest, can sometimes end up more on your apron than in the shell!), we’re taking all those incredible cannoli flavors – that creamy, sweet ricotta, hints of citrus zest, and those delightful chocolate chips – and folding them right into a Cake Batter. Then, we create this gorgeous, marbled effect that looks just as stunning as it tastes. It’s essentially a delightful mash-up that captures the essence of a classic cannoli in a super approachable, cake form. The “easy” part isn’t just a marketing ploy, either; it truly lives up to its name, making it accessible for even novice bakers. It’s the perfect way to get that beloved cannoli flavor without any of the intimidating steps. It’s a comforting, familiar taste wrapped up in a brand-new, utterly delicious format.
Why you’ll love this recipe?
Let me count the ways!flavor is just out of this world. You get that unmistakable creamy ricotta goodness, brightened with a touch of lemon zest that cuts through the richness beautifully, and those delightful pops of mini chocolate chips. It’s like a party in your mouth! Then there’s the simplicity. Honestly, this is one of the most straightforward cakes I’ve ever made. No fancy techniques, no intimidating steps. It comes together so quickly, making it perfect for those times when you’re short on time but still want something truly impressive. And the cost-efficiency? It’s fantastic! Most of the ingredients are pantry staples, and even the ricotta and Cream Cheese are relatively affordable. You get a whole lot of deliciousness for your buck. What I love most about this easy cannoli cake, though, is its versatility. You can serve it as a light dessert, a sweet breakfast treat alongside your morning coffee, or even as part of a brunch spread. It’s also incredibly forgiving! I’ve tried it with different types of chocolate chips, and it always turns out wonderfully. It’s a recipe that truly delivers on taste, ease, and pure joy, making it a consistent winner in my kitchen. It’s the kind of dessert that makes people ask for the recipe the moment they try it!
How to Make Easy Cannoli Cake
Quick Overview
This recipe is a breeze! We’re essentially making a simple cake batter, then swirling in a creamy ricotta filling and chocolate chips before baking. The magic happens in the swirl, giving you beautiful marbling in every slice. It’s designed to be foolproof, so don’t stress; even if your swirls aren’t perfect, the taste will be. It’s the ultimate “looks harder than it is” dessert. You’ll have a stunning, flavorful cake ready with minimal effort.
Ingredients
For the Main Batter:
You’ll need all-purpose flour – about 2 and a half cups will do. Make sure it’s your standard flour; no need for anything fancy here. Then, we’ll use baking powder for lift, a pinch of salt to balance the sweetness, and a good amount of granulated sugar, about 1 and 3/4 cups. For richness and moisture, unsalted butter is key, softened to room temperature – that’s crucial for creaming properly. We’ll also need a couple of large eggs, also at room temperature. And for that classic cannoli flavor infusion, a good splash of vanilla extract and some finely grated lemon zest. I always use fresh lemons; the aroma is just incomparable!
For the Filling:
This is where the cannoli magic really happens! We’ll use a full container of whole milk ricotta cheese, well-drained. Trust me on draining it; too much liquid can make your cake soggy. A bit of Cream Cheese, softened, adds an extra layer of creaminess. More granulated sugar, about half a cup, for sweetness. Another good dose of vanilla extract and some more of that fragrant lemon zest. And, of course, mini chocolate chips – I like about a cup, but feel free to go wild if you’re a chocolate lover!
For the Glaze:
This is optional but highly recommended! A simple powdered sugar glaze works wonders. Start with about 1 and a half cups of powdered sugar. You’ll add milk or cream, just a tablespoon at a time, until you reach a nice, drizzly consistency. A tiny bit of vanilla extract can be added here too, or even a squeeze of lemon juice for an extra tangy kick.
“Packed with flavor and so simple. Exactly what I wanted from this Easy Cannoli Cake!”
Step-by-Step Instructions
Step 1: Preheat & Prep Pan
First things first, get that oven preheated to 350 degrees Fahrenheit (175 degrees Celsius). While it’s warming up, grab a 9×13 inch baking pan. I like to grease mine really well with butter or cooking spray, and then give it a light dusting of flour. This ensures that your beautiful cake won’t stick, making for easy removal later. Some people like to line the bottom with parchment paper too, which is another great trick for guaranteed easy release.
Step 2: Mix Dry Ingredients
In a large bowl, whisk together your flour, baking powder, and salt. Give it a good whisk to make sure everything is evenly distributed. This is a simple but important step to ensure your cake rises evenly and has a consistent texture throughout. No one wants a bite that’s too salty or has a big clump of baking powder!
Step 3: Mix Wet Ingredients
In a separate, large bowl, cream together the softened butter and granulated sugar until it’s light and fluffy. This usually takes a few minutes with an electric mixer. Then, beat in the eggs one at a time, making sure each one is fully incorporated before adding the next. Stir in the vanilla extract and the lemon zest. The mixture should smell amazing at this point!
Step 4: Combine
Now, we’re going to add the dry ingredients to the wet ingredients in batches, alternating with a liquid – I usually use milk for this, about a cup. Start by adding about a third of the dry ingredients, mix until just combined, then add half of the milk, mix again. Repeat this process, ending with the dry ingredients. The key here is *not* to overmix. Mix until you just don’t see any dry streaks of flour. Overmixing develops the gluten too much, which can make your cake tough.
Step 5: Prepare Filling
In a medium bowl, combine your well-drained ricotta, softened Cream Cheese, sugar, vanilla extract, and lemon zest. Stir or whisk until it’s smooth and creamy. Then, gently fold in the mini chocolate chips. Taste it – it should be sweet and tangy, just like a cannoli filling!
Step 6: Layer & Swirl
Now for the fun part! Pour about half of the cake batter into your prepared pan and spread it out evenly. Dollop spoonfuls of the ricotta filling over the batter. Don’t worry about making it perfect; just scatter it around. Then, gently pour the remaining cake batter over the filling. Dollop the rest of the ricotta filling on top. Now, take a knife or a skewer and gently swirl the filling into the batter. You don’t want to mix it completely, just create beautiful ribbons of flavor. Aim for a marbled effect.
Step 7: Bake
Pop that pan into your preheated oven and bake for about 35-45 minutes. The exact time will depend on your oven, so start checking around the 35-minute mark. You’ll know it’s done when a toothpick inserted into the center comes out clean, or with just a few moist crumbs attached. If the top starts to get too brown before the center is cooked, you can loosely tent it with foil.
Step 8: Cool & Glaze
Once it’s baked, let the cake cool in the pan for about 15-20 minutes before attempting to remove it. Then, carefully invert it onto a wire rack to cool completely. Once it’s totally cool, you can whip up your glaze. Whisk together the powdered sugar with milk or cream, adding the liquid a tablespoon at a time until it’s smooth and pourable. Drizzle it all over the top of the cooled cake. Let the glaze set for a bit before slicing.
“New family favorite! This Easy Cannoli Cake was so flavorful and ridiculously easy. Crowd-pleaser for sure.”
Step 9: Slice & Serve
Once the glaze has set, slice into your gorgeous Easy Cannoli Cake. I find using a sharp knife works best. Serve it at room temperature for the best texture and flavor. It’s delicious on its own, or with a dollop of Whipped Cream if you’re feeling extra decadent!
What to Serve It With
This Easy Cannoli Cake is so wonderfully versatile, it fits into almost any occasion. For Breakfast, I love serving a thinner slice alongside a strong cup of coffee. The lemon zest really wakes you up, and it feels so much more special than a regular pastry. Just a simple dusting of powdered sugar on top works beautifully here. For Brunch, this cake is a star! I’ll serve it on a pretty platter, perhaps with some fresh berries scattered around the edge. It pairs wonderfully with mimosas or a light sparkling wine. When serving it as a more formal Dessert, I might add a small scoop of vanilla bean ice cream or a dollop of mascarpone whipped cream on the side. A few chocolate shavings on top also elevate it beautifully. And for those Cozy Snacks moments, when you just need a comforting treat after a long day? A generous slice with a glass of cold milk is pure bliss. My kids are obsessed with it like this, and it’s so much easier than trying to make actual cannoli for a quick craving fix.
Top Tips for Perfecting Your Easy Cannoli Cake
Over the years of making this cake, I’ve picked up a few tricks that make it even better. For the ricotta, make sure you’re using whole milk ricotta, and please, please, *please* drain it well. You can do this by lining a sieve with cheesecloth or a coffee filter and letting it sit over a bowl in the fridge for at least an hour, or even overnight. This is probably the most crucial step for preventing a soggy cake. When it comes to mixing the batter, remember what I said about not overmixing. Just mix until the dry ingredients are incorporated. A few little lumps are actually fine and will result in a more tender cake. For the swirl, don’t go overboard trying to create intricate patterns. Gentle, broad strokes with a knife are all you need to get that beautiful marbling. It’s the rustic look that makes it so charming! If you want to experiment with the filling, I’ve tried adding a teaspoon of orange zest along with the lemon, which is lovely, or even a hint of cinnamon. For ingredient swaps, if you don’t have cream cheese, you can often get away with just using more ricotta, but the texture might be a little softer. And if you’re out of mini chocolate chips, chopped dark chocolate works, but it can melt and spread a bit more. Baking is always a bit of an art, so pay attention to your oven. If your oven tends to run hot, you might want to reduce the temperature slightly or check on the cake a little earlier. Don’t be afraid to do the toothpick test; it’s your best friend for determining doneness. And for the glaze, if it’s too thick, add milk drop by drop; if it’s too thin, add more powdered sugar. It’s all about achieving that perfect drizzling consistency.
Storing and Reheating Tips
This Easy Cannoli Cake is fantastic for making ahead, which is always a win in my book! If you’re storing it at Room Temperature, make sure it’s completely cooled first. Cover it loosely with plastic wrap or foil. It should stay fresh and delicious for about 2-3 days. The glaze helps keep it moist. For Refrigerator Storage, it will last even longer, about 4-5 days. Keep it in an airtight container or well-wrapped to prevent it from drying out. When you want to serve it from the fridge, I recommend letting it sit at room temperature for about 30 minutes to an hour to take the chill off and bring out the best flavors and texture. If you want to Freeze portions, I find it works best to freeze the cake *without* the glaze. Wrap individual slices tightly in plastic wrap, then in foil, and place them in a freezer-safe bag or container. They should be good for up to 2-3 months. To thaw, simply unwrap them and let them come to room temperature. You can then add a fresh drizzle of glaze or a dusting of powdered sugar. For the glaze itself, it’s always best to add it right before serving if you plan on storing the cake for more than a day, especially if you’re freezing it. A fresh glaze makes all the difference!
Frequently Asked Questions
Final Thoughts
Honestly, this Easy Cannoli Cake is one of those recipes that just makes me happy. It’s simple, it’s incredibly forgiving, and the flavor is just spot-on. It truly captures the essence of a cannoli without any of the fuss, which is a win-win in my book. It’s the perfect way to bring a little bit of Italian sweetness into your home, whether you’re celebrating something special or just need a comforting treat. If you love the idea of a fuss-free dessert that tastes like pure sunshine, you’ve got to give this a try. I promise, it’ll disappear faster than you can say “dolce vita”! For those who enjoy this kind of delightful, flavor-packed baking, you might also want to check out my Easy Tiramisu Cups or my No-Bake Lemon Cheesecake for more simple yet impressive dessert ideas. I can’t wait to hear what you think when you make this cake! Please leave a comment below and let me know how yours turned out, or share any delicious variations you try. Happy baking, everyone!
Easy Cannoli Cake
Ingredients
Cake Layers
- 2.5 cups all-purpose flour
- 1.5 cups granulated sugar
- 1 teaspoon baking powder
- 0.5 teaspoon salt
- 0.5 cup unsalted butter, softened
- 3 large eggs
- 1 teaspoon vanilla extract
- 1 cup milk
- 0.5 cup ricotta cheese
- 1 teaspoon orange zest
Cannoli Filling
- 2 cups ricotta cheese, well-drained
- 0.75 cup powdered sugar
- 0.25 cup heavy cream
- 0.5 teaspoon vanilla extract
- 0.25 cup mini chocolate chips
- 0.25 cup candied orange peel, chopped
Instructions
Preparation Steps
- Preheat oven to 350°F (175°C). Grease and flour two 9-inch cake pans.
- In a large bowl, whisk together flour, sugar, baking powder, and salt.
- Add softened butter and mix until the mixture resembles coarse crumbs.
- In a separate bowl, whisk together eggs, vanilla extract, milk, ricotta cheese, and orange zest.
- Gradually add the wet ingredients to the dry ingredients, mixing until just combined. Do not overmix.
- Divide the batter evenly between the prepared cake pans and bake for 30-35 minutes, or until a toothpick inserted into the center comes out clean.
- Let the cakes cool in the pans for 10 minutes before inverting them onto a wire rack to cool completely.
- While the cakes are cooling, prepare the filling. In a medium bowl, combine ricotta cheese, powdered sugar, heavy cream, and vanilla extract. Beat until smooth and creamy.
- Gently fold in the mini chocolate chips and chopped candied orange peel.
- Once the cakes are completely cool, place one layer on a serving plate. Spread a generous amount of the cannoli filling over the top.
- Place the second cake layer on top. Frost the entire cake with the remaining cannoli filling. Garnish with extra chocolate chips or candied orange peel if desired.


