If you’re like me, then holiday baking has always been a heartfelt tradition. I remember how, as a kid, I’d sneak into my grandma’s kitchen and watch her roll out those little bourbon balls with such care. The smell of sweet chocolate mixed with a hint of bourbon always seemed to fill the whole house with warmth and joy. Honestly, these bourbon balls became my ultimate go-to for Christmas parties, potlucks, or just a cozy night in when I crave a little treat that’s both indulgent and nostalgic. They’re one of those recipes that taste like a secret family handshake—simple, a little decadent, and impossible to resist once you’ve tried one. Plus, they’re so easy to make that I always do this when I need something quick and delicious to impress guests or satisfy a sweet tooth late at night. I promise, once you try making these, they’ll become a staple on your holiday table—or anytime you need a bite of comfort. Believe me, the first bite always takes me back to those special moments around my grandma’s kitchen table, sharing laughs over these tiny bites of happiness.
Thank you for reading this post, don't forget to subscribe!What are Bourbon Balls?
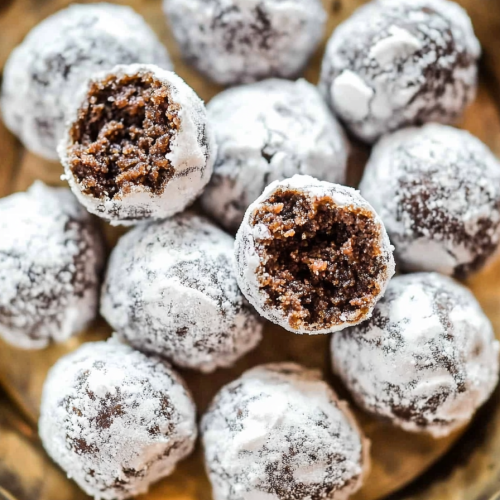
Think of bourbon balls as little no-bake bites of chocolate and bourbon magic. They’re essentially fudgy, bite-sized treats, coated in powdered sugar or chocolate, and infused with just enough bourbon to give a warming, boozy kick—without being overwhelming. The origin of bourbon balls is a bit of a mystery, but they’re forever associated with holiday festivities and family gatherings. The name “bourbon ball” pretty much describes the star ingredient and the shape: a sweet, round ball packed with flavor, reminiscent of the classic Southern cocktail. It’s like the best of both worlds—rich chocolate, a hint of vanilla, and a spicy splash of bourbon all wrapped up in one tiny package. These little confections are the perfect balance of sweet, boozy, and creamy, making them a beloved treat for grown-ups and a fun surprise for kids (just with less bourbon for them, of course!). They’re so simple but so satisfying, and once you’ve got the technique down, you’ll find yourself making batches just to keep around for those “urgent” sweet moments.
Why you’ll love this recipe?
What I love most about making bourbon balls is how effortlessly they come together yet taste like you’ve slaved away in the kitchen for hours. The flavor—oh, it’s nothing short of divine. The rich, velvety chocolate melts in your mouth, and that whisper of bourbon adds a sophisticated edge that surprises everyone. Plus, they’re great because they don’t require oven time—hallelujah for busy nights or last-minute cravings. I’ve tested these with different ingredients over the years, and honestly, I’ve found that using good-quality chocolate chips really makes a difference. And trust me on this: a dash of vanilla and a sprinkle of Sea Salt at the end elevate the flavor even more. They’re budget-friendly too, since most pantry staples work perfectly, and you probably already have everything you need in your kitchen. These bourbon balls are also super versatile—roll them in crushed nuts, coconut, or even sprinkles for a little extra flair. My kids actually ask for these all the time—they love how they look like tiny truffles, and I love how quick they are to whip up. Honestly, I can’t think of a better treat to serve at holiday gatherings—or simply to stash away for a cozy night. Trust me, once you make these, you’ll wonder how you ever lived without them.
How do you make Bourbon Balls?
Quick Overview
This recipe is practically foolproof, which is why it’s become a family favorite of mine. You start by mixing a rich chocolate cookie crumb base with a little bit of Sweetened Condensed Milk and a splash of bourbon, then shaping the mixture into small balls. Next, you chill them until firm, dip or roll in your choice of coating—powdered sugar, cocoa powder, or melted chocolate—and let them set. No baking required! The magic really happens during the chilling step, where the flavors meld beautifully, and the texture becomes perfectly fudgy. It’s such a straightforward process that I often make these last minute, and they’re always a hit. Plus, the best part? You get to enjoy that heavenly bourbon aroma wafting through your kitchen while you roll and coat these little gems. Once set, they’re a tempting, bite-sized treat that disappears faster than you’d believe—trust me, I’ve tested this more times than I can count!
Ingredients
For the Main Batter:
- 2 cups chocolate cookie crumbs (Oreos without the filling are perfect, or graham cracker crumbs if you want a different twist)
- 1/2 cup sweetened condensed milk (you’ll need just enough to bind the crumbs together)
- 2 tablespoons bourbon (adjust based on taste preference, I like a little more for that punch)
- 1 teaspoon vanilla extract (optional, but it really brightens the flavor)
For the Filling:
For the Glaze or Coating:
“Packed with flavor and so simple. Exactly what I wanted from this Easy Bourbon Sweets Recipe!”
- 1 cup chocolate melts or semi-sweet chocolate chips (melts beautifully and makes coating easy)
- Powdered sugar for rolling (for a snowy look and sweet finish)
- Cocoa powder or nuts for variation (optional)
Step-by-Step Instructions
Step 1: Preheat & Prep Pan
No oven needed here! Just line a baking sheet with parchment or wax paper. This will be your resting spot for the bourbon balls after coating—easy cleanup guaranteed. Chill your baking sheet in the fridge beforehand if you want to speed things up.
Step 2: Mix Dry Ingredients
In a large mixing bowl, combine the cookie crumbs with a pinch of salt if you like—that little salt really balances the sweetness. Mix well so the crumbs are evenly coated, which makes rolling easier later on.
Step 3: Mix Wet Ingredients
Add the Sweetened Condensed Milk, bourbon, and vanilla to the dry mixture. Use a spatula or clean hands (I always do this when I want a bit more control—plus, who doesn’t love getting a little messy?) and mix until everything comes together into a dough-like consistency. It should be soft but firm enough to roll into balls. Keep in mind: if it’s too sticky, just pop it in the fridge for 10 minutes.
Step 4: Combine
Once your mixture is just right, scoop out small portions and roll into about 1-inch balls. Trust me, bite-size is perfect. If your hands get sticky, dampen them slightly or dust with cocoa powder for easier rolling.
Step 5: Prepare Filling
This is optional, but I love adding chopped pecans or Mini Chocolate chips into the center of each ball for a little surprise inside. Just press a few into the center of the rolled ball before setting it aside.
Step 6: Layer & Swirl
After shaping the balls, if you’re feeling fancy, you can lightly flatten them or dip one side in melted chocolate for an extra glossy finish. For swirling, I like to dip half the ball into melted chocolate, then use a toothpick to create a decorative swirl on top—you know, for that boutique look!
Step 7: Bake (or Chill)
Here’s the best part—these don’t need baking! Just pop your tray in the fridge or freezer for at least 30 minutes to set. If you’re in a rush, a quick 10-minute freeze works too. They should be firm but still tender when you bite into them.
Step 8: Cool & Glaze
If you’re coating in chocolate, melt your chocolate chips in a double boiler or microwave in 20-second bursts until smooth. Dip each ball into the melted chocolate or roll it in powdered sugar. Place back on your prepared tray and let everything set at room temperature or in the fridge. I like to add an extra drizzle of chocolate on top for a fancy touch.
Step 9: Slice & Serve
These bourbon balls are best enjoyed once they’ve had a little time to chill and set. Serve them at room temperature with a mug of coffee or a glass of milk—the flavors really shine when they’re slightly soft and fudgy. They look adorable on a little platter with festive sprinkles or just a simple dusting of powdered sugar. And don’t be surprised if everyone is asking for seconds—these disappear faster than you’d think!
“The Easy Bourbon Sweets Recipe turned out amazing. My kids asked for seconds. Saving this one!”
What to Serve It With
Honestly, these bourbon balls are such a treat that they don’t need much by way of accompaniments. But if you want to elevate your hosting game, here are a few ideas:
– For a cozy breakfast: Pair with dark roasted coffee or a creamy latte. The rich chocolate and bourbon are surprisingly good with a strong brew.
– For brunch gatherings: Serve alongside a fruit platter or cheese board—think dried apricots, almonds, or a sharp cheddar—that contrast nicely with the sweetness.
– As a dessert: These little bites go beautifully with vanilla ice cream or a dollop of whipped cream. If you’re feeling fancy, add a drizzle of caramel or a sprinkle of sea salt on top.
– For casual snacking: Keep them in a cute jar on your counter or serve with a warm cup of cocoa or spiced APPLE CIDER during colder months. They’re also a hit on cookie platters or wrapped in cellophane for gifts—the perfect homemade holiday present. These bourbon balls are versatile enough to fit into any occasion, and honestly, they’re just plain addictive.
Top Tips for Perfecting Your Bourbon Balls
Over the years, I’ve learned a few tricks that make these bourbon balls turn out perfectly every single time:
– Zucchini prep? Just kidding! But for cookies, sometimes I add a tiny splash of bourbon to my frosting for that extra flavor kick.
– Mixing advice: Avoid overmixing your dough. It’s tempting to stir until everything’s perfectly integrated, but gently folding in ingredients ensures a fudgy, tender texture.
– Swirl customization: For a pretty marbled look, dip half in chocolate and then drizzle more on top once set. Use a toothpick for delicate swirl patterns—practice makes perfect!
– Ingredient swaps: If you’re dairy-free, almond or coconut condensed milk works like a charm. For a less boozy version, reduce the bourbon or omit it altogether—though I’ll admit, the flavor is so good with the bourbon that I usually go full throttle.
– Baking tips: If you want a softer center, reduce chilling time; for firmer bites, pop them in the freezer for an hour. Keep an eye on your melted chocolate—stir until smooth, then immediately dip for a glossy finish.
– Glaze variations: Experiment with adding a splash of peppermint extract to your melted chocolate in winter or a pinch of cayenne for a spicy kick. The secret is in the little details that personalize your treats!
Honestly, the more I make these, the more I discover new tweaks. Sometimes I toss in a handful of crushed peppermint candies or sprinkle crushed nuts on top for texture. The key is to have fun and taste as you go. These are forgiving little treats—just trust your palate and your instincts!
Storing and Reheating Tips
Once you’ve got your bourbon balls made, proper storage keeps them fresh and delicious:
– Room temperature: Keep them in an airtight container for up to a week. Cover with plastic wrap or a tight lid—no need to refrigerate unless it’s very warm where you live.
– Refrigerator storage: Place them in a sealed container or zip-top bag. They’ll stay good for about two weeks and might even taste better after a day or two, as the flavors deepen.
– Freezer instructions: For longer storage, freeze in an airtight container or wrap tightly in plastic wrap and foil. They’ll keep for up to 3 months! Thaw in the fridge for a few hours before serving.
– Glaze timing: If you’re coating in chocolate, it’s best to do so after chilling. But if you want fresh powdered sugar dusting, don’t add it until just before serving, or it’ll melt or get soggy.
– My personal tip? Make a double batch and freeze half; that way, you always have a go-to sweet treat ready to go when friends drop by or you need a little something sweet at a moment’s notice. They reheat surprisingly well if you want a warm chocolate-licked bite, just microwave for about 10 seconds—watch carefully! Once thawed, they remain soft and almost velvety to the last bite.
Frequently Asked Questions
Final Thoughts
If there’s one thing I’ve learned from years of making and tasting bourbon balls, it’s that these little bites hold a special place in my heart and our family traditions. They’re so simple yet so satisfying—perfect for slipping into gift boxes, sharing at parties, or just keeping around for those “just because” moments. Every time I make them, I feel that warm sense of nostalgia, reminding me of holidays past and gatherings with loved ones. Trust me, once you master this recipe, you’ll find yourself craving that little hit of chocolate, vanilla, and bourbon more often than you’d think. They’re more than treats—they’re memories in the making. So go ahead, gather your ingredients, and get rolling—I can’t wait to hear how yours turn out! And if you’re inspired to try variations or add your own twist, I’d love to hear about it in the comments. Happy baking, friends—here’s to many more sweet moments ahead!
bourbon balls
Ingredients
Main Ingredients
- 11 ounces vanilla wafers
- 1 cup finely chopped pecans
- 0.75 cup powdered sugar plus more for rolling
- 2 tablespoons unsweetened cocoa powder
- 0.5 cup bourbon
- 2.5 tablespoons light corn syrup
Instructions
Preparation Steps
- Process the cookies. Place the vanilla wafers in a food processor and pulse until finely crushed.
- In a bowl, combine crushed wafers, chopped pecans, powdered sugar, and cocoa.
- Whisk bourbon and corn syrup together in a separate bowl.
- Pour the bourbon mixture into the dry ingredients and mix until a soft dough forms.
- Cover and chill the mixture for 20 minutes.
- Shape the mixture into 1-inch balls and roll them in powdered sugar.
- Refrigerate the bourbon balls for 30 minutes before serving or store in advance for a more intense flavor.


