You know those days when company’s coming over, maybe even a little unexpectedly, and you panic just a tiny bit? Or perhaps you’re just craving something that feels a little fancy, a little festive, but doesn’t require you to spend hours slaving away in the kitchen? Yeah, me too. That’s precisely when my mind wanders to my absolute favorite antipasto salad. It’s not just a salad; it’s a vibrant, flavorful explosion of everything I love about Italian charcuterie and antipasti, all tossed together in one glorious bowl. It feels like a million bucks but honestly, it’s surprisingly simple. Think of it as a deconstructed Charcuterie Board that’s way easier to manage and a whole lot more satisfying when you’re really hungry. Honestly, compared to trying to meticulously arrange a cheese board, this antipasto salad is a lifesaver.
Thank you for reading this post, don't forget to subscribe!What is an antipasto salad?
So, what exactly *is* antipasto salad, you ask? Well, the word “antipasto” itself means “before the meal” in Italian, and it traditionally refers to a starter course of cured meats, cheeses, olives, and marinated vegetables. My antipasto salad takes all those wonderful elements and tosses them together into one magnificent dish. It’s not a strict, traditional recipe; it’s more of a philosophy. It’s about bringing together a harmonious blend of salty, briny, tangy, and savory components. Think of it as the most delicious buffet you can create right in your own bowl! It’s got all the bells and whistles of a classic antipasto platter, but without the fuss of individual serving dishes. It’s essentially the best bits of an Italian deli, beautifully arranged and ready to be devoured.
Why you’ll love this recipe?
Honestly, there are so many reasons why this antipasto salad has become a staple in my home. Firstly, the flavor profile is just out of this world. You get the salty punch from the cured meats and olives, the creamy tang of the mozzarella, the bright acidity from the marinated artichokes, and a lovely herbaceous note from the Italian dressing. It’s a symphony of tastes that just works perfectly together. Beyond the taste, it’s unbelievably simple to make. I can whip this up in under 20 minutes, which is a huge win on busy weeknights or when I’m hosting. Plus, it’s incredibly budget-friendly. You can often find Italian deli meats and cheeses on sale, and the rest of the ingredients are pantry staples or easily found at any grocery store. What I love most is its versatility. I can serve it as a light lunch, a fantastic appetizer before a big Italian feast, or even as a main course alongside some crusty bread. It’s perfect for potlucks because it travels so well, and it always gets rave reviews. Compared to a complicated Pasta Salad, this comes together in a flash and feels so much more sophisticated.
How do I make an antipasto salad?
Quick Overview
Making this antipasto salad is all about assembly and a quick, flavorful dressing. You’ll chop your favorite antipasti, toss them with a zesty Italian dressing, and let the flavors meld. It’s the kind of dish that practically makes itself, and the best part is you can customize it endlessly. No cooking required, just pure, delicious layering of awesome ingredients.
Ingredients
For the main salad: What is the best way to prepare it?
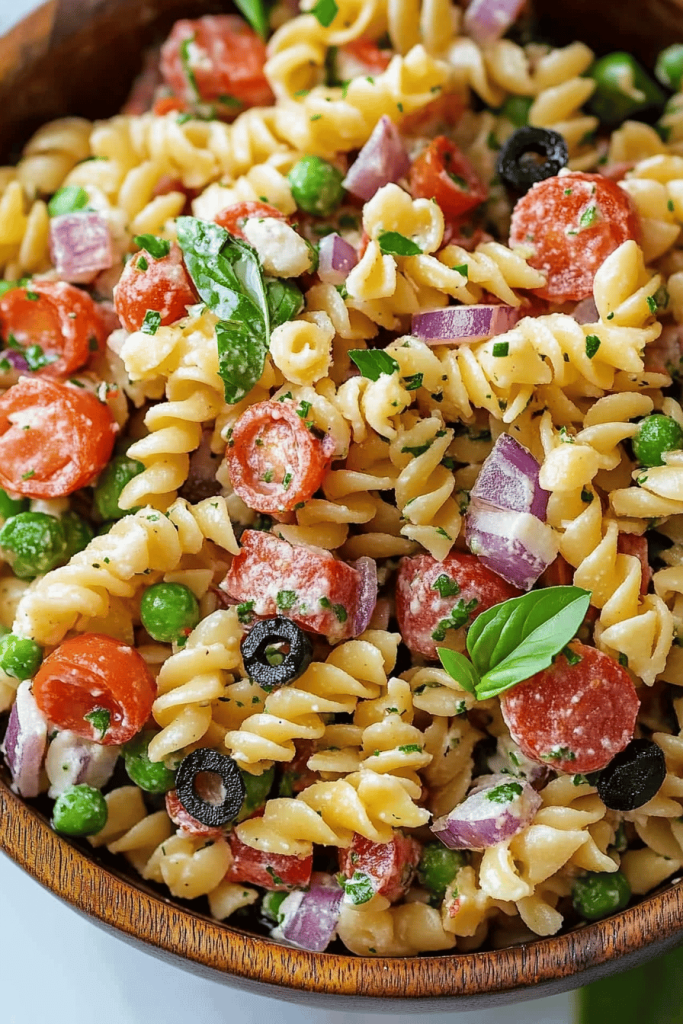
1 pound (about 450g) farfalle pasta (bow-tie pasta), cooked al dente and cooled. I find farfalle holds the dressing and little bits of goodness so well. If you can’t find farfalle, rotini or penne are great too!
1 cup (about 150g) Genoa salami, thinly sliced and quartered. Look for a good quality, not-too-spicy salami.
1 cup (about 150g) pepperoni, thinly sliced and quartered. The slightly different spice level adds another layer of flavor.
1 cup (about 150g) provolone cheese, cut into small cubes. Sharp provolone is lovely if you like a bit more bite.
1 cup (about 150g) fresh Mozzarella Balls (bocconcini), halved or quartered. These little pearls are just divine.
1/2 cup (about 80g) pitted Kalamata olives, halved. Their brininess is essential.
1/2 cup (about 80g) pitted green olives, halved. A nice contrast to the Kalamatas.
1/2 cup (about 75g) marinated artichoke hearts, drained and roughly chopped. These bring a wonderful tangy depth.
1/4 cup (about 30g) roasted red peppers, drained and roughly chopped. Sweetness and a lovely color boost.
1/4 cup (about 30g) pepperoncini peppers, drained and sliced. For that little kick of heat and tang. Don’t skip these if you love a bit of zing!
For the Dressing:
1/2 cup (120ml) good quality Italian dressing. You can use store-bought or make your own! I love a simple vinaigrette with olive oil, red wine vinegar, garlic, oregano, and a pinch of red pepper flakes.
2 tablespoons (30ml) extra virgin olive oil. For richness and that beautiful sheen.
1 tablespoon (15ml) red wine vinegar. To amp up the acidity and brightness.
1 teaspoon dried oregano. Classic Italian flavor.
1/2 teaspoon garlic powder. Or you can mince a clove of fresh garlic if you’re feeling adventurous!
Salt and freshly ground Black Pepper to taste. Always season well!
“Packed with flavor and so simple. Exactly what I wanted from this Easy Antipasto Salad Creations!”
Step-by-Step Instructions
Step 1: Cook and Cool the Pasta
First things first, get that pasta going! Bring a large pot of generously salted water to a rolling boil. Add your farfalle pasta and cook according to package directions until it’s perfectly al dente – you want it to have a slight chew, not be mushy. Drain the pasta well and rinse it briefly under cold water to stop the cooking process and prevent it from sticking together. Spread it out on a baking sheet or in a large bowl to cool completely. This step is super important; warm pasta will make your salad soggy and the dressing won’t coat it properly. Trust me on this one, I’ve learned the hard way!
Step 2: Prep Your Antipasti
While the pasta cools, it’s time to chop all those delicious antipasto components. Slice your salami and pepperoni into bite-sized pieces – I like to quarter them so they’re easy to get on your fork. Cube the provolone cheese and halve or quarter the fresh Mozzarella Balls. If your marinated artichoke hearts are whole, give them a good chop. Drain and chop the roasted red peppers, and slice up your pepperoncini peppers. This is where you can really get creative. I sometimes add chopped sundried tomatoes or even some capers for extra briny goodness.
Step 3: Whisk Together the Dressing
In a small bowl or a jar with a tight-fitting lid, whisk together the Italian dressing, extra virgin olive oil, red wine vinegar, dried oregano, and garlic powder. Give it a good shake or whisk until everything is well combined. Taste it and season with salt and freshly ground Black Pepper. Remember, the olives and cured meats are already salty, so go easy on the salt at first. You can always add more later!
Step 4: Combine Everything
Now for the fun part – bringing it all together! In a really large bowl (you’ll need plenty of space to toss everything without making a mess), add the cooled pasta, all the chopped meats, cheeses, olives, Artichoke Hearts, roasted red peppers, and pepperoncini peppers. Pour about three-quarters of the dressing over the mixture. Gently toss everything together, making sure all those delicious ingredients are coated in that zesty dressing. I like to use two large spoons or salad tongs for this, carefully lifting and folding to avoid breaking up the pasta or cheese too much.
Step 5: Let it Mingle
This is perhaps the most crucial, yet often overlooked, step: letting the flavors meld. Cover the bowl tightly with plastic wrap or a lid and refrigerate for at least 30 minutes, or ideally for an hour. This allows the pasta to absorb all those wonderful flavors from the dressing and the antipasti. If you’re short on time, you can serve it immediately, but I promise you, the wait is *so* worth it. Before serving, give it another gentle toss and add the remaining dressing if you think it needs it. Sometimes, depending on how absorbent your pasta is, it might need a little extra.
Step 6: Taste and Adjust
Before you serve, give your antipasto salad one last taste. Does it need a little more salt? A bit more pepper? Maybe a squeeze of lemon juice for brightness? This is your chance to fine-tune it to perfection. This recipe is really forgiving, so don’t be afraid to adjust seasonings and ingredients to your liking.
Step 7: Serve and Enjoy
Serve your glorious antipasto salad chilled or at room temperature. It’s a complete meal in itself, but it also makes an incredible side dish. Spoon it into a pretty serving bowl and get ready for the compliments!
“I don’t know if I’ve ever eaten a better Easy Antipasto Salad Creations. The rub alone is wonderful, but the sauce??? Over the top!”
What to Serve It With
This antipasto salad is so versatile, it’s practically a culinary chameleon! For a leisurely breakfast or a sophisticated brunch, I love serving it alongside some fluffy scrambled eggs or a perfectly poached egg. A sprinkle of fresh parsley on top adds a pop of color and freshness. If you’re serving it as a main course for lunch or a light dinner, a few slices of warm, crusty Garlic Bread are absolutely divine for soaking up any leftover dressing. For a more formal dinner party, it’s the perfect starter. I like to serve it in smaller portions, perhaps in individual martini glasses or small bowls, to make it feel extra elegant. And don’t forget dessert! While this salad is savory, it pairs beautifully with something sweet and simple, like a light lemon tart or some biscotti. For cozy snacks, it’s just perfect on its own, maybe with a glass of crisp white wine or a cold Italian soda. My family also loves it as a “build-your-own” bowl night, where everyone adds their favorite extras like grilled chicken or extra veggies.
Top Tips for Perfecting Your Antipasto Salad
Over the years, I’ve picked up a few tricks that really elevate this antipasto salad from good to absolutely unforgettable. First, when it comes to the pasta, make sure it’s truly al dente. Mushy pasta is the enemy of a good salad! Rinsing it under cold water not only stops the cooking but also helps prevent clumping, which is a lifesaver when you’re trying to toss everything gently. For the meats and cheeses, don’t be afraid to mix and match! I’ve used chopped ham, turkey, and even chunks of leftover roasted chicken in a pinch. For the cheese, if you’re not a fan of provolone, a sharp cheddar or a mild Monterey Jack can work too, though provolone really brings that classic Italian vibe. When chopping your ingredients, aim for relatively uniform sizes. This makes it easier to get a bit of everything in each bite. I’ve learned that if the pieces are too big, some bites can be overwhelming with one flavor. For the dressing, homemade is always best if you have the time. A simple ratio of 3 parts olive oil to 1 part Red Wine vinegar, with some dried herbs and a crushed garlic clove, is fantastic. But honestly, a good quality store-bought Italian dressing works wonders too, especially when you’re in a rush! Don’t be afraid to play with the briny elements. If you love capers, toss in a tablespoon or two. If you’re not a fan of pepperoncini, swap them for some sweet banana peppers. I’ve also found that adding a handful of fresh chopped parsley or basil right before serving adds a wonderful burst of freshness and color. It makes it look like you’ve really put in extra effort, even if you haven’t! Lastly, let it sit. I cannot stress this enough. The flavors need time to meld and mingle. If you can make it a couple of hours ahead, or even the night before, it’s a game-changer. The pasta soaks up all those delicious vinaigrette notes, and everything just tastes better.
Storing and Reheating Tips
This antipasto salad is incredibly forgiving when it comes to storage, which is another reason I love it so much. If you find yourself with leftovers (which is rare in my house, but it happens!), you can store it quite easily. For room temperature serving, it’s best to keep it refrigerated until just before you’re ready to serve. If it’s been sitting out for more than two hours, it’s best to discard any leftovers, just to be safe. In the refrigerator, this salad will keep beautifully for about 3 to 4 days. I always store it in an airtight container, which helps maintain its freshness and prevents it from absorbing any unwanted odors from other foods in the fridge. When you’re ready to eat leftovers, just give it a good stir. Sometimes, the pasta might absorb a bit more dressing as it sits, so you might want to add a tiny splash of Olive oil or a little extra Italian dressing to liven it up. I don’t typically reheat this salad, as it’s meant to be served chilled or at room temperature. The texture of the cheese and meats is best when they’re cool. However, if you absolutely wanted to serve it warm, I would suggest gently warming the pasta and meats separately, then tossing them with the fresh vegetables and dressing just before serving. Freezing antipasto salad isn’t really recommended because the texture of the cheese and the vegetables can become a bit watery and unpleasant after thawing. It’s so quick to make, it’s really best enjoyed fresh or within a few days of making it.
Frequently Asked Questions
Final Thoughts
So there you have it – my beloved antipasto salad! It’s one of those recipes that truly embodies effortless elegance. It’s packed with flavor, incredibly satisfying, and always a crowd-pleaser. I genuinely hope you’ll give this a try, whether you’re hosting a big gathering or just looking for a fantastic, easy meal to whip up for yourself. It’s the kind of dish that makes you feel like a culinary rockstar without any of the fuss. If you love this, you might also enjoy my recipes for a Classic Caprese Salad or a Speedy Pesto Pasta Salad. They share that fresh, vibrant Italian flair! I can’t wait to hear what you think, and I’d be absolutely thrilled if you’d share your own variations or how your antipasto salad turned out in the comments below!
antipasto salad
Ingredients
Main Ingredients
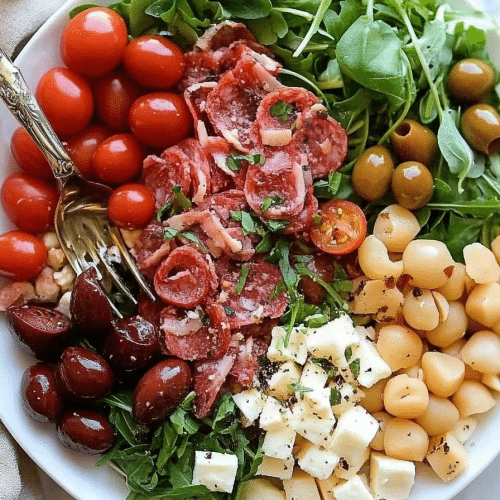
- 1 can chickpeas rinsed and drained (15 oz)
- 1 jar pitted Castelvetrano olives drained (10 oz)
- 1 jar sun-dried tomatoes drained (8.5 oz)
- 1 jar grilled artichoke halves drained (12 oz)
- 4 oz feta cheese crumbled
- 4 oz Parmesan cheese shaved or cubed
- 4 oz sopressata or salami thinly sliced or diced
- 2 tablespoons extra virgin olive oil
- 2 tablespoons balsamic glaze
- 5 oz baby greens such as arugula or mixed greens
- 1 cup cherry tomatoes halved
- 1 large cucumber diced
Instructions
Preparation Steps
- Start with a very large platter or serving board.
- Arrange the baby greens (arugula or mixed greens) in the center of the platter.
- Cut the cherry tomatoes in half and dice the cucumber. Arrange these fresh vegetables around the greens.
- Slice the sopressata or salami, crumble the feta, and shave or cube the Parmesan cheese. Arrange them separately around the greens.
- Open the chickpeas, pitted olives, sun-dried tomatoes, and grilled artichoke halves. Drain them well and arrange them in sections on the platter.
- Set out small bowls of extra virgin olive oil, balsamic glaze, and your favorite dressings alongside the platter.
- Provide serving spoons or tongs and allow guests to help themselves and build their own antipasto salad.


