
You know those days? The ones where you’re hit with a craving so intense, so specific, that nothing else will do? For me, it’s usually a craving for that delightful, safe-to-eat cookie dough flavor. Not just a nibble from the tub (though, guilty!), but something a little more… elegant. Something that feels like a treat but is ridiculously easy to whip up. That’s precisely where these no-bake cookie dough truffles come in. They’re like pure bliss, condensed into bite-sized wonders. They’re also my absolute go-to when I need a last-minute dessert for a party or just want to surprise the family with something special without turning on the oven. Seriously, if you’ve ever loved those Edible Cookie Dough bars you see everywhere, you are going to adore these. They’re the closest you can get to that pure, unadulterated cookie dough flavor, but in a perfectly portioned, melt-in-your-mouth truffle form. And the best part? No baking required!
Thank you for reading this post, don't forget to subscribe!What is cookie dough truffle?
So, what exactly are cookie dough truffles? Think of them as the most delicious shortcut to cookie dough heaven. They’re essentially a delightful mixture that tastes remarkably like raw cookie dough – but totally safe to eat, of course! We achieve this by combining some pantry staples with a few clever tricks to get that classic cookie dough flavor and texture. The “truffle” part comes in because we roll these delicious little bites into balls and then often dip them in chocolate, making them as pretty as they are tasty. It’s like a Chocolate Chip Cookie met a fancy chocolate truffle and they decided to have the most delicious baby ever. It’s that irresistible flavor of sweet, slightly brown-sugary dough, sometimes with little bits of chocolate chips, all wrapped up in a satisfyingly smooth package.
Why you’ll love this recipe?
Honestly, there are so many reasons why this recipe has become a staple in my kitchen. First off, the flavor is just out of this world. It’s that pure, unadulterated Cookie Dough taste that brings back all the nostalgic memories of sneaking bites from the mixing bowl when I was a kid. But beyond the nostalgia, it’s incredibly simple to make. You don’t need any fancy equipment or skills – just a bowl, a spoon, and a few minutes. I’ve made these when I’ve had absolutely no time, and they always come through. They’re also surprisingly budget-friendly. Most of the ingredients are things you probably already have in your pantry. And the versatility? Oh my goodness. You can customize them in so many ways, which I’ll get into later, but it means they’re never boring. What I love most is how they satisfy that sweet craving without the commitment of baking an entire batch of cookies. It’s my secret weapon when the 3 pm slump hits or when unexpected guests pop by. They feel so much more special than they actually are to make, and that’s a win-win in my book!
How do I make cookie dough truffles?
Quick Overview
The process for these cookie dough truffles is wonderfully straightforward. We’re essentially mixing a few key ingredients to create a dough-like consistency, forming them into balls, and then, if you like, giving them a decadent chocolate coating. It’s a no-bake situation from start to finish, which means no preheating ovens, no waiting for things to cool, and minimal cleanup. You can have these ready to chill and set in under 15 minutes, making them perfect for those spontaneous sweet cravings.
Ingredients
For the Main Batter:
Let’s talk about what makes these little guys taste so much like real cookie dough. The secret is using ingredients that mimic that texture and flavor profile. We need unsalted butter, softened to room temperature – this is crucial for a smooth, creamy base. Then comes the flour, but here’s a little tip: I always lightly toast my flour in a dry skillet for a few minutes until it smells nutty. This isn’t just for flavor; it also ensures the flour is safe to eat raw. You’ll need about a cup. Next up is Brown Sugar, which gives us that signature caramel-like sweetness and depth. Make sure it’s packed! A touch of granulated sugar balances it out. For that classic taste, vanilla extract is a must. And of course, for the “cookie dough” experience, we need mini chocolate chips. I prefer mini because they distribute better and you get that chocolate hit in every bite without overwhelming the dough itself. A pinch of salt to enhance all those flavors is also key.
For the Filling (Optional but Recommended!):
While the base batter is delicious on its own, sometimes I like to add a little something extra in the center. This could be a whole chocolate chip, a tiny dollop of peanut butter, or even a small raspberry. It adds another layer of flavor and texture. For this recipe, we’re keeping it simple with more mini chocolate chips, but feel free to get creative!
For the Glaze:
This is where we make them look like fancy little truffles! You can use a good quality melting chocolate – milk, semi-sweet, or dark, depending on your preference. I usually opt for semi-sweet as it’s a nice balance. A tiny bit of coconut oil or vegetable oil can help thin out the chocolate, making it easier to dip and giving it a smooth, glossy finish once set. If you don’t have melting chocolate, you can also use chocolate chips, but you might need to add a bit more oil to get the right consistency.
“New family favorite! This Cookie Dough Truffles The Best Sweet Treat was so flavorful and ridiculously easy. Crowd-pleaser for sure.”
Step-by-Step Instructions
Step 1: Preheat & Prep Pan
This step is more about preparing your workspace than preheating an oven. You’ll want a baking sheet lined with parchment paper or wax paper. This is where your beautiful cookie dough truffles will rest after they’re formed and before they go into the fridge to firm up. Make sure you have enough space on the baking sheet for all the truffles you plan to make.
Step 2: Mix Dry Ingredients
In a medium bowl, whisk together your toasted flour, brown sugar, granulated sugar, and salt. Make sure there are no lumps, especially in the brown sugar. This dry mix is the foundation of our cookie dough flavor. Whisking them together ensures everything is evenly distributed for the next steps.
Step 3: Mix Wet Ingredients
In a separate larger bowl, cream together the softened unsalted butter and vanilla extract until it’s light and fluffy. This is where we start building that rich, creamy texture that mimics actual cookie dough. Make sure your butter is truly softened, not melted; you want it spreadable but not liquid.
Step 4: Combine
Now, gradually add the dry ingredients to the wet ingredients. Mix on low speed or with a spatula until just combined. Be careful not to overmix! Overmixing can lead to a tougher texture, and we want these to be tender and delightful. Stir in your mini chocolate chips until they’re evenly distributed throughout the dough.
Step 5: Prepare Filling
If you’re adding a little surprise center, now’s the time. You can roll a few extra chocolate chips together with a tiny bit of the dough to form a small ball, or have your chosen filling (like a raspberry or a small dollop of peanut butter) ready to place inside the main dough balls.
Step 6: Layer & Swirl
Take about a tablespoon of the cookie dough mixture and roll it into a ball. If you’re adding a filling, flatten the dough ball slightly, place your filling in the center, and then carefully enclose it with the dough, re-rolling it into a smooth ball. Place each formed ball onto your prepared baking sheet.
Step 7: Bake
This is the step that *isn’t* happening! Since these are no-bake, we skip the oven entirely. The magic happens in the chilling process. So, just place the baking sheet with the formed cookie dough balls into the refrigerator for at least 30 minutes to an hour. This allows them to firm up nicely, making them easier to dip.
Step 8: Cool & Glaze
Once the truffles are firm, it’s time for the chocolate coating. Melt your chosen chocolate (along with the coconut oil) gently, either in a double boiler or in the microwave at 30-second intervals, stirring in between. Once smooth and pourable, dip each chilled truffle into the melted chocolate, letting any excess drip off. You can use a fork or a toothpick to help coat them evenly. Place them back on the parchment-lined baking sheet to set. If you want to add some flair, you can drizzle extra chocolate over the tops once the initial coating has started to set.
“Made the Cookie Dough Truffles The Best Sweet Treat tonight and wow — perfect weeknight dinner. Will definitely make again!”
Step 9: Slice & Serve
Once the chocolate coating is completely set (this usually takes about 15-20 minutes in the fridge), your cookie dough truffles are ready to be enjoyed! You can serve them directly from the fridge or let them come to room temperature for a few minutes for an even softer bite. They’re perfect for popping into your mouth!
What to Serve It With
These cookie dough truffles are so versatile, they can be the star of the show or a delightful supporting act. For breakfast, I sometimes like to place a couple alongside a fresh fruit salad or on top of a stack of pancakes. It feels like a decadent treat to start the day, especially on weekends. For brunch, they’re fantastic arranged on a dessert platter alongside mini quiches and scones. They add a touch of sweetness and fun that everyone, young and old, will appreciate. As a dessert, they’re simply divine. Imagine serving them after a hearty meal with a cup of good coffee or a glass of milk. They’re also a wonderful addition to a dessert board, complementing other sweets like brownies or macarons. And for those cozy snack moments? Honestly, there’s nothing better than curling up on the couch with a few of these and a good movie. My kids absolutely love them as an after-school treat, especially when I’ve made a big batch and they’re still slightly chilled and the chocolate is perfectly crisp.
Top Tips for Perfecting Your Cookie Dough Truffles
I’ve made these cookie dough truffles so many times that I’ve picked up a few tricks along the way that really make a difference. First, about the flour: toasting it is a small step but it really elevates the flavor and, crucially, makes it safe. I usually do this while I’m gathering my other ingredients. Don’t skip it! When it comes to mixing, remember that gentle is the key. Overmixing can make the texture a little too dense, so stop as soon as everything is just incorporated. You want that delightful, slightly crumbly texture that truly mimics cookie dough. For the chocolate coating, patience is a virtue. Make sure the truffles are well-chilled before dipping. If they’re still a bit soft, the chocolate might melt them slightly, and you won’t get that clean, sharp edge. Also, use a good quality chocolate for dipping; it makes all the difference in flavor and how smoothly it melts. If your chocolate seems too thick, don’t be afraid to add just a tiny bit more coconut oil or vegetable oil to loosen it up. I’ve learned that a little goes a long way. For glaze variations, sometimes I’ll sprinkle a few sea salt flakes on top of the chocolate while it’s still wet – it adds a fantastic sweet-and-salty contrast. And if you want to get creative with the dough itself, adding a touch of cinnamon or even a tiny bit of espresso powder can give it a whole new flavor dimension. I once tried adding a teaspoon of matcha powder, and it was surprisingly delicious!
Storing and Reheating Tips
These cookie dough truffles are pretty forgiving when it comes to storage. If you have any leftovers (which is rare in my house!), you can keep them at room temperature for a day or two, especially if your kitchen isn’t too warm. Just make sure they’re in an airtight container to keep them fresh and prevent them from picking up any unwanted odors. However, I find they’re best stored in the refrigerator. They stay nice and firm, and the chocolate coating stays crisp. Pop them in an airtight container or a zip-top bag, and they’ll stay delicious for up to a week. I’ve even frozen them! If you want to freeze them, make sure the chocolate coating is fully set. Wrap them individually in plastic wrap, then place them in a freezer-safe bag or container. They can last in the freezer for up to 2-3 months. To thaw, just transfer them to the refrigerator overnight. They’ll be just as good as when you first made them. For the glaze timing advice, I always make sure the chocolate is fully set before storing them, whether in the fridge or freezer. This prevents any condensation from affecting the chocolate’s texture.
Frequently Asked Questions
Final Thoughts
Seriously, if you’ve been searching for that perfect little treat that’s easy, delicious, and always a crowd-pleaser, look no further. These cookie dough truffles are my absolute favorite for a reason. They capture that magical flavor of safe-to-eat cookie dough in a perfect, bite-sized package. They’re impressive enough for company but simple enough for a weeknight craving. I hope you give them a try, and when you do, I can’t wait to hear how they turn out for you! Don’t be afraid to experiment with different chocolate coatings or add-ins; that’s part of the fun. If you enjoyed this recipe, you might also love my no-bake chocolate peanut butter bars or my easy fudgy brownie recipe. Happy truffle-making!
cookie dough truffles
Ingredients
Main Ingredients
- 1.25 cup all-purpose flour heat treated
- 4 ounce cream cheese softened
- 0.5 cup unsalted butter softened
- 0.5 cup granulated sugar
- 0.25 cup light brown sugar packed
- 1 teaspoon vanilla extract
- 0.25 teaspoon kosher salt
- 1.25 teaspoon ground cinnamon divided, for dough
- 0.25 teaspoon cream of tartar
- 16 ounce Ghirardelli white chocolate wafers divided
- 0.5 teaspoon ground cinnamon for white chocolate coating
- 2 tablespoons cinnamon-sugar mixture for dusting
Instructions
Preparation Steps
- First, heat treat your all-purpose flour for food safety. Spread the flour on a baking sheet and bake at 300°F (150°C) for 5-7 minutes, or microwave in a microwave-safe bowl on high for 1 minute 15 seconds, stirring halfway. Let it cool completely before using.
- In a large mixing bowl, beat the softened cream cheese and butter with the granulated sugar and light brown sugar until the mixture is smooth and creamy. Use an electric mixer for best results.
- Gradually beat in the heat-treated flour, vanilla extract, kosher salt, 1.25 teaspoons of ground cinnamon, and cream of tartar until a cohesive cookie dough forms.
- Using a small tablespoon scoop (or a 1-tablespoon cookie scoop), portion the dough into small balls. Place these cookie dough balls onto a parchment paper-lined freezer-safe baking sheet.
- Freeze the scooped cookie dough balls for at least 2 hours, or preferably overnight, until they are firm.
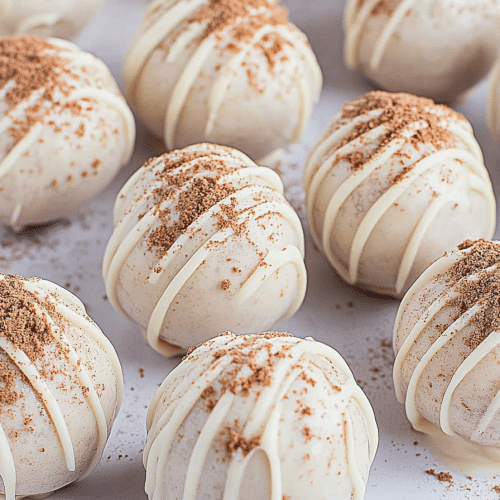
- Melt the white chocolate wafers according to package directions. Remove about 0.25 cup of the melted white chocolate and set aside for later drizzling. To the remaining melted white chocolate, stir in 0.5 teaspoon of ground cinnamon.
- Using a toothpick or a candy dipping tool, dip each frozen truffle into the cinnamon-infused melted white chocolate. Tap the side of the bowl gently to remove any excess chocolate. Place the dipped truffles back onto the parchment-lined baking sheet.
- Once all truffles are coated, pour the reserved 0.25 cup of plain melted white chocolate into a small ziploc sandwich bag. Snip off a tiny corner of the bag and drizzle the white chocolate over the coated truffles.
- Immediately sprinkle the drizzled truffles with the cinnamon-sugar mixture. Allow the truffles to set, which should take about 15 minutes at room temperature, or faster in the refrigerator.
- Store the finished truffles in an airtight container in the refrigerator for up to one week, or in the freezer for up to one month for longer storage.


