Oh, where do I even begin with this chicken parmesan recipe? It’s one of those dishes that just makes my heart sing. You know those meals that instantly transport you back to your childhood kitchen, filled with the aroma of something truly special bubbling away? This is it for me. It’s more than just dinner; it’s a warm hug on a plate, a guaranteed crowd-pleaser, and honestly, my secret weapon for when unexpected guests pop by or when I just need a little something comforting to make the day better. I’ve tried so many versions over the years, but this one… this is the one I always come back to. It’s like the platonic ideal of chicken parm, but I promise, it’s totally doable for any home cook. Forget those fancy, complicated restaurant versions; this chicken parmesan recipe brings all that glorious flavor right to your own table, and it’s surprisingly simple to pull off. If you’ve ever found other chicken parm recipes intimidating, stick with me, because this one’s a game-changer.
Thank you for reading this post, don't forget to subscribe!What is chicken parmesan?
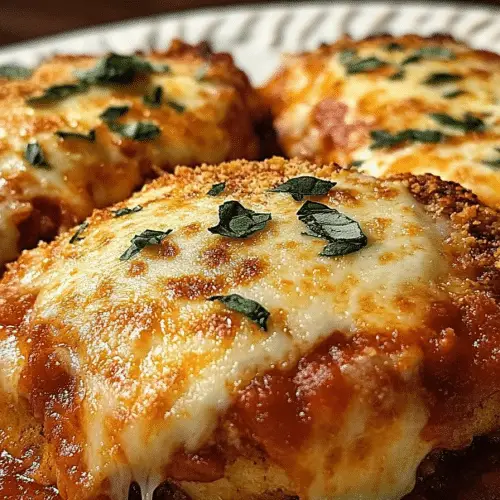
So, what exactly *is* Chicken Parmesan? At its core, it’s a beautiful harmony of tender chicken cutlets, coated in a crispy breading, pan-fried to golden perfection, then bathed in a rich, savory tomato sauce and topped with generous amounts of melted cheese. Think of it as the ultimate comfort food mash-up. The “parmesan” part comes from the finely grated Parmesan cheese that’s usually mixed into the breading, giving it that irresistible salty, nutty kick. It’s the kind of dish that feels luxurious and special, even though the ingredients are pretty straightforward. It’s often compared to dishes like eggplant parm or schnitzel, but there’s something about the combination of juicy chicken, tangy marinara, and gooey mozzarella that just hits different. It’s Italian-American comfort food at its absolute finest, and I’ve found that a really good chicken parmesan recipe is something everyone should have in their back pocket.
Why you’ll love this recipe?
Let me tell you why this Chicken Parmesan recipe is my absolute go-to, and why I think you’re going to fall head over heels for it too. First off, the FLAVOR. Oh. My. Goodness. We’re talking tender, juicy chicken that’s perfectly crispy on the outside, thanks to the double-coating magic I’ll share with you. Then, it’s swimming in a vibrant, homemade (or your favorite store-bought!) marinara sauce that’s just bursting with fresh, bright tomatoey goodness. And the cheese… we’re talking melty, gooey mozzarella and that sharp, salty bite of Parmesan. It’s a symphony of textures and tastes that makes your tastebuds do a happy dance.
Next up: SIMPLICITY. I know, I know, chicken parm can sound a bit involved, but I’ve streamlined this recipe so it’s totally manageable, even on a weeknight. The steps are clear, and the payoff is HUGE. You don’t need fancy equipment or a culinary degree, just a little bit of love and patience. What I love most about this is that it doesn’t require hours of simmering or complex techniques. It’s elegant enough for company but easy enough that I don’t dread making it when the craving strikes.
And let’s talk COST-EFFICIENCY. Chicken Breast is usually a budget-friendly protein, and the other ingredients like tomatoes, breadcrumbs, and cheese are staples most of us have on hand or can grab without breaking the bank. Compared to ordering takeout or going out for chicken parm, this homemade version is incredibly economical.
Finally, VERSATILITY! This isn’t a one-trick pony. While it’s classic served over spaghetti, I’ve also served it with a side of roasted vegetables, tucked into a crusty roll for a killer sandwich, or even just enjoyed on its own. It’s that satisfying and complete. If you’re a fan of comfort food classics like my Baked Ziti recipe or my lasagna bolognese, I’m willing to bet this chicken parmesan recipe will become a staple in your rotation too. It truly is a lifesaver for busy nights when you want something deeply satisfying without a fuss.
How do I make Parmesan Chicken?
Quick Overview
Alright, so the magic behind this incredible chicken parmesan recipe is all about building layers of flavor and texture. We’re going to start by prepping our chicken so it’s perfectly tender and ready to soak up all that deliciousness. Then comes the crucial step of coating it – and trust me, the way we do it here is key to that ultimate crispiness. We’ll pan-fry them until they’re golden brown and beautiful, then nestle them into a luscious tomato sauce, crown them with cheese, and let the oven do its final, glorious work. It’s a simple progression, but each step is designed to maximize flavor and minimize fuss. It’s the kind of dish that makes your kitchen smell heavenly and promises a truly satisfying meal.
Ingredients
For the Chicken Cutlets:
4 boneless, skinless chicken breasts (about 6-8 ounces each)
1 cup all-purpose flour (or gluten-free blend)
2 large eggs, lightly beaten
1 ½ cups Panko breadcrumbs (these give the best crunch!)
½ cup grated Parmesan cheese (the good stuff, please!)
1 teaspoon dried oregano
½ teaspoon garlic powder
Salt and freshly ground black pepper, to taste
Olive oil or vegetable oil, for frying
A note on the chicken: I like to use breasts because they’re readily available and cook quickly. If yours are super thick, I highly recommend pounding them out a bit. This ensures they cook evenly and quickly, preventing the breading from getting too dark before the chicken is cooked through. Just place them between two pieces of plastic wrap or in a resealable bag and gently pound with the flat side of a meat mallet or even a rolling pin. Aim for about ½-inch thickness. For the breadcrumbs, Panko is my absolute favorite for its airy texture and superior crispiness. If you can’t find Panko, regular breadcrumbs will work, but you might not get quite the same crunch. And for the Parmesan, freshly grated makes a world of difference in flavor!
For the Sauce & Topping:
“I don’t know if I’ve ever eaten a better chicken parmesan recipe. The rub alone is wonderful, but the sauce??? Over the top!”
4 cups marinara sauce (store-bought or your favorite homemade)
8 ounces fresh mozzarella cheese, thinly sliced or shredded
¼ cup grated Parmesan cheese, for topping
Fresh basil leaves, for garnish (optional, but highly recommended!)
The sauce is a really personal choice here. If you have a beloved marinara recipe that you swear by, absolutely use it! Otherwise, a good quality store-bought jar is perfectly fine. Look for one with simple ingredients – tomatoes, olive oil, garlic, basil. Avoid ones that are too sweet. For the mozzarella, fresh is best for that incredible melt, but pre-shredded works in a pinch. Just make sure it’s full-fat for the best meltiness!
Step-by-Step Instructions
Step 1: Preheat & Prep Pan
First things first, let’s get our oven preheated to a nice and cozy 400°F (200°C). While it’s heating up, grab a large, oven-safe skillet or a baking dish. If you’re using a skillet, you can lightly grease it or just pour your marinara sauce directly into it later. If you’re using a baking dish, give it a little spray of cooking oil or a thin layer of sauce to prevent sticking. This step ensures everything is ready to go when our chicken is perfectly fried.
Step 2: Mix Dry Ingredients
Now, let’s set up our dredging station. Grab three shallow dishes or plates. In the first one, we’ll put our flour. Make sure it’s seasoned generously with salt and pepper – this is your first layer of flavor! In the second dish, whisk your eggs until they’re nice and frothy. And in the third dish, this is where the magic happens for the coating: combine your Panko breadcrumbs, ½ cup of grated Parmesan cheese, dried oregano, and garlic powder. Give it all a good stir to make sure everything is evenly distributed. This mix is going to give us that incredible golden crust.
Step 3: Mix Wet Ingredients
This step is super simple! Just crack your eggs into a bowl and give them a good whisk with a fork. You want them light and airy, ready to coat the chicken evenly. No need to overthink this part; a quick scramble is all you need. If you’re feeling fancy, you could add a tiny splash of milk or cream, but honestly, plain eggs work beautifully and keep this recipe super accessible.
Step 4: Combine
It’s time to get our chicken ready for its crispy coat! Take one of your pounded chicken cutlets and dredge it in the seasoned flour, making sure to coat both sides and shake off any excess. Then, dip it into the beaten eggs, letting any extra drip off. Finally, press it firmly into the Panko and Parmesan mixture, ensuring it’s completely coated. Repeat this process with all your chicken cutlets. It’s a bit of a hands-on process, but it’s so worth it for that perfect crunchy exterior. Make sure you press the breadcrumbs on well so they adhere properly.
Step 5: Prepare Filling
For the sauce and topping, this step is all about setting yourself up for success. If you’re using a skillet for baking, pour your marinara sauce into the bottom and spread it evenly. If you’re using a baking dish, do the same. This creates a delicious bed for our chicken. Then, arrange your sliced or shredded mozzarella cheese over the sauce. We want it ready to go so we can top our chicken right after frying.
Step 6: Layer & Swirl
Now for the pan-frying! Heat a generous amount of olive oil or vegetable oil in a large skillet over medium-high heat. You want enough oil to coat the bottom generously, about ¼ inch deep. Once the oil is shimmering (test by dropping a tiny piece of breadcrumb – it should sizzle immediately), carefully lay your coated chicken cutlets into the hot oil. Don’t overcrowd the pan; cook in batches if necessary. Fry for about 3-4 minutes per side, until golden brown and crispy. Use tongs to carefully flip them. Once golden, transfer them to a plate lined with paper towels to drain any excess oil. This is where that beautiful golden crust starts to form, and the aroma in your kitchen is just heavenly!
Step 7: Bake
Once your chicken cutlets are beautifully golden and crispy, it’s time to bring it all together. Carefully place the fried chicken cutlets on top of the marinara sauce in your oven-safe skillet or baking dish. Make sure they’re nestled in there nicely. Then, spoon a little extra marinara sauce over the top of each piece of chicken, if you like, and top generously with the sliced or shredded fresh mozzarella. Sprinkle with the remaining ¼ cup of grated Parmesan cheese. Pop the skillet or dish into your preheated oven and bake for about 15-20 minutes, or until the cheese is melted, bubbly, and golden brown, and the chicken is cooked through. You can check for doneness by inserting a thermometer into the thickest part of the chicken; it should read 165°F (74°C).
Step 8: Cool & Glaze
Once the chicken parmesan is out of the oven, let it rest for about 5-10 minutes before serving. This is a crucial step! It allows the juices to redistribute in the chicken, making it even more tender and moist, and it also lets the cheese set up just a little so it doesn’t slide off when you cut into it. While it’s resting, if you’re using fresh basil, chiffonade (thinly slice) some leaves. This little touch adds such a fresh, vibrant contrast to the rich dish.
Step 9: Slice & Serve
And there you have it! Your absolutely stunning, homemade chicken parmesan. For serving, you can either slice each cutlet into manageable pieces or serve them whole. I love to serve it right out of the skillet if I used one – it’s so rustic and inviting. Garnish with those fresh basil leaves for a pop of color and freshness. The aroma alone will have everyone gathered around the table, eagerly awaiting their first bite. It’s truly a sight to behold and a taste that never disappoints!
What to Serve It With
This glorious chicken parmesan recipe is so satisfying on its own, but it also pairs beautifully with a variety of sides that elevate the meal from great to absolutely spectacular. Here are some of my favorite ways to serve it, depending on the occasion and my mood!
For Breakfast: Okay, hear me out on this one! Leftover chicken parm, perhaps a little chopped up and tucked into a fluffy omelet or scrambled eggs, is surprisingly delicious. The savory flavors are a fantastic wake-up call. Alternatively, a small portion on a piece of toasted sourdough with a drizzle of extra marinara could be a decadent weekend breakfast treat. I like to serve it with a strong cup of black coffee to balance the richness.
For Brunch: For a more elegant brunch, I love to serve smaller portions of chicken parm alongside a fresh, crisp green salad with a light vinaigrette. It cuts through the richness beautifully. A side of roasted potatoes or some crusty bread for soaking up any extra sauce is also a winner. For beverages, a crisp white wine like a Pinot Grigio or even some sparkling water with lemon and mint feels just right.
As Dessert: This might sound unconventional, but a small, perfectly cooked chicken parmesan cutlet can be a surprising star on a “savory course” of a multi-course meal, served before a lighter dessert like a panna cotta or a fruit sorbet. The contrast in flavors can be quite exciting for the palate!
For Cozy Snacks: This is where it gets really fun and informal! My kids absolutely devour this chicken parm chopped up and served over crispy tater tots or sweet potato fries – think of it like a gourmet loaded fry situation. Another family favorite is to chop it up and serve it in mini slider buns for chicken parm sliders. It’s the ultimate comfort food snack, perfect for movie nights or casual get-togethers. I always make extra because these disappear fast!
Of course, the most classic pairing is a big pile of spaghetti or linguine tossed with a little extra marinara sauce. My family insists on this, and honestly, I can’t argue. The pasta catches all that extra sauce and cheese, making every bite a delight. We’ve also had it with a side of garlic bread to sop up every last bit of sauce, which is always a hit!
Top Tips for Perfecting Your Chicken Parmesan
Over the years, I’ve learned a few tricks and made a few oopsies that have led me to the perfected chicken parmesan recipe I share with you today. Here are my absolute best tips to help you achieve chicken parm perfection at home:
Chicken Prep: As I mentioned, pounding the chicken breasts to an even ½-inch thickness is non-negotiable in my kitchen. It ensures quick and even cooking, preventing dry chicken or burnt breading. If you don’t have a meat mallet, the bottom of a heavy saucepan or a rolling pin works wonders. Just remember to place the chicken between parchment paper or plastic wrap to keep things clean and prevent tearing.
Mixing Advice: When coating the chicken, really press the breadcrumbs into the chicken after dipping it in the egg. This helps the coating adhere beautifully during frying. Don’t be shy! I also find that letting the coated chicken sit on the wire rack for about 5 minutes before frying can help the breading firm up, leading to an even crispier crust.
“The chicken parmesan recipe turned out amazing. My kids asked for seconds. Saving this one!”
Swirl Customization: This doesn’t strictly apply to chicken parm itself, but if you’re making your own marinara sauce from scratch, don’t be afraid to swirl in a dollop of mascarpone cheese or a touch of cream at the end for added richness. For the cheese topping, I like a mix of fresh mozzarella and a good quality low-moisture mozzarella for the best melt without being too watery. If you want extra cheesy goodness, add a little more Parmesan on top of the mozzarella before baking.
Ingredient Swaps: For a gluten-free version, I’ve had great success using a good quality gluten-free all-purpose flour in place of regular flour, and gluten-free breadcrumbs (or crushed gluten-free crackers) for the coating. The texture might be slightly different, but the flavor will still be fantastic. If you’re not a fan of Panko, regular dried breadcrumbs work, but you might want to toast them lightly in a dry pan before using them to enhance their flavor and crispiness.
Baking Tips: Make sure your oven is fully preheated before the chicken goes in. This is crucial for getting that lovely bubbly, melted cheese. If your mozzarella is browning too quickly, you can always tent the dish loosely with foil for the last few minutes of baking. I usually place my skillet or baking dish on the middle rack of the oven for even cooking. And remember that rest time after baking – it really makes a difference in the final texture of the chicken.
Glaze Variations: While this recipe focuses on a classic marinara, you can absolutely jazz things up! For a bit of a kick, add a pinch of red pepper flakes to your marinara sauce. Or, for a slightly richer sauce, stir in a tablespoon of tomato paste along with your marinara. Sometimes, I’ll even add a splash of red wine to the sauce while it’s simmering (if I’m making it from scratch) for an extra layer of depth.
Storing and Reheating Tips
The best part about this chicken parmesan recipe (besides eating it, of course!) is that it reheats beautifully. It’s one of those dishes that’s almost as good the next day. Here’s how I like to store and reheat leftovers to keep them tasting as fresh and delicious as possible:
Room Temperature: Honestly, I rarely leave cooked chicken parm sitting out for more than two hours. It’s best to get it into the fridge or freezer before it has a chance to cool down too much. If it’s a quick snack before it goes into storage, just cover it loosely.
Refrigerator Storage: Once the chicken parm has cooled to room temperature, transfer it to an airtight container. You can layer it with parchment paper if you want to prevent the breading from getting too soggy, especially if you have extra sauce. It will keep well in the refrigerator for up to 3-4 days. The breading might soften a bit, but the flavor will still be amazing.
Freezer Instructions: If you know you won’t get to your leftovers within a few days, freezing is a great option. Let the chicken parm cool completely. You can freeze individual portions or the whole dish. Wrap each piece tightly in plastic wrap, then in aluminum foil, or place in a freezer-safe airtight container. It will last in the freezer for up to 2-3 months. To thaw, transfer it to the refrigerator overnight.
Glaze Timing Advice: For refrigerator storage, I usually keep the sauce and cheese on top. When reheating, I might add a tiny splash of extra marinara sauce if it looks a bit dry. For freezing, I often store the chicken parm without the extra sauce and cheese. When reheating from frozen, I’ll place the thawed chicken in a baking dish, add a bit of marinara sauce, top with cheese, and then bake until heated through and bubbly. This helps maintain the integrity of the breading.
Reheating Method: My favorite way to reheat is in a 375°F (190°C) oven for about 15-20 minutes, or until heated through and the cheese is bubbly again. This helps crisp up the breading. If you’re in a rush, you can reheat individual portions in the microwave, but the breading won’t be as crispy. You can also pop it in a toaster oven or even an air fryer for a few minutes for extra crispiness.
Frequently Asked Questions
Final Thoughts
So there you have it – my absolute favorite chicken parmesan recipe. I truly believe that this is the kind of dish that brings people together, filling your home with incredible aromas and even better memories. It’s simple enough for a weeknight but impressive enough for company, and the flavors are just unbeatable. The crispy chicken, the rich marinara, the gooey cheese… it’s a classic for a reason, and I’m so excited for you to try it and see why I love it so much. It’s the perfect antidote to a long day, a guaranteed hit with kids and adults alike, and honestly, just pure comfort on a plate.
If you’re a fan of this recipe, you might also enjoy my other Italian-inspired dishes like my simple yet flavorful chicken piccata or my creamy garlic butter chicken. They’re all about bringing those comforting, delicious flavors into your home kitchen with ease.
I can’t wait to hear how your chicken parmesan turns out! Please leave a comment below with your thoughts, any variations you tried, or how much your family loved it. And if you snap a picture, don’t forget to share it – I love seeing your culinary creations! Happy cooking!
Chicken Parmesan Recipe
Ingredients
Chicken and Breading
- 4 boneless, skinless chicken breasts chicken breasts
- 0.5 cup all-purpose flour
- 2 large eggs eggs beaten
- 1 cup Italian breadcrumbs
- 0.5 cup grated Parmesan cheese
- 0.5 teaspoon salt
- 0.25 teaspoon black pepper
- 3 tablespoons olive oil for frying
Sauce and Cheese
- 2 cups marinara sauce
- 8 ounces shredded mozzarella cheese
- 0.25 cup grated Parmesan cheese for topping
Instructions
Preparation Steps
- Preheat oven to 400°F (200°C).
- If chicken breasts are thick, pound them to an even thickness.
- Set up three shallow dishes: one with flour, one with beaten eggs, and one with breadcrumbs mixed with 0.5 cup Parmesan cheese, salt, and pepper.
- Dredge each chicken breast in flour, then dip in egg, and finally coat with breadcrumb mixture.
- Heat olive oil in a large oven-safe skillet over medium-high heat.
- Sear chicken breasts for 2-3 minutes per side until golden brown. You may need to do this in batches.
- Pour marinara sauce over the chicken in the skillet. Top with shredded mozzarella and remaining Parmesan cheese.
- Transfer skillet to the preheated oven and bake for 15-20 minutes, or until chicken is cooked through and cheese is melted and bubbly.
- Let stand for a few minutes before serving.


