You know those nights, right? The ones where you’re completely wiped, the fridge looks a little sad, and the thought of intricate meal prep makes you want to order pizza for the third time this week. Yeah, I’ve been there. A LOT. And that’s exactly when this enchilada bake swoops in like a culinary superhero. It’s honestly one of my absolute favorite comfort foods. Forget rolling individual enchiladas; this is the lazy (but brilliant!) shortcut that tastes just as incredible, if not better. My kids practically do a happy dance when they see me pulling the ingredients out, and my husband always says it’s his favorite weeknight meal. It’s kind of like a lasagna, but with all the vibrant flavors of Mexico – a delicious mashup that’s become a staple in our home. If you’ve ever loved a hearty casserole, you’re going to fall head over heels for this simple yet utterly satisfying enchilada bake.
Thank you for reading this post, don't forget to subscribe!What is Enchilada Bake?
So, what exactly *is* an enchilada bake? Think of it as deconstructed enchiladas, all baked together in one glorious pan. Instead of rolling up tortillas and filling them individually (which, let’s be honest, can be a bit of a production!), we’re layering everything up. We’ve got the soft corn tortillas, a rich, savory filling (usually seasoned ground meat or beans), a luscious enchilada sauce, and of course, plenty of melty cheese. All of that gets baked until it’s bubbly, golden, and utterly irresistible. It’s got all the heart and soul of traditional enchiladas but with a fraction of the effort. It’s the kind of dish that feels like a warm hug on a plate, perfect for feeding a crowd or just making sure you have amazing leftovers for days. It’s humble, it’s delicious, and it’s ridiculously easy.
Why you’ll love this recipe?
Honestly, there are so many reasons why this enchilada bake has earned its permanent spot in my recipe rotation. First off, the FLAVOR! Even though it’s simple, the combination of spices, the savory filling, the tangy sauce, and the gooey cheese is just divine. It hits all the right notes, every single time. And speaking of simple, that’s the other huge win here. I’m talking minimal chopping, mostly just dumping and layering. This is a lifesaver on those crazy weeknights when I’m rushing from soccer practice to homework help. Plus, it’s incredibly COST-EFFECTIVE. The ingredients are all pantry staples or easily found at any grocery store, making it a budget-friendly option that doesn’t skimp on taste. And VERSATILITY? Oh yeah. You can swap out the protein, add extra veggies, make it vegetarian – it’s incredibly forgiving. What I love most about this particular enchilada bake is that it doesn’t feel like a compromise. It’s genuinely as satisfying and flavorful as any fancier meal, but it’s also one of the easiest things I make. If you’ve ever loved my Cheesy Chicken Broccoli Casserole, you’ll appreciate the similar comfort food vibe but with a totally different, zesty flavor profile.
How do you make Enchilada Bake?
Quick Overview
The beauty of this enchilada bake lies in its straightforward approach. We’ll brown some seasoned meat (or use your favorite beans), mix up a quick sauce base if you’re not using store-bought, layer everything with tortillas and cheese in a baking dish, and let the oven do the rest. It’s truly that simple. The key is layering to get those perfect pockets of flavor and that gorgeous, bubbly top. You can prep most of this ahead of time, which is a game-changer for busy households. It’s a recipe that just keeps on giving, delivering maximum deliciousness for minimum effort.
Ingredients
For the main layer:
1 pound Ground Beef or turkey (you can totally use plant-based crumbles or black beans here too!)
1 tablespoon olive oil
1 medium onion, finely chopped
2 cloves garlic, minced
1 teaspoon chili powder
1/2 teaspoon cumin
1/4 teaspoon dried oregano
Salt and freshly ground black pepper to taste
8-10 corn tortillas, cut into 1-inch strips or squares (I find cutting them makes them easier to layer evenly)
2 cups shredded Monterey Jack cheese (or a Mexican blend!)
1 cup shredded cheddar cheese
For the Sauce:
1 (15 ounce) can red enchilada sauce (or my homemade version below if you’re feeling ambitious!)
1/2 cup Sour Cream (or plain Greek yogurt for a lighter option)
1/4 cup milk (any kind works, I’ve even used almond milk and it was surprisingly creamy!)
1 tablespoon chopped fresh cilantro (optional, but it adds a lovely freshness)
Step-by-Step Instructions
Step 1: Preheat & Prep Pan
First things first, get that oven preheating to 375°F (190°C). While it’s warming up, lightly grease a 9×13 inch baking dish. You don’t need anything fancy, just a quick spray of cooking oil or a little butter will do the trick to prevent any sticking.
“Packed with flavor and so simple. Exactly what I wanted from this Chicken Enchilada Bake Easy Weeknight Meal!”
Step 2: Mix Dry Ingredients
Okay, here’s where we build that savory foundation. Heat the Olive oil in a large skillet over medium-high heat. Add the chopped onion and cook until it’s softened and translucent, about 5-7 minutes. Toss in the minced garlic and cook for another minute until fragrant – be careful not to burn it! Now, add your ground meat (or plant-based crumbles/beans) to the skillet. Break it up with a spoon and cook until it’s nicely browned. Drain off any excess grease. Stir in the chili powder, cumin, oregano, salt, and pepper. Cook for another minute, letting those spices really bloom and coat the meat. This step is crucial for building depth of flavor!
Step 3: Mix Wet Ingredients
In a medium bowl, whisk together the enchilada sauce, Sour Cream (or Greek yogurt), milk, and fresh cilantro (if using). You want this to be smooth and well combined. The sour cream and milk make the sauce a little creamier and less intense, which is perfect for a bake like this. It creates this lovely, rich texture that coats everything beautifully.
Step 4: Combine
Now, let’s bring it all together in the skillet. Pour about half of the sauce mixture over the browned meat and stir until everything is well coated. You want it to look saucy and delicious, not dry. This is also the stage where I’d taste and adjust the seasoning if needed – maybe a pinch more salt or a dash more chili powder if you like it spicier.
Step 5: Prepare Filling
This step is essentially done in Step 4 when you combine the meat mixture with half the sauce. So, your filling is ready to go! Make sure it’s evenly distributed in the skillet.
Step 6: Layer & Swirl
Time to assemble this beauty! Spread about half of the tortilla strips evenly over the bottom of your prepared baking dish. Then, spoon about half of the meat and sauce mixture over the tortillas. Sprinkle about a third of the shredded cheese over the meat layer. Repeat with another layer of tortilla strips, the remaining meat mixture, and another third of the cheese. Finally, pour the remaining enchilada sauce mixture evenly over the top layer of tortillas and meat. Sprinkle the rest of the cheese over everything. For a little extra visual appeal and flavor distribution, you can gently swirl the sauce into the top layer of cheese with a spoon or a knife, but don’t overthink it!
Step 7: Bake
Pop that dish into your preheated oven. Bake for 25-30 minutes, or until it’s heated through, bubbly around the edges, and the cheese on top is melted and starting to turn golden brown. If the cheese is browning too quickly, you can loosely tent it with foil for the last 10 minutes of baking. The aroma that fills your kitchen at this stage is just heavenly!
Step 8: Cool & Glaze
Once it’s out of the oven, let this amazing enchilada bake rest for about 5-10 minutes before slicing. This is important! It allows everything to set up a bit, so it doesn’t turn into a soupy mess when you cut into it. The sauce will thicken slightly as it cools.
Step 9: Slice & Serve
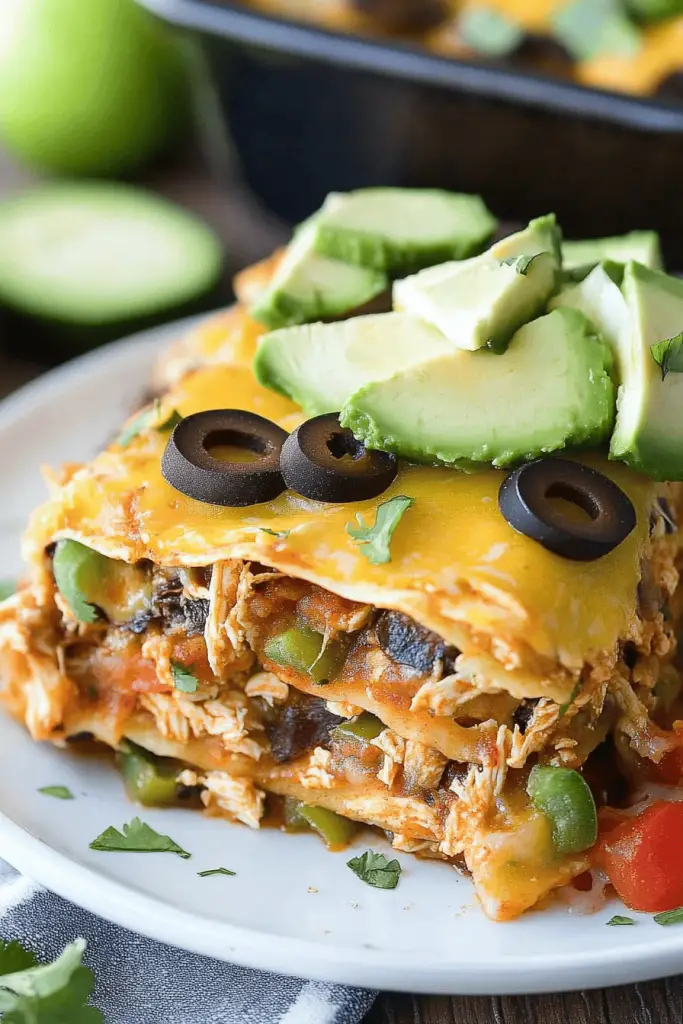
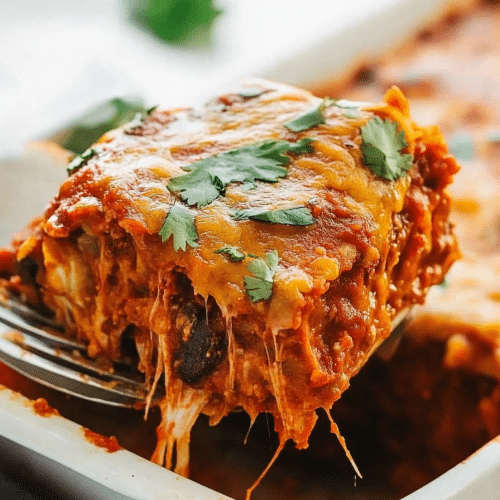
Cut into generous squares and serve immediately. It’s best enjoyed warm, fresh from the oven, when the cheese is gooey and everything is perfectly melded together. A little sprinkle of fresh cilantro on top just makes it sing!
“The Chicken Enchilada Bake Easy Weeknight Meal turned out amazing. My kids asked for seconds. Saving this one!”
What to Serve It With
This enchilada bake is honestly a meal in itself, but it also plays wonderfully with a few friends! For a hearty BREAKFAST, I love serving a smaller portion alongside some scrambled eggs and maybe a dollop of salsa. It’s surprisingly satisfying and the flavors just work. For a more festive BRUNCH, I’ll often serve it with a side of black beans, some fresh pico de gallo, and maybe a light, zesty lime crema for drizzling. It feels celebratory without being fussy. As a sweet DESSERT after the meal? Well, this is a savory dish, but if you’re looking for something sweet to round things out, I’d pair it with some fresh fruit salad or a light, citrusy sorbet – something to cleanse the palate. For COZY SNACKS, a small slice is perfect with a side of Tortilla Chips and extra salsa or guacamole. My family loves having leftovers for lunch the next day, especially heated up and topped with a fried egg. We also have a tradition of making a big batch for game nights, and it’s always the first thing to disappear!
Top Tips for Perfecting Your Enchilada Bake
I’ve made this enchilada bake more times than I can count, and over the years, I’ve picked up a few tricks that make it even better. First, regarding the tortillas: while you can use them whole, cutting them into strips or squares (about 1-inch pieces) really helps them absorb the sauce better and makes for a more evenly cooked, layered dish. Don’t be afraid to really saturate them with the sauce mixture. For the meat mixture, if you’re using Ground Beef, browning it well and draining the fat is key to a cleaner flavor. Don’t skip the spices – they’re what give it that authentic enchilada taste! I’ve found that using a good quality store-bought enchilada sauce is perfectly fine and keeps this super quick, but if you have a favorite homemade recipe, go for it! When it comes to cheese, don’t be shy! Monterey Jack is my go-to for its meltability, but a blend with cheddar adds a nice sharpness. I’ve tested various cheese combinations and they all work beautifully. If you’re looking to cut down on richness, using plain Greek yogurt instead of sour cream in the sauce is a fantastic swap, and you honestly can’t tell the difference. Baking time can vary a bit depending on your oven, so always keep an eye on it. You’re looking for that bubbly, golden-brown perfection. And the resting period after baking? It’s non-negotiable! It makes all the difference in the final texture. If you find your tortillas are a little too stiff, you can quickly warm them in a dry skillet or microwave for a few seconds before layering; this makes them more pliable. Lastly, for an extra layer of flavor, I sometimes add a can of drained and rinsed black beans or corn to the meat mixture. It’s a simple way to add texture and nutrition!
Storing and Reheating Tips
The best part about this enchilada bake, besides its incredible taste, is how well it stores and reheats. If you happen to have any leftovers (which is rare in my house!), you can keep it covered tightly with plastic wrap or foil at ROOM TEMPERATURE for no more than 2 hours. For longer storage, pop it into the REFRIGERATOR. I usually store it in the same baking dish, making sure it’s well covered, and it stays delicious for up to 3-4 days. The flavors actually meld and deepen overnight, making it even tastier the next day! If you want to FREEZE this, make sure it’s completely cooled first. Wrap the entire dish tightly in a couple of layers of plastic wrap, then a layer of aluminum foil. It should keep well in the freezer for up to 2-3 months. When you’re ready to reheat, the best method for a refrigerated portion is to pop it back into a 350°F (175°C) oven for about 20-30 minutes, or until heated through. For a frozen portion, it’s best to thaw it in the refrigerator overnight first, then reheat as above. If you’re in a real rush, you can reheat smaller portions directly in the microwave, just be careful not to overheat it, as it can dry out. For the glaze, I typically apply it right before baking. If I’m storing leftovers, I’ll reheat the bake without the final cheese topping and then add fresh cheese and a little more sauce before reheating for that freshly baked goodness.
Frequently Asked Questions
Final Thoughts
Seriously, if you’re looking for a meal that’s big on flavor but wonderfully low on effort, this enchilada bake is your answer. It’s the kind of recipe that makes you feel like a kitchen rockstar without breaking a sweat. It’s comforting, it’s satisfying, and it’s so incredibly adaptable. Whether you’re feeding a hungry family, hosting a casual get-together, or just craving some serious comfort food, this dish delivers every single time. It’s proof that delicious doesn’t have to be complicated. If you enjoy this recipe, you might also love my Speedy Skillet Enchiladas or my Baked Chicken Chimichangas for more Tex-Mex inspired goodness! Give this enchilada bake a try – I promise you won’t be disappointed. I can’t wait to hear how yours turns out and what delicious variations you come up with! Happy baking!
enchilada bake
Ingredients
Main Ingredients
- 2 cups cooked, shredded chicken breast
- 2.5 cups red enchilada sauce (store-bought or homemade)
- 2 cups shredded Mexican cheese blend
- 8 small flour tortillas (6-inch diameter, corn tortillas also work for gluten-free)
- 1 can refried beans (15 ounces)
Optional Garnishes
- 0.5 cup fresh cilantro chopped
- sour cream or plain Greek yogurt
- diced avocado or guacamole
Instructions
Preparation Steps
- Preheat your oven to 375°F (190°C). Lightly grease a 9x9 inch (or similar sized) baking dish.
- Spread about 0.5 cup of the enchilada sauce evenly across the bottom of the prepared baking dish. This helps prevent sticking and adds flavor to the first layer.
- Place two tortillas in the baking dish, overlapping them slightly to cover the entire bottom surface.
- Evenly spread about 0.5 can of the refried beans over the tortillas. Top with 1 cup of the shredded chicken, 0.75 cup of the shredded Mexican cheese, and another 0.75 cup of enchilada sauce.
- Repeat the layering process: place two more tortillas, then spread the remaining refried beans, remaining chicken, 0.75 cup cheese, and 0.75 cup sauce.
- Place the final two tortillas on top. Pour the remaining enchilada sauce over them and sprinkle with the last 0.5 cup of shredded cheese.
- Cover the baking dish loosely with aluminum foil (you can spray the underside of the foil with cooking spray to prevent cheese from sticking). Bake for 25 minutes.
- Remove the foil and bake for an additional 10-15 minutes, or until the cheese is melted, bubbly, and slightly golden, and the sauce is simmering.
- Let the enchilada bake rest for at least 10-15 minutes before slicing and serving. This allows it to set up and makes it easier to serve. Garnish with fresh cilantro, sour cream, or avocado if desired.


