Home » Breakfast » Page 2
Baked Feta Eggs

If you’re looking for a quick, savory breakfast or brunch dish that feels a little fancy, these Baked Feta Eggs are a game-changer! With creamy, tangy feta cheese, perfectly baked eggs, and simple seasonings, this dish is full of flavor with minimal effort. It’s perfect for a weekend brunch or a quick weekday breakfast, and it pairs wonderfully with toast, fresh herbs, or a side of roasted veggies. Once you try it, you’ll see why it’s become a new breakfast obsession!

Baked Feta Eggs


Why You’ll Love These Baked Feta Eggs

  • Quick and Easy: Ready in just 20 minutes—great for busy mornings.
  • Creamy and Savory: The melted feta adds a tangy richness that elevates the eggs.
  • Versatile: Customize with herbs, spices, or add-ins to suit your taste.
  • One-Pan Wonder: Less cleanup and perfect for sharing.
  • Healthy and Satisfying: A protein-packed breakfast that keeps you full.

Ingredients

  • 4 large eggs
  • ½ cup (100g / 0.22 lb) crumbled feta cheese
  • 2 tbsp olive oil
  • 1 tsp garlic powder
  • 1 tsp dried oregano or thyme
  • Salt and pepper, to taste
  • Optional: Red pepper flakes for heat
  • Optional toppings: Fresh parsley, dill, or cherry tomatoes

Baked Feta Eggs


Directions

  1. Preheat the Oven:
    Preheat your oven to 375°F (190°C). Lightly grease a small baking dish or oven-safe skillet with olive oil.
  2. Add the Feta and Seasonings:
    Spread the crumbled feta evenly across the bottom of the baking dish. Drizzle with olive oil and sprinkle garlic powder, oregano (or thyme), salt, and pepper over the top.
  3. Add the Eggs:
    Crack the eggs over the feta, spacing them evenly. Season the eggs with a pinch of salt, pepper, and red pepper flakes if you like a bit of heat.
  4. Bake:
    Place the dish in the preheated oven and bake for 10-12 minutes, or until the egg whites are set but the yolks are still runny. If you prefer firmer yolks, bake for an additional 2-3 minutes.
  5. Garnish and Serve:
    Remove from the oven and sprinkle with fresh parsley or dill. Serve immediately with toasted bread, pita, or a side of roasted vegetables.

Notes

  • Cooking Time: Adjust the baking time to your preferred egg consistency—shorter for runny yolks, longer for firmer eggs.
  • Add Veggies: Toss in some cherry tomatoes, spinach, or bell peppers for added flavor and color.
  • No Feta? Use goat cheese or ricotta as a creamy alternative.
  • Make It Spicy: Add a drizzle of hot sauce or more red pepper flakes for extra kick.
  • Storage Tip: Store leftovers in an airtight container in the fridge for up to 2 days. Reheat in the oven or microwave.

Frequently Asked Questions

Can I make this dish ahead of time?
It’s best enjoyed fresh, but you can prep the feta and seasoning mixture in advance. Just crack the eggs in before baking.

Can I use a cast-iron skillet?
Absolutely! A small cast-iron skillet works wonderfully and helps retain heat.

What can I serve with baked feta eggs?
This dish pairs perfectly with toasted bread, pita, avocado, or roasted potatoes.

How do I keep the eggs from overcooking?
Check the eggs at the 10-minute mark and keep an eye on them to ensure the yolks stay runny if that’s your preference.

Can I use egg whites only?
Yes, but the texture will be slightly different—less rich without the yolks.


Tips and Notes

  • My Tip: For a Mediterranean twist, add a handful of olives or sun-dried tomatoes.
  • Pro Trick: Broil the dish for the last 1-2 minutes to get the edges crispy and the feta lightly browned.
  • Serving Suggestion: Enjoy with a drizzle of extra olive oil and a squeeze of lemon for a bright, fresh finish.

Baked Feta Eggs


Variations

  • Mediterranean Baked Feta Eggs: Add kalamata olives, cherry tomatoes, and a sprinkle of basil.
  • Spicy Shakshuka-Style Eggs: Add harissa or chili paste and some sautéed onions and peppers.
  • Herbed Delight: Use a mix of fresh herbs like thyme, dill, and basil for a more aromatic dish.
  • Pesto Baked Eggs: Add a spoonful of pesto on top for a vibrant flavor.
  • Cheesy Mix: Combine feta with mozzarella or Parmesan for extra cheesiness.
    Baked Feta Eggs

    Baked Feta Eggs

    This Baked Feta Eggs recipe is an easy, flavorful breakfast or brunch dish inspired by Mediterranean flavors. Creamy feta cheese melts beautifully in the oven with eggs, cherry tomatoes, and herbs, creating a savory and satisfying meal. With just one dish and minimal prep, this recipe is perfect for busy mornings or a simple weekend treat.
    Prep Time 5 minutes
    Cook Time 15 minutes
    0 minutes
    Total Time 20 minutes
    Course Breakfast, Brunch
    Cuisine Mediterranean
    Servings 1 4

    Ingredients
      

    • 4 large eggs
    • ½ cup 0.25 lb crumbled feta cheese
    • 1 cup 0.5 lb cherry tomatoes, halved
    • 2 tablespoons 0.1 lb olive oil
    • 1 teaspoon dried oregano
    • ½ teaspoon red pepper flakes optional
    • Salt and black pepper to taste
    • Chopped parsley for garnish optional

    Instructions
     

    Step 1: Preheat the Oven

    • Preheat the oven to 375°F (190°C).

    Step 2: Prepare the Baking Dish

    • In a small baking dish or oven-safe skillet, drizzle 1 tablespoon of olive oil to lightly coat the bottom.

    Step 3: Assemble the Ingredients

    • Scatter the crumbled feta cheese and cherry tomato halves evenly across the dish.
    • Sprinkle oregano, salt, black pepper, and red pepper flakes (if using) over the top.

    Step 4: Add the Eggs

    • Crack the eggs directly into the baking dish, spacing them evenly.

    Step 5: Bake the Eggs

    • Drizzle the remaining 1 tablespoon of olive oil over the top.
    • Bake for 12–15 minutes, or until the egg whites are set but the yolks are still slightly runny.

    Step 6: Serve and Enjoy

    • Remove from the oven and garnish with chopped parsley, if desired. Serve warm with crusty bread or toast.

    Notes

    • Storage: Store leftovers in an airtight container in the fridge for up to 2 days. Reheat in the oven or microwave.
    • Variations: Add spinach, olives, or sautéed onions for extra flavor.
    • Serving Tip: Pair with pita bread or a light side salad for a complete meal.
    Tried this recipe?Let us know how it was!
0 FacebookTwitterPinterestEmail
Cinnamon Roll Pancakes

Why choose between pancakes and cinnamon rolls when you can have both? These Cinnamon Roll Pancakes combine the fluffy goodness of pancakes with the sweet, swirly magic of cinnamon rolls. Drizzled with a luscious cream cheese glaze, these pancakes are perfect for special breakfasts, weekend brunches, or whenever you’re in the mood for something indulgent. It’s like dessert for breakfast—and nobody’s complaining!

Cinnamon Roll Pancakes


Why You’ll Love These Cinnamon Roll Pancakes

  • Best of Both Worlds: Fluffy pancakes meet sweet cinnamon rolls in this decadent combo.
  • Easy to Make: A few simple steps turn regular pancakes into something magical.
  • Perfect for Brunch: Great for holidays, birthdays, or cozy weekend mornings.
  • Kid-Friendly: Fun swirls and sweet glaze make these a family favorite.
  • Customizable: Adjust the cinnamon swirl or glaze to your liking!

Ingredients

Pancake Batter

  • 1 ½ cups (190g / 0.42 lb) all-purpose flour
  • 3 ½ tsp baking powder
  • 1 tbsp sugar
  • ¼ tsp salt
  • 1 ¼ cups (300ml) milk
  • 1 large egg
  • 3 tbsp melted butter

Cinnamon Swirl

  • ¼ cup (60g / 0.13 lb) unsalted butter, melted
  • ½ cup (100g / 0.22 lb) brown sugar, packed
  • 1 tbsp ground cinnamon

Cream Cheese Glaze

  • 4 oz (115g) cream cheese, softened
  • ¼ cup (30g / 0.07 lb) powdered sugar
  • 2 tbsp milk
  • ½ tsp vanilla extract


Directions

Step 1: Make the Cinnamon Swirl

In a small bowl, mix the melted butter, brown sugar, and cinnamon until smooth. Transfer the mixture to a piping bag or a zip-top bag with the corner snipped off. Set aside.

Step 2: Prepare the Pancake Batter

In a large bowl, whisk together the flour, baking powder, sugar, and salt. In a separate bowl, whisk the milk, egg, and melted butter. Pour the wet ingredients into the dry ingredients and stir until just combined (a few lumps are okay).

Step 3: Make the Pancakes

Heat a non-stick skillet or griddle over medium heat. Grease lightly with butter or oil. Pour about ¼ cup of pancake batter onto the skillet.

Immediately pipe a swirl of the cinnamon mixture onto the pancake, starting from the center and working outward.

Cook for 2-3 minutes, or until bubbles form on the surface. Flip carefully and cook for another 1-2 minutes until the pancake is cooked through. Repeat with the remaining batter.

Step 4: Make the Cream Cheese Glaze

While the pancakes cook, beat the cream cheese, powdered sugar, milk, and vanilla extract until smooth. If needed, add more milk to reach your desired drizzle consistency.

Step 5: Serve

Stack the pancakes on a plate and drizzle generously with the cream cheese glaze. Enjoy every bite of these swirly, cinnamon-sugar pancakes!


Notes

  • Make-Ahead Tip: The cinnamon swirl mixture can be made ahead and stored in the fridge. Just warm it slightly before using.
  • No Piping Bag? A zip-top bag works perfectly—just snip off a small corner.
  • Storage Tips: Store leftover pancakes in the fridge for up to 2 days. Reheat in the microwave or toaster.
  • Extra Flavor: Add a pinch of nutmeg or cardamom to the cinnamon swirl for a more complex spice profile.

Frequently Asked Questions

Can I freeze these pancakes?
Yes! Freeze them in a single layer, then transfer to a freezer bag. Reheat in the toaster or microwave.

What if my cinnamon swirl leaks?
That’s totally okay! Any swirl that escapes will caramelize into a delicious sugary crust on the pancake.

Can I use a different glaze?
Absolutely! A simple powdered sugar and milk glaze works if you’re short on cream cheese.

Can I make these gluten-free?
Yes! Use a 1:1 gluten-free flour blend for the batter.

What other toppings go well?
Try chopped pecans, whipped cream, or even a drizzle of maple syrup on top.


Tips and Notes

  • My Tip: For perfect swirls, let the pancake cook slightly before adding the cinnamon mixture—it will stay in place better.
  • Pro Trick: Don’t overmix the pancake batter—keeping some lumps makes for fluffier pancakes.
  • Serving Suggestion: Serve with crispy bacon or sausage for a sweet-and-savory breakfast feast.

Variations

  • Chocolate Cinnamon Roll Pancakes: Add a handful of chocolate chips to the batter for an extra indulgent version.
  • Pumpkin Cinnamon Pancakes: Mix pumpkin puree and pumpkin spice into the batter for a fall-inspired twist.
  • Caramel Drizzle: Swap the cream cheese glaze with caramel sauce for a decadent treat.
  • Nutty Pancakes: Sprinkle chopped pecans or walnuts on top for extra texture.
  • Apple Cinnamon Pancakes: Add sautéed cinnamon apples between layers for an apple-pie-inspired breakfast.
    Cinnamon Roll Pancakes

    Cinnamon Roll Pancakes

    These Cinnamon Roll Pancakes bring together two beloved breakfast treats in one delicious dish. Swirled with cinnamon-sugar goodness and topped with a creamy glaze, these pancakes taste just like a cinnamon roll but are much easier to make. Perfect for special breakfasts or weekend brunches, these pancakes are sure to impress!
    Prep Time 15 minutes
    Cook Time 10 minutes
    0 minutes
    Total Time 43 minutes
    Course Breakfast, Brunch
    Cuisine American
    Servings 2 10

    Ingredients
      

    For the Pancakes

    • 1 ½ cups 0.75 lb all-purpose flour
    • 3 ½ teaspoons baking powder
    • ½ teaspoon salt
    • 1 tablespoon 0.06 lb sugar
    • 1 ¼ cups 0.31 lb whole milk
    • 1 large egg
    • 3 tablespoons 0.15 lb unsalted butter, melted

    For the Cinnamon Swirl

    • ¼ cup 0.12 lb unsalted butter, melted
    • cup 0.15 lb brown sugar
    • 1 tablespoon ground cinnamon

    For the Cream Cheese Glaze

    • 2 oz 0.12 lb cream cheese, softened
    • ½ cup 0.12 lb powdered sugar
    • 2 tablespoons 0.1 lb milk
    • ½ teaspoon vanilla extract

    Instructions
     

    Step 1: Make the Pancake Batter

    • In a large bowl, whisk together the flour, baking powder, salt, and sugar.
    • In another bowl, combine the milk, egg, and melted butter.
    • Pour the wet ingredients into the dry ingredients and whisk until just combined (a few lumps are okay). Set the batter aside while you prepare the cinnamon swirl.

    Step 2: Prepare the Cinnamon Swirl

    • In a small bowl, mix the melted butter, brown sugar, and cinnamon until smooth.
    • Transfer the mixture to a piping bag or a zip-top bag with the corner snipped off.

    Step 3: Make the Cream Cheese Glaze

    • In another bowl, whisk together the softened cream cheese, powdered sugar, milk, and vanilla extract until smooth. Set aside.

    Step 4: Cook the Pancakes

    • Heat a non-stick skillet or griddle over medium heat and lightly grease it with butter.
    • Pour ¼ cup of pancake batter onto the skillet.
    • Immediately pipe a swirl of the cinnamon mixture onto the pancake.
    • Cook for 2–3 minutes on the first side, then flip and cook for another 1–2 minutes until golden brown.

    Step 5: Serve and Enjoy

    • Drizzle the warm pancakes with the cream cheese glaze and serve immediately.

    Notes

    • Storage: Store leftover pancakes in an airtight container in the refrigerator for up to 2 days. Reheat in a skillet or microwave.
    • Make-Ahead Tip: Prepare the cinnamon swirl mixture and glaze the night before for quicker breakfast prep.
    • Variation: Swap cream cheese glaze with maple syrup for a simpler option.
    • Serving Idea: Serve with fresh fruit or crispy bacon on the side for a complete breakfast.
    Tried this recipe?Let us know how it was!
0 FacebookTwitterPinterestEmail
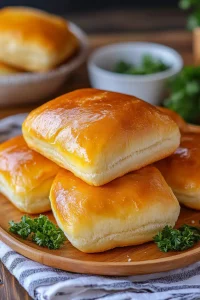
Hawaiian Roll French Toast

Say goodbye to ordinary French toast and hello to this Hawaiian Roll French Toast! Soft, fluffy Hawaiian rolls soaked in a rich, custardy mixture, then pan-fried to golden perfection—it’s the ultimate indulgent breakfast. With a touch of sweetness from the rolls and a hint of vanilla and cinnamon in the batter, this recipe takes French toast to the next level. Whether you’re making a weekend brunch or a special breakfast, these little bites will wow your family and friends!

Hawaiian Roll French Toast


Why You’ll Love This Hawaiian Roll French Toast

  • Soft and Fluffy: Hawaiian rolls soak up the custard perfectly, making each bite soft and tender.
  • Slightly Sweet: The natural sweetness from the rolls adds an extra layer of flavor.
  • Easy to Make: A quick and simple recipe that’s ready in no time.
  • Perfect for Brunch: Great for a special breakfast, brunch, or even a fun dessert.
  • Customizable: Top it with syrup, fruits, whipped cream, or powdered sugar.

Ingredients

  • 12 Hawaiian rolls
  • 4 large eggs
  • 1 cup (240ml) milk (whole or any milk of choice)
  • 2 tbsp sugar
  • 1 tsp vanilla extract
  • ½ tsp ground cinnamon
  • ¼ tsp salt
  • 2 tbsp butter (for cooking)

Optional Toppings

  • Maple syrup
  • Powdered sugar
  • Fresh berries
  • Whipped cream


Directions

  1. Prepare the Custard:
    In a large bowl, whisk together the eggs, milk, sugar, vanilla extract, cinnamon, and salt until smooth.
  2. Soak the Rolls:
    Slice the Hawaiian rolls in half, keeping the tops and bottoms together. Dip each roll half into the egg mixture, letting it soak for about 10-15 seconds. Make sure the rolls are fully coated but not overly soggy.
  3. Cook the French Toast:
    Heat 1 tablespoon of butter in a large skillet or griddle over medium heat. Place the soaked rolls on the skillet and cook for 2-3 minutes per side, or until golden brown and crisp on the outside. Repeat with the remaining rolls, adding more butter as needed.
  4. Serve:
    Transfer the French toast rolls to a serving platter. Top with your favorite toppings like maple syrup, powdered sugar, berries, or whipped cream.

Notes

  • Make It Ahead: You can prepare the egg mixture the night before and store it in the fridge. Just stir it well before using.
  • Add More Flavor: Sprinkle a pinch of nutmeg into the custard for an extra warm, spiced flavor.
  • Use Stale Rolls: Slightly stale rolls absorb the custard better, resulting in a more flavorful French toast.
  • Storage Tips: Store leftovers in an airtight container in the fridge for up to 2 days. Reheat in a toaster oven or on a skillet for the best texture.


Frequently Asked Questions

Can I use other types of bread?
Yes! You can use brioche, challah, or regular dinner rolls if you don’t have Hawaiian rolls.

Can I make this recipe dairy-free?
Absolutely! Use almond milk, oat milk, or coconut milk and a plant-based butter alternative.

How do I keep the French toast warm?
Place the cooked French toast on a baking sheet and keep it in a 200°F (95°C) oven until ready to serve.

What if I don’t have cinnamon?
No problem! You can leave it out or replace it with a pinch of nutmeg or allspice.

Can I freeze leftovers?
Yes! Freeze the cooked French toast in a single layer, then transfer to a freezer bag. Reheat in the toaster oven or microwave when ready to eat.


Tips and Notes

  • My Tip: For extra indulgence, serve with a drizzle of caramel or chocolate sauce.
  • Pro Trick: Lightly toast the rolls before soaking them in the egg mixture—this helps them hold their shape better.
  • Serving Suggestion: Pair with bacon or sausage and fresh fruit for a complete brunch spread.

Variations

  • Stuffed French Toast: Spread cream cheese or Nutella between the tops and bottoms of the rolls before soaking them in the custard.
  • Coconut French Toast: Use coconut milk in the custard and sprinkle toasted coconut flakes on top.
  • Cinnamon Roll French Toast: Add a drizzle of cream cheese icing for a cinnamon roll-inspired treat.
  • Savory Twist: Skip the cinnamon and sugar, and serve with crispy bacon and eggs for a savory option.
  • French Toast Bites: Cut the rolls into bite-sized pieces before cooking for fun, dippable snacks.
    Hawaiian Roll French Toast

    Hawaiian Roll French Toast

    This Hawaiian Roll French Toast takes classic French toast to the next level. The soft, sweet Hawaiian rolls soak up a creamy custard and are pan-fried until golden brown. Perfect for breakfast or brunch, this dish is easy to make and pairs beautifully with syrup, fresh fruit, or powdered sugar for an extra indulgent treat.
    Prep Time 10 minutes
    Cook Time 10 minutes
    0 minutes
    Total Time 20 minutes
    Course Breakfast, Brunch
    Cuisine American
    Servings 6

    Ingredients
      

    • 12 Hawaiian rolls 0.75 lb, kept whole or separated
    • 4 large eggs
    • ½ cup 0.12 lb whole milk (or half-and-half)
    • ¼ cup 0.06 lb heavy cream
    • 2 tablespoons 0.03 lb sugar
    • 1 teaspoon vanilla extract
    • ½ teaspoon cinnamon
    • 2 tablespoons 0.1 lb butter, for cooking

    Optional Toppings:

    • Maple syrup
    • Powdered sugar
    • Fresh berries
    • Whipped cream

    Instructions
     

    Step 1: Prepare the Custard

    • In a medium bowl, whisk together the eggs, milk, heavy cream, sugar, vanilla extract, and cinnamon until well combined.

    Step 2: Soak the Hawaiian Rolls

    • If using the rolls whole, keep them connected. Alternatively, separate them if you prefer individual portions.
    • Dip the rolls into the egg custard mixture, making sure all sides are evenly coated. Allow them to soak for 30 seconds on each side.

    Step 3: Cook the French Toast

    • Heat 1 tablespoon of butter in a large skillet or griddle over medium heat.
    • Place the soaked rolls in the skillet and cook for 2–3 minutes on each side, or until golden brown and cooked through. Add more butter as needed for additional batches.

    Step 4: Serve and Garnish

    • Transfer the French toast to a plate and top with your desired toppings—maple syrup, powdered sugar, fresh berries, or whipped cream. Serve warm and enjoy!

    Notes

    • Make-Ahead: Prepare the custard mixture the night before for a quick breakfast in the morning.
    • Storage: Store leftovers in an airtight container in the refrigerator for up to 2 days. Reheat in a skillet or oven to maintain crispness.
    • Variations: Add a pinch of nutmeg or swap vanilla with almond extract for a twist.
    • Serving Idea: Pair with bacon or sausage for a complete breakfast.
    Tried this recipe?Let us know how it was!
0 FacebookTwitterPinterestEmail

Introduction:

If you’re on the hunt for a quick, no-fuss snack that fuels your day, these oatmeal peanut butter energy bites are exactly what you need! They’re sweet but not too indulgent, easy to whip up, and packed with all the good stuff. Whether you need a post-workout snack, a pick-me-up during the day, or a lunchbox treat for the kiddos, these bites fit the bill. The best part? No baking required!


Why These Oatmeal Peanut Butter Energy Bites

Here’s what makes these energy bites impossible to resist:

  • Quick and No-Bake: No oven needed! Perfect for those busy days.
  • Packed with Protein & Fiber: Thanks to oats and peanut butter, these bites keep you full longer.
  • Naturally Sweetened: With a hint of honey or maple syrup, you get just the right amount of sweetness.
  • Customizable: Toss in chocolate chips, dried fruit, or chia seeds to make them your own.
  • Make-Ahead Friendly: Store them in the fridge or freezer for a grab-and-go snack anytime.

Ingredients

  • 1 ½ cups (135g / 0.3 lb) rolled oats
  • ½ cup (130g / 0.28 lb) creamy peanut butter
  • ¼ cup (85g / 0.19 lb) honey or maple syrup
  • 1 tsp vanilla extract
  • ¼ cup (45g / 0.1 lb) mini chocolate chips (optional)
  • 2 tbsp (24g / 0.05 lb) chia seeds or ground flaxseed (optional)


Directions

  1. In a large mixing bowl, combine the oats, peanut butter, and honey (or maple syrup). Stir until the mixture is well combined.
  2. Add the vanilla extract, along with any extras like chocolate chips or chia seeds. Mix until evenly distributed.
  3. Roll the mixture into 1-inch balls. If it feels sticky, pop it into the fridge for 10-15 minutes to firm up before rolling.
  4. Arrange the energy bites on a baking sheet lined with parchment paper.
  5. Refrigerate for at least 30 minutes to let them set. Store them in an airtight container in the fridge for up to a week or freeze for longer.


Notes

  • Substitutions: Swap peanut butter with almond butter or sunflower seed butter for a nut-free version.
  • Texture Tip: If the mixture feels too dry, add a splash of almond milk or a bit more peanut butter. If it’s too wet, stir in a bit more oats.
  • Healthy Extras: Boost the nutrition with a tablespoon of hemp seeds or shredded coconut.
  • Storage: These bites store well in the fridge for up to a week or in the freezer for up to 3 months. Just thaw for a few minutes before eating.

Frequently Asked Questions

Can I make these energy bites vegan?
Yes! Just swap honey with maple syrup and make sure your chocolate chips are dairy-free.

Can I use quick oats instead of rolled oats?
Absolutely. The texture will be a little softer, but they’ll still taste great!

How do I prevent the mixture from being too sticky?
If the dough feels too sticky, chill it in the fridge for 10-15 minutes. This will make rolling much easier.

Can I freeze these energy bites?
Yes, they freeze beautifully! Store them in an airtight container, and they’ll keep for up to three months.

What other add-ins work well?
Feel free to get creative with dried cranberries, chopped nuts, raisins, or even some protein powder to switch things up.

Oatmeal Peanut Butter Energy Bites

These oatmeal peanut butter energy bites are the perfect no-bake snack, packed with wholesome oats, flaxseeds, and nut butter to fuel your day. They are naturally sweetened, customizable, and come together quickly—ideal for busy schedules. Store them in the fridge or freezer, and you’ll have an easy grab-and-go snack anytime you need a boost!
Prep Time 15 minutes
Cook Time 0 minutes
30 minutes
Total Time 45 minutes
Course Breakfast, Snack
Cuisine American
Servings 1

Ingredients
  

  • 1 ½ cups 0.56 lb old-fashioned oats
  • ½ cup 0.31 lb creamy peanut butter (or other nut butter)
  • ¼ cup 0.12 lb honey or maple syrup
  • cup 0.12 lb ground flaxseed
  • ½ teaspoon vanilla extract
  • cup 0.13 lb mini chocolate chips (optional)
  • ¼ teaspoon salt

Instructions
 

  • Mix the dry ingredients: In a large mixing bowl, combine the oats, ground flaxseed, and salt. Stir until the ingredients are evenly distributed.
  • Add wet ingredients: Pour in the peanut butter, honey, and vanilla extract. Stir thoroughly until the mixture starts coming together and becomes slightly sticky. You may need to use a spatula to ensure all the ingredients are incorporated.
  • Incorporate optional ingredients: If you’re adding mini chocolate chips, fold them in gently to avoid melting.
  • Chill the mixture: Place the bowl in the refrigerator for 20–30 minutes. This step makes the mixture firmer and easier to shape.
  • Form the bites: Using your hands, scoop out small portions (around 1 tablespoon each) and roll them into balls. You should get approximately 20 bites.
  • Store and serve: Place the energy bites in an airtight container. Store them in the refrigerator for up to one week or freeze for longer storage. They’re ready to eat whenever you need a quick energy boost!

Notes

  • Ingredient Substitutions: Swap peanut butter for almond or sunflower seed butter to make these nut-free.
  • Sweetener Options: Use agave syrup or date syrup as an alternative to honey or maple syrup.
  • Add-ins: Dried fruit, chia seeds, or shredded coconut can enhance flavor and nutrition.
  • Texture Tip: If the mixture feels too dry, add a spoonful of milk or extra honey; if too sticky, add a bit more oats.
Tried this recipe?Let us know how it was!

I’ve tailored this to make it friendly, easy to read, and relatable. Let me know if you’d like any tweaks!

0 FacebookTwitterPinterestEmail
Older Posts

Pin It on Pinterest