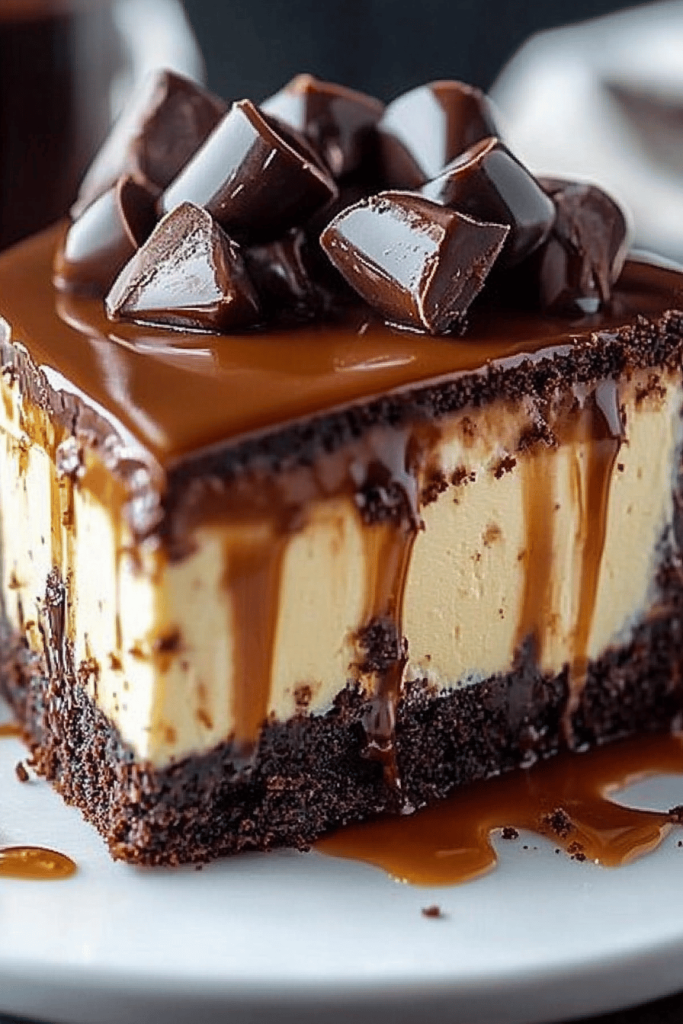
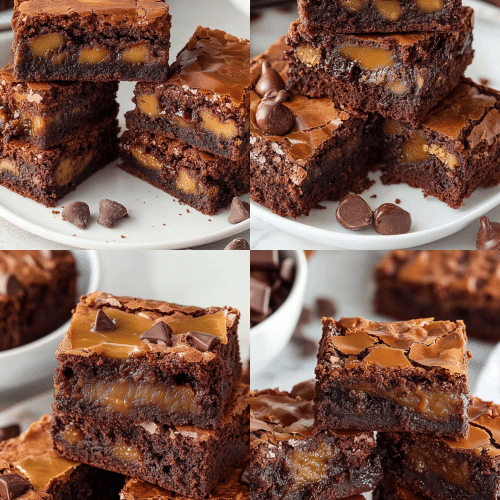
Oh, my goodness, if there’s one dessert that always, ALWAYS hits the spot, it’s a good ol’ batch of homemade Caramel Brownies. I’m talking about those rich, dense, intensely chocolatey bars with that gooey, glorious caramel swirl running through them. Seriously, just the thought of that warm, fudgy center giving way to a sweet, slightly chewy caramel ribbon makes my heart sing. My mom used to make a version of these when I was a kid, and I swear, the smell alone would bring the whole family running to the kitchen. It’s that kind of magic. While I love a classic fudgy brownie, adding that caramel layer? It’s a game-changer. Think of it as the best of both worlds – the comforting familiarity of a perfect brownie, elevated by that decadent caramel surprise. If you’re anything like me, you’re probably on the hunt for a caramel brownies recipe that delivers every single time, and friends, I think I’ve found it. It’s the one I reach for when I need a serious chocolate fix or when unexpected guests pop by. This recipe is my secret weapon, and I’m so excited to finally share it with you!
Thank you for reading this post, don't forget to subscribe!What are caramel brownies?
So, what exactly makes these caramel brownies so special? Well, at their core, they’re a fantastic, intensely chocolatey brownie batter that’s been layered with a rich, smooth caramel. It’s not just a drizzle on top; the caramel is swirled right into the batter before baking, creating these incredible pockets of chewy, gooey goodness that are absolutely divine. Think of it as a marriage between a super Fudgy Brownie and a decadent caramel candy. The name itself, “caramel brownies,” tells you exactly what you’re getting: deep, satisfying chocolate flavor punctuated by pockets of sweet, buttery caramel. It’s essentially a hug in dessert form, a treat that manages to be both incredibly comforting and surprisingly sophisticated. It’s not overly complicated, but the result feels like something you’d get from a fancy bakery. It’s the perfect way to elevate your brownie game without needing any fancy techniques, just a little bit of love and a few simple steps.
Why you’ll love this recipe?
What are some of the best reasons to make caramel brownies?flavor. Oh. My. Goodness. We’re talking deep, dark chocolate with that perfect balance of sweetness from the caramel. The contrast between the slightly bittersweet chocolate and the rich, buttery caramel is pure heaven. It’s not overly sweet, which is something I really strive for. Then there’s the simplicity. I know, I know, baking with caramel can sound intimidating, but I promise, this part is surprisingly straightforward. You’ll be amazed at how easily the caramel comes together and how beautifully it swirls into the brownie batter. It’s truly a lifesaver on busy nights when you want something impressive without spending hours in the kitchen. Plus, the Cost-efficiency: What is the best way to measure cost-efficiency? is a huge win. You likely already have most of the ingredients in your pantry, making this an incredibly budget-friendly way to create a show-stopping treat. And the versatility! These brownies are perfect on their own, but they’re also amazing with a scoop of vanilla Ice Cream, a dusting of powdered sugar, or even a sprinkle of sea salt on top. What I love most about this recipe is that it’s forgiving. Even if you’re new to baking or a little nervous about the caramel, this recipe guides you so well. It’s the kind of dessert that makes people think you’ve spent all day in the kitchen, when in reality, it’s quite manageable. It’s a guaranteed crowd-pleaser, whether it’s for a casual family movie night or a more special occasion.
How to Make Caramel Brownies
Quick Overview
This recipe is all about creating a rich, fudgy brownie base and then swirling in a luscious, homemade caramel before baking. You’ll whip up the Brownie Batter first, then prepare the caramel while the oven preheats. The magic happens when you layer the caramel into the batter and swirl it gently. It’s a straightforward process, designed to give you maximum flavor and that irresistible chewy texture. Trust me, the result is so worth it and feels way more complicated than it actually is!
Ingredients
For the Main Batter:
1 cup (2 sticks) unsalted butter, melted
2 cups granulated sugar
4 large eggs, at room temperature
1 teaspoon vanilla extract
1 cup all-purpose flour
1/2 cup unsweetened cocoa powder (use a good quality one, it makes a difference!)
1/2 teaspoon baking powder
1/4 teaspoon salt
1 cup semi-sweet chocolate chips (optional, but highly recommended for extra chocolatey goodness)
For the Filling:
1 cup (2 sticks) unsalted butter
1 cup packed light Brown Sugar
1/2 cup heavy cream
1 teaspoon vanilla extract
1/2 teaspoon salt
For the Glaze:
1/2 cup powdered sugar, sifted
1-2 tablespoons milk (or heavy cream for extra richness)
1/2 teaspoon vanilla extract (optional)
Step-by-Step Instructions
Step 1: Preheat & Prep Pan
First things first, get that oven preheating to 350°F (175°C). You’ll need a 9×13 inch baking pan. I like to line mine with parchment paper, leaving an overhang on the sides. This makes lifting the finished brownies out a breeze, and cleanup is a dream! Just grease the pan lightly before adding the parchment, then grease the parchment itself. It’s a little extra step, but it saves so much hassle later.
Step 2: Mix Dry Ingredients
In a medium bowl, whisk together the all-purpose flour, unsweetened cocoa powder, baking powder, and salt. Give it a good whisk to make sure everything is evenly distributed. This ensures no pockets of flour or cocoa powder and helps the baking powder work its magic for a little lift. Don’t skip this step – it’s crucial for a consistent texture!
Step 3: Mix Wet Ingredients
In a large bowl, combine the melted butter and granulated sugar. Whisk them together until they’re well combined. Then, add the eggs, one at a time, beating well after each addition. Stir in the vanilla extract. You want this mixture to be smooth and glossy.
Step 4: Combine
Gradually add the dry ingredients to the wet ingredients, mixing on low speed or by hand until just combined. Be careful not to overmix! Overmixing can lead to tough brownies, and nobody wants that. Fold in the chocolate chips now, if you’re using them. The batter should be thick and fudgy.
Step 5: Prepare Filling
Now for the star of the show! In a medium saucepan over medium heat, melt the 1 cup of butter. Once melted, stir in the packed light Brown Sugar, heavy cream, vanilla extract, and salt. Bring the mixture to a gentle boil, stirring constantly. Let it boil for about 2 minutes, still stirring. It will thicken slightly. Remove from heat and let it cool for about 10-15 minutes. You want it pourable but not scalding hot.
“Made the Caramel Brownies How to Make The Best Treat tonight and wow — perfect weeknight dinner. Will definitely make again!”
Step 6: Layer & Swirl
Pour about half of the Brownie Batter into your prepared pan and spread it evenly. Then, carefully pour about half of the slightly cooled caramel mixture over the batter. Dollop spoonfuls of the remaining brownie batter over the caramel, then dollop the remaining caramel over that. Now, grab a butter knife or a skewer and gently swirl the caramel and brownie batter together. Don’t over-swirl, you want distinct ribbons, not a muddy mess! A few figure-eights or random swirls are perfect.
Step 7: Bake
Bake for 30-35 minutes, or until a toothpick inserted into the center (avoiding a caramel swirl) comes out with moist crumbs attached. If you want them super fudgy, err on the side of less time. If you prefer them a bit firmer, bake a few minutes longer. Ovens can be tricky, so keep an eye on them!
Step 8: Cool & Glaze
Let the brownies cool completely in the pan on a wire rack. This is probably the hardest part, but it’s crucial for them to set properly! Once cooled, whisk together the sifted powdered sugar, 1 tablespoon of milk, and vanilla extract until smooth. Add more milk a teaspoon at a time if you want a thinner glaze. Drizzle the glaze over the cooled brownies.
Step 9: Slice & Serve
Once the glaze has set slightly, use the parchment paper overhang to lift the brownies out of the pan. Slice into squares with a sharp knife (wiping the knife between cuts helps for clean edges). Enjoy these glorious Caramel Brownies warm or at room temperature!
What to Serve It With
These caramel brownies are seriously a standalone superstar, but if you’re looking to elevate the experience or pair them with something, I’ve got you covered!
For Breakfast: Okay, hear me out! A small, Fudgy Brownie can be a decadent treat with your morning coffee. The rich chocolate and sweet caramel pair surprisingly well with a bold brew. I like to cut them into mini squares for a truly indulgent start to the day. It’s like a fancy pastry, but way easier!
For Brunch: These are fantastic on a brunch spread. Arrange them on a pretty platter with fresh berries – the tartness of raspberries or strawberries cuts through the richness beautifully. A dollop of lightly sweetened Whipped Cream or crème fraîche alongside is also lovely. And for drinks? A mimosa or a smooth cold brew coffee would be perfect.
As Dessert: This is where they truly shine! Serve them warm, perhaps with a scoop of high-quality vanilla bean ice cream. The contrast of the warm, gooey brownie and the cold ice cream is divine. A drizzle of extra caramel sauce on top is never a bad idea. For a more elegant presentation, dust them lightly with cocoa powder or powdered sugar.
For Cozy Snacks: These are my go-to for a comforting afternoon treat. A glass of cold milk is the classic pairing, and it never disappoints. They’re also wonderful with a cup of tea, especially an Earl Grey or a chai latte. My kids love them crumbled over a bowl of ice cream for a quick dessert after dinner.
My family tradition is to have these after a big Sunday dinner. We always serve them with a little pitcher of extra caramel sauce on the side, and everyone can add as much as they like. It’s pure joy!
Top Tips for Perfecting Your Caramel Brownies
I’ve made this caramel brownies recipe more times than I can count, and through trial and (a little) error, I’ve picked up a few tricks that I think will help you get them just right every single time.
Zucchini Prep: Wait, zucchini? Oh, my apologies, I got my recipes mixed up for a second! That’s for my zucchini bread post. For these brownies, there’s no zucchini involved. My mistake! Let’s get back to the important stuff – these decadent caramel brownies.
Mixing Advice: The biggest mistake people make with brownies is overmixing the batter after adding the flour. This develops the gluten too much, resulting in tough, cakey brownies instead of the dense, fudgy ones we’re aiming for. Mix the dry ingredients into the wet ingredients *just* until you no longer see streaks of flour. A few lumps are okay! Fold in your chocolate chips gently. Remember, we want tender, chewy brownies.
Swirl Customization: When you’re swirling the caramel into the batter, don’t go crazy! You want distinct ribbons of caramel running through the chocolate. Think of it like creating art. A few random swooshes with a knife or skewer are perfect. If you swirl too much, the caramel and brownie will just meld together, and you’ll lose that delightful contrast. Also, make sure your caramel isn’t too hot when you layer it, or it might sink completely into the batter. Let it cool for about 10-15 minutes after boiling.
Ingredient Swaps: For the chocolate chips, feel free to use dark chocolate, milk chocolate, or even a mix. White chocolate can work too, but it’s quite sweet. If you want an extra depth of chocolate flavor, you can use a combination of cocoa powder and melted chocolate in the batter itself (though this recipe as written is fantastic!). For the caramel, using good quality butter and cream really makes a difference. If you don’t have heavy cream, you *can* use evaporated milk in a pinch, but the caramel might be a little less rich.
“Packed with flavor and so simple. Exactly what I wanted from this Caramel Brownies How to Make The Best Treat!”
Baking Tips: Every oven is a little different, so knowing your oven is key. The toothpick test is your best friend here. You want moist crumbs clinging to the toothpick, not wet batter. If it comes out completely clean, your brownies might be overbaked. If it’s dripping with batter, they need more time. I usually bake mine on the middle rack. For even cooking, ensure your pan is centered in the oven.
Glaze Variations: The powdered sugar glaze is simple and delicious, but feel free to get creative! You can add a pinch of salt to the glaze to enhance the caramel flavor, or even a tiny bit of espresso powder for a mocha twist. If you prefer no glaze, that’s perfectly fine too – these brownies are spectacular on their own. You could also just dust them with powdered sugar or cocoa powder after they’ve cooled.
Storing and Reheating Tips
These caramel brownies are fantastic fresh, but they also store beautifully, which is why I love making a batch ahead of time.
Room Temperature: Once completely cooled and the glaze has set, store the brownies in an airtight container at room temperature. They’ll stay delicious for about 3-4 days. Make sure they’re fully cooled before sealing the container to prevent condensation, which can make them soggy. I often just use the pan they were baked in, covered tightly with plastic wrap or foil, if they’re going to be eaten within a couple of days.
Refrigerator Storage: If your kitchen is particularly warm, or you want them to last a bit longer (up to a week), you can store them in the refrigerator. Place them in an airtight container. The caramel might firm up a bit in the fridge, but they’ll still be lovely. Just let them sit out at room temperature for about 15-20 minutes before serving to soften them up.
Freezer Instructions: Yes, you can absolutely freeze these brownies! For the best quality, I recommend cutting them into individual portions first. Wrap each brownie tightly in plastic wrap, then place them in a freezer-safe bag or container. They’ll keep well for up to 2-3 months. Thaw them overnight in the refrigerator, then let them come to room temperature for about 30 minutes before enjoying.
Glaze Timing Advice: It’s best to add the glaze *after* the brownies have completely cooled and set. If you glaze them while they’re still warm, the glaze will melt and become a sticky mess rather than a clean drizzle. For brownies you plan to freeze, I usually wait to glaze them until after they’ve thawed, or I just dust them with powdered sugar once thawed. This prevents the glaze from cracking or becoming icy.
Frequently Asked Questions
Final Thoughts
There you have it, my friends – the recipe for my ultimate caramel brownies! I truly hope you give these a try. They’re the kind of dessert that makes any day feel a little bit more special. That rich, fudgy texture paired with those pockets of gooey caramel is just pure bliss, and honestly, it’s not nearly as complicated to make as it might seem. I love that these brownies bring a little bit of joy and comfort, whether it’s for a quiet moment with a cup of coffee or for sharing with loved ones. If you enjoyed these, you might also love my recipe for extra-fudgy chocolate chip cookies or my classic New York-style cheesecake – they’re equally crowd-pleasing!
I can’t wait to hear what you think once you try these caramel brownies! Did they disappear as quickly in your house as they do in mine? Did you add any fun swirls or toppings? Let me know in the comments below – I love hearing your stories and variations! Happy baking!
caramel brownies recipe
Ingredients
Caramel Brownies
- 11 ounces Kraft caramels unwrapped
- 0.33 cup evaporated milk
- 18 ounces brownie mix
- 2 large eggs
- 0.5 cup vegetable oil
- 3 tablespoons water
- 0.5 cup semi-sweet chocolate chips
Instructions
Preparation Steps
- Preheat the oven to 350°F. Line a 9x9 inch baking dish with parchment paper, leaving an overhang on the sides for easy removal, and set it aside.
- In a small saucepan, combine the unwrapped Kraft caramels and evaporated milk. Heat over medium-low, stirring constantly to prevent burning, until the caramels are completely melted and the mixture is smooth and well combined (this usually takes 5 to 7 minutes). Set aside.
- In a medium mixing bowl, prepare the brownie batter according to package directions using the brownie mix, eggs, vegetable oil, and water.
- Spread about two-thirds of the prepared brownie batter evenly into the lined baking dish.
- Carefully spread the caramel mixture over the brownie batter. Dollop it gently across the top to avoid mixing it into the brownie layer.
- Dollop the remaining brownie batter over the top of the caramel layer, distributing it as evenly as possible.
- Bake for 40 to 45 minutes, or until a toothpick inserted into the brownie portion comes out clean. Immediately after removing from the oven, sprinkle the semi-sweet chocolate chips over the hot brownies.
- Allow the brownies to cool completely in the pan before lifting them out using the parchment paper overhang and cutting them into squares. This ensures clean cuts and prevents the caramel from oozing.


