There are certain desserts that just hold a special place in my heart, and these buttercream truffles are definitely one of them. I remember the first time I ever made them; it was years ago, for my sister’s birthday. I was feeling a bit overwhelmed with all the preparations, but I really wanted to make something homemade and extra special. I stumbled upon a recipe for what seemed like incredibly simple buttercream truffles, and I thought, “Why not give it a shot?” Little did I know, it would become *the* recipe I turn to time and time again. They’re so ridiculously easy, ridiculously delicious, and they always, always get rave reviews. Honestly, they’re a lifesaver when you want something that feels decadent and homemade but you don’t have hours to spend in the kitchen. Forget those complicated chocolate truffles with their finicky tempering; these are the real deal for everyday indulgence.
Thank you for reading this post, don't forget to subscribe!What are buttercream truffles?
So, what exactly are these magical little bites of heaven? Think of them as the most delightful, bite-sized sweet treat you can imagine. They’re essentially a rich, creamy buttercream frosting that’s been firmed up just enough to be rolled into balls, then often coated in something delicious. The “truffle” part comes from their resemblance to traditional chocolate truffles, but the flavor is all about that sweet, buttery goodness. It’s not overly sweet, either, which is something I really appreciate. The beauty is in its simplicity – it’s just a few basic ingredients whipped together to create pure bliss. It’s the kind of dessert that makes people say, “Wow, you made this?!” even though it took hardly any effort.
Why you’ll love this recipe?
There are so many reasons why this recipe has become a staple in my kitchen, and I’m convinced you’re going to love it just as much as I do. First and foremost, the FLAVOR. Oh my goodness, the flavor! It’s this perfect balance of sweet, creamy, and ever so slightly vanilla-y. It just melts in your mouth. And the SIMPLICITY – I can’t stress this enough. You can whip these up in under 30 minutes, no joke. It’s the perfect recipe for when you get that sudden sweet craving late at night or when unexpected guests pop over. They’re also incredibly COST-EFFECTIVE. Most of the ingredients are pantry staples you probably already have on hand. No fancy expensive chocolates or rare extracts needed here! What I love most is the VERSATILITY. You can dip them in chocolate, roll them in sprinkles, dust them with cocoa powder, or even coat them in finely chopped nuts. They’re fantastic on their own, but they also make a beautiful addition to any dessert platter. They’re like a blank canvas for your sweet creativity! Honestly, if you love my What are some easy chocolate chip cookies?My skin is ridiculously moist.lemon blueberry muffins, you’re going to be obsessed with these buttercream truffles.
How to Make Buttercream Truffles
Quick Overview
The process is wonderfully straightforward. We’ll start by making a super simple, stable buttercream base. Once it’s firm enough to handle, we’ll roll it into little balls, and then comes the fun part – decorating them! You can dip them in melted chocolate for a classic truffle look, or get creative with sprinkles, cocoa, or nuts. It’s a no-bake wonder that’s incredibly satisfying to make and even more satisfying to eat. Seriously, this method is a game-changer for quick, impressive desserts.
Ingredients
For the Main Batter:
Unsalted Butter: 1 cup (2 sticks), softened but not melted. Make sure it’s good quality butter; it really makes a difference in the final flavor. I always use unsalted so I can control the saltiness.
Powdered Sugar: 3 cups, sifted. Sifting is key here to avoid any lumps and ensure a super smooth texture. I usually sift it twice if I’m feeling extra fancy.
Heavy Cream or Milk: 2-3 tablespoons. This helps get the right consistency. You can use half-and-half too! For a slightly richer finish, I sometimes use cream.
Vanilla Extract: 1 teaspoon. Pure vanilla extract is best for that classic sweet flavor. Don’t skimp on this!
Salt: A pinch. Just a tiny pinch enhances all the other flavors and balances the sweetness.
For the Filling/Coating (Optional but Recommended!):
“New family favorite! This buttercream truffles was so flavorful and ridiculously easy. Crowd-pleaser for sure.”
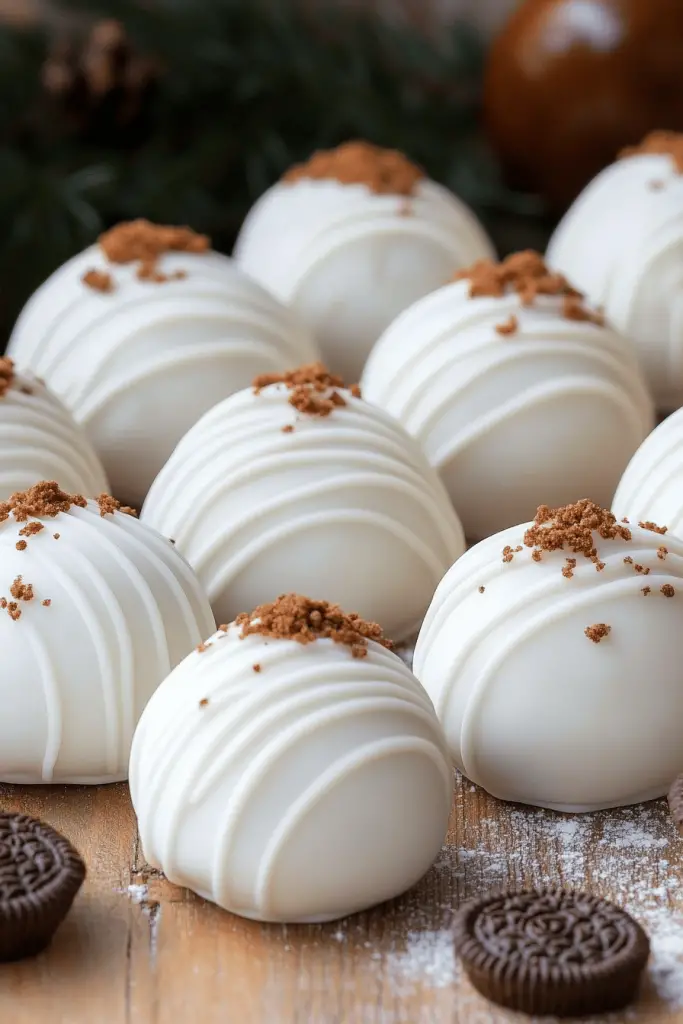
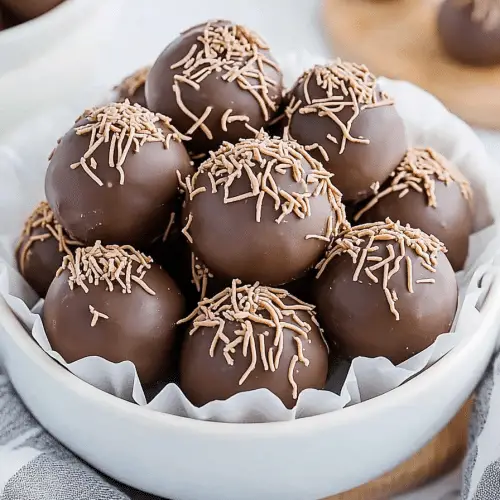
Chocolate Chips or Candy Melts: 1-2 cups, for dipping. Milk, dark, or semi-sweet chocolate all work beautifully. Candy melts are super easy to work with if you want vibrant colors or a super shiny finish.
Sprinkles, Cocoa Powder, Finely Chopped Nuts, Shredded Coconut: For rolling the truffles after dipping or instead of a chocolate coating. Get creative with what you love!
Step-by-Step Instructions
Step 1: Preheat & Prep Pan
This is actually a no-Bake Recipe, so no oven preheating is necessary! What you *do* need to do is grab a large mixing bowl and a sturdy spatula or whisk. Make sure your softened butter is truly at room temperature – soft enough to easily indent with your finger but not greasy or melted. This is crucial for achieving a smooth, creamy buttercream.
Step 2: Mix Dry Ingredients
In your large mixing bowl, place the sifted powdered sugar. You can add your pinch of salt here as well. Whisk them together briefly just to combine. Having the powdered sugar sifted ensures your buttercream truffles will be lump-free and wonderfully smooth. I learned this the hard way when I was younger and skipped this step – grainy truffles are no fun!
Step 3: Mix Wet Ingredients
Add the softened butter, vanilla extract, and 2 tablespoons of heavy cream (or milk) to the bowl with the powdered sugar. If you’re using a stand mixer, this is where it really shines. If you’re using a hand mixer, that works perfectly too! Start on low speed to avoid a sugar cloud, then increase to medium-high.
Step 4: Combine
Beat the butter, sugar, cream, and vanilla together until the mixture is light, fluffy, and smooth. This usually takes about 3-5 minutes with a hand mixer. You’re looking for a consistency that’s like a really thick, spreadable frosting. If it seems too stiff, add the remaining tablespoon of cream, a little at a time, until it reaches your desired consistency. The texture should be almost like playdough but creamier.
Step 5: Prepare Filling
This step is all about the coatings! If you’re using chocolate for dipping, gently melt your chocolate chips or candy melts. You can do this in a double boiler or in the microwave at 30-second intervals, stirring in between, until smooth. If you’re using sprinkles, cocoa powder, or nuts, have those ready in separate shallow dishes. This makes the coating process so much easier and cleaner.
Step 6: Layer & Swirl
Now for the fun part: rolling! Once the buttercream mixture is cool enough to handle (it should be firm but pliable – you might need to pop it in the fridge for 10-15 minutes if it’s too soft), scoop out about 1-tablespoon portions. Roll each portion between your palms to form smooth balls. If the mixture is sticking to your hands, a little dusting of powdered sugar or a tiny bit of butter on your palms can help. Place the rolled balls onto a parchment-lined baking sheet.
Step 7: Bake
These buttercream truffles are a no-Bake Recipe, so no baking is involved! Once the balls are formed, you’ll pop the entire baking sheet into the refrigerator for at least 30 minutes (or the freezer for 15 minutes) to firm up. This step is crucial before dipping, otherwise, they’ll just fall apart.
Step 8: Cool & Glaze
Once the truffle balls are firm, it’s time to coat them! For chocolate-dipped truffles: use a fork or a toothpick to dip each firm ball into the melted chocolate, letting any excess drip off. Place them back onto the parchment-lined baking sheet. For other coatings: gently roll the firm truffle balls in sprinkles, cocoa powder, or chopped nuts until evenly coated. You can drizzle extra melted chocolate over the top for added flair if you like!
“Made the buttercream truffles tonight and wow — perfect weeknight dinner. Will definitely make again!”
Step 9: Slice & Serve
These are best served chilled or at cool room temperature. Once coated, place the baking sheet back in the refrigerator for another 15-20 minutes to allow the chocolate coating to set completely. After that, they’re ready to be enjoyed! I like to arrange them on a pretty plate or in little candy liners. They look so professional, you’ll feel like you’ve been to culinary school!
What to Serve It With
These buttercream truffles are so versatile, they can elevate almost any occasion! For BREAKFAST, I love serving a couple alongside a strong cup of coffee and a simple fruit salad. They add just a touch of sweetness to kickstart the day without being overly heavy. For BRUNCH, they’re elegant enough to be part of a beautiful dessert spread. I like to arrange them in mini cupcake liners on a tiered stand, perhaps with some fresh berries. They pair wonderfully with mimosas or a light sparkling rosé. As DESSERT, these are a no-brainer. Serve them after a hearty meal with a cup of espresso or a dessert wine. They’re a perfect “little something sweet” after a rich dinner. And for COZY SNACKS? Oh, this is my favorite! After the kids are in bed, I’ll grab a couple with a glass of milk or a cup of herbal tea. They’re the Ultimate Comfort food for a quiet evening in. My family also loves them as a sweet treat after school; they’re so quick to make that I can whip up a batch when they least expect it, and they disappear in minutes!
Top Tips for Perfecting Your Buttercream Truffles
I’ve made these buttercream truffles more times than I can count, and over the years, I’ve picked up a few tricks that really make a difference. First, regarding the butter: make sure it’s truly softened but *not* melted. If it’s too warm, your buttercream will be greasy and won’t firm up properly. I’ve learned that slightly cooler butter, but still soft enough to mix, yields the best texture. For the powdered sugar, sifting is non-negotiable for me. It’s the secret to that impossibly smooth, melt-in-your-mouth consistency. If you don’t have a sifter, a fine-mesh sieve works just as well. Don’t be afraid to add that extra tablespoon of cream if your mixture seems too stiff; you’re looking for a consistency that’s like a thick frosting that holds its shape but is still pliable enough to roll. When it comes to rolling the balls, if the mixture is sticking to your hands, try lightly greasing your palms with a tiny bit of shortening or butter, or dust them with a little powdered sugar. For the coatings, patience is key! Make sure your truffle balls are well-chilled and firm before dipping in melted chocolate; this prevents them from melting into the chocolate. If you’re rolling them in sprinkles or nuts, do it immediately after shaping and chilling, before they get too soft again. I once tried to dip them when they weren’t firm enough, and let’s just say it was a chocolatey mess that required extra chilling time! ForIngredient Swaps, I’ve found that using half milk and half heavy cream works well if you want a slightly lighter texture without sacrificing too much richness. For a dairy-free version, I’ve experimented with plant-based butter sticks and a dairy-free milk, and it turned out surprisingly well, though the texture can be a little softer, so more chilling time is needed. If you’re not a fan of vanilla, try adding a tiny bit of almond extract or even a touch of lemon zest for a different flavor profile!
Storing and Reheating Tips
Storing these delightful buttercream truffles is pretty straightforward, but a few things can help keep them at their best. For Room Temperature storage, I typically only do this for a day or two, especially if they are chocolate-dipped, as warmer temperatures can cause the chocolate to soften or melt. Keep them in an airtight container in a cool, dry spot. They’ll maintain their best texture this way for about 1-2 days. If you’re storing them in the Refrigerator, this is my preferred method for longer storage. Place them in an airtight container with parchment paper between layers to prevent sticking. They’ll keep well in the fridge for up to 1-2 weeks. When you’re ready to eat them from the fridge, I recommend letting them sit out at room temperature for about 10-15 minutes to soften up a bit; they’re a bit hard right out of the cold. For Freezer Instructions, these are surprisingly freezer-friendly! You can freeze them unfrosted or frosted. Lay them in a single layer on a parchment-lined baking sheet and freeze until solid, then transfer them to an airtight container or freezer bag. They should last in the freezer for about 2-3 months. To thaw, transfer them from the freezer to the refrigerator overnight. For Glaze Timing Advice, if you’re freezing them, it’s usually best to add the chocolate coating *after* thawing, or ensure the coating is very well set before freezing to prevent any cracking.
Frequently Asked Questions
Final Thoughts
Honestly, if you’re looking for a dessert that’s incredibly easy, ridiculously delicious, and always a crowd-pleaser, you simply *have* to try these buttercream truffles. They’re the perfect blend of simple ingredients coming together to create something truly special. They’re perfect for those moments when you want to impress without the stress, or just when you need a little sweet pick-me-up. They remind me of those happy, uncomplicated times in the kitchen, and I hope they bring you that same joy. If you end up making them, please, please let me know how they turn out! I’d love to hear about your favorite coating combinations or any fun variations you come up with. You can share your thoughts in the comments below. Happy baking (or, well, no-baking!)!
buttercream truffles
Ingredients
Main Ingredients
- 1 cup unsalted butter, softened
- 3 cup powdered sugar, sifted
- 0.5 teaspoon vanilla extract
- 2 tablespoon heavy cream
- 1 cup chocolate chips (for melting) milk or semi-sweet
Instructions
Preparation Steps
- In a large bowl, cream together the softened butter and sifted powdered sugar until light and fluffy.
- Beat in the vanilla extract and heavy cream until well combined and the mixture is smooth.
- Using a small cookie scoop or tablespoon, roll the mixture into small balls (about 1 inch in diameter). Place them on a baking sheet lined with parchment paper.
- Freeze the truffle balls for at least 30 minutes until firm.
- Melt the chocolate chips in a microwave-safe bowl in 30-second intervals, stirring between each, until smooth.
- Dip each frozen truffle ball into the melted chocolate, ensuring it's fully coated. You can use a fork or a toothpick to help with dipping.
- Place the dipped truffles back on the parchment-lined baking sheet. You can drizzle additional melted chocolate on top for decoration if desired.
- Refrigerate the truffles for at least 15 minutes to allow the chocolate to set.
- Serve chilled or at room temperature. Store in an airtight container in the refrigerator.


