Okay, so I have to tell you about these bars. They’re not just any bars; they’re my “Better Than Anything” bars, and the name really isn’t an exaggeration. Every time I make them, which is more often than I probably should admit, they disappear in minutes. It’s like magic! My kids, bless their hearts, will skip dessert if these are on the counter. They’re that good. I remember the first time I tried a similar recipe years ago, and while it was good, I always felt it was missing something. So, I tweaked and tinkered, and honestly, I think I’ve landed on perfection. If you’ve ever had those incredibly decadent layered desserts, you know the kind that just melt in your mouth? That’s the vibe we’re going for here, but in a perfectly portioned bar that’s surprisingly easy to whip up. They’re like a warm hug in bar form, perfect for a cozy afternoon or a special treat when you just need a little something sweet without a ton of fuss. Forget about complicated cakes for a moment, because these Better Than Anything Bars are about to become your new go-to.
Thank you for reading this post, don't forget to subscribe!What are the best bars?
So, what exactly are these “Better Than Anything” Bars that have my family so obsessed? Think of them as a dreamy, decadent symphony of textures and flavors all rolled into one irresistible treat. At its heart, it’s a wonderfully moist and tender cake-like base, often with a hint of spice or vanilla that just makes everything pop. Layered on top is usually a luscious, creamy filling – think Cream Cheese, pudding, or even a whipped topping, depending on the variation. Then, the grand finale: a rich, often chocolatey, topping that might be a ganache, a whipped cream frosting, or even a caramel drizzle. It’s that combination of soft, creamy, and rich that makes them so darn addictive. The name itself, “Better Than Anything,” comes from that feeling you get when you take a bite – it’s so incredibly satisfying, so comforting, and just so *delicious*, that it truly feels like the best thing you’ve ever tasted in that moment. It’s less about a specific ingredient and more about the overall experience, the pure joy it brings with every single bite. It’s a dessert that aims to please everyone, and trust me, it does.
Why you’ll love this recipe?
I love this recipe. There are so many reasons why I keep coming back to it.flavor. Oh my goodness, the flavor! It’s this perfect balance of sweet and rich, with textures that just sing together. You get the soft, cakey base, then that cool, creamy layer, and finally the decadent topping that ties it all together. It’s like a gourmet dessert without all the fuss. And speaking of fuss, let’s talk about simplicity. I’ve made this countless times, even when I’m feeling totally overwhelmed and short on time, and it always turns out beautifully. It’s not complicated, and you don’t need any fancy techniques. The steps are straightforward, and the result is always impressive. Plus, it’s surprisingly cost-efficient! The ingredients are all pantry staples or easily found at any grocery store, so you can whip up this incredible treat without breaking the bank. It feels fancy, but it’s totally budget-friendly. And the versatility! This is what really seals the deal for me. You can enjoy these Better Than Anything Bars at breakfast (yes, I do!), for brunch, as a stunning dessert, or just as a cozy snack when you need a little pick-me-up. They’re perfect for potlucks, holidays, or just because. What I love most about this recipe, though, is that it’s consistently a crowd-pleaser. No one ever leaves my house without asking for the recipe. It’s that reliable, that delicious, and that special. It reminds me a bit of my grandmother’s classic layered pudding desserts, but these bars have a certain charm and portability that makes them even better for everyday life.
How do I make better than anything bar?
Quick Overview
Making these Better Than Anything Bars is a straightforward process that’s really all about layering simple, delicious components. We’ll start by baking a tender cake-like base. While that’s cooling slightly, we’ll whip up a dreamy, creamy filling. Once the base is ready, we’ll spread that luscious filling over it, and then finish it off with a decadent topping. It’s that easy! The beauty of this recipe is that it comes together without any complicated steps, making it a lifesaver on busy nights when you want something truly special. You’ll be amazed at how quickly it transforms from simple ingredients into something so incredibly delicious.
Ingredients
For the Main Batter:
2 cups all-purpose flour: Make sure it’s fresh! I usually use unbleached all-purpose flour for a nice, tender crumb. If you’re feeling adventurous, you can try using half whole wheat, but it will make the texture a little denser.
1 ½ teaspoons baking soda: This is what gives our bars that lovely lift and tenderness. Make sure it’s not expired; I’ve learned the hard way that old baking soda can really affect the texture.
½ teaspoon salt: Essential for balancing out the sweetness and bringing out all the flavors.
1 teaspoon ground cinnamon: This adds such a warm, comforting note. You can adjust this up or down depending on how much cinnamon flavor you like.
2 cups granulated sugar: The sweetness is key here for that classic dessert bar flavor.
1 cup (2 sticks) unsalted butter, softened: Make sure it’s properly softened, not melted! This is crucial for getting a good batter consistency.
2 large eggs: Room temperature eggs incorporate much better into the batter. Just pop them in a bowl of warm water for 5-10 minutes if you forget to take them out.
1 teaspoon vanilla extract: Pure vanilla extract makes a big difference in flavor, trust me.
1 cup buttermilk: This is my secret to a Super Moist cake base! If you don’t have buttermilk, you can make your own by adding 1 tablespoon of lemon juice or white vinegar to 1 cup of milk and letting it sit for about 5 minutes.
For the Filling:
2 (8-ounce) packages Cream Cheese, softened: Make sure this is really soft so it blends smoothly. Cold cream cheese will give you lumps, and we don’t want that!
1 cup powdered sugar: This makes the filling light and sweet without being grainy. Sift it if you want to be extra sure it’s smooth.
1 teaspoon vanilla extract: Just a touch more vanilla to amp up the flavor.
1 ½ cups heavy cream, whipped to stiff peaks: This is what gives the filling its airy, luscious texture. Make sure it’s cold for best results.
For the Glaze:
1 cup semi-sweet chocolate chips: Or milk chocolate, if you prefer! I like semi-sweet because it balances the sweetness of the rest of the bar.
½ cup (1 stick) unsalted butter: This makes the glaze wonderfully smooth and rich.
2 tablespoons corn syrup (optional, for shine): This is a little trick I learned that gives the glaze a beautiful, professional sheen. It’s totally optional, but it makes them look extra special.
1 teaspoon vanilla extract: For a little extra flavor depth in the glaze.
Step-by-Step Instructions
Step 1: Preheat & Prep Pan
First things first, let’s get our oven ready. Preheat it to 350 degrees Fahrenheit (175 degrees Celsius). Now, grab a 9×13 inch baking pan. I like to grease mine really well with butter or cooking spray, and then I lightly dust it with flour. This ensures that our beautiful cake base doesn’t stick at all. Some people like to line their pan with parchment paper, leaving an overhang, which makes lifting the bars out even easier, but I’ve found a good greasing and flouring works wonders. Make sure to get all the corners!
“New family favorite! This Better Than Anything Bars was so flavorful and ridiculously easy. Crowd-pleaser for sure.”
Step 2: Mix Dry Ingredients
In a large bowl, whisk together the all-purpose flour, baking soda, salt, and ground cinnamon. Give it a good whisk until everything is evenly distributed. This ensures that your leavening agents are spread out properly, which is key for an even bake. I always do this step first because it makes sure all the dry bits are happy and combined before we introduce the wet ingredients.
Step 3: Mix Wet Ingredients
In a separate, even bigger bowl (or the bowl of your stand mixer if you’re using one), cream together the softened butter and granulated sugar until it’s light and fluffy. This is where you start building that delicious cake texture! Then, beat in the eggs, one at a time, making sure to scrape down the sides of the bowl after each addition. Stir in the vanilla extract.
Step 4: Combine
Now for the magic of bringing it all together! With your mixer on low speed, or by gently stirring with a spatula, alternately add the dry ingredients and the buttermilk to the wet ingredients. Start and end with the dry ingredients. So, add about a third of the dry mixture, mix until just combined, then add half of the buttermilk, mix, add another third of the dry, mix, the remaining buttermilk, mix, and finally the last of the dry ingredients. Be careful not to overmix here – overmixing develops the gluten too much and can lead to tough bars. We’re looking for a smooth batter, but a few tiny lumps are totally fine.
Step 5: Prepare Filling
While your cake batter is waiting (or you can do this while the cake bakes if you prefer!), let’s make that luscious filling. In a medium bowl, beat the softened Cream Cheese until it’s completely smooth and creamy. You don’t want any lumps! Gradually beat in the powdered sugar until well combined. Then, stir in the vanilla extract. In a separate bowl, whip the heavy cream until stiff peaks form. Gently fold the whipped cream into the cream cheese mixture until it’s all incorporated and you have a light, airy, and dreamy filling. Try not to deflate the whipped cream too much!
Step 6: Layer & Swirl
Pour about two-thirds of your cake batter into the prepared baking pan and spread it out evenly. Now, spoon dollops of the Cream Cheese filling over the batter. Don’t worry about making it perfect; it’s actually nicer when it’s a bit rustic. Carefully spread the remaining cake batter over the filling. This is where you can get creative with a knife or a skewer to gently swirl the layers together, creating a beautiful marbled effect. Don’t over-swirl, or you’ll lose the distinct layers.
Step 7: Bake
Pop the pan into your preheated oven. Bake for 30-40 minutes, or until a wooden skewer or toothpick inserted into the center comes out clean. The top should be golden brown and slightly puffed. Ovens can be so different, so definitely keep an eye on it towards the end of the baking time. If the top starts to brown too quickly, you can loosely tent it with foil.
Step 8: Cool & Glaze
Once baked, take the pan out of the oven and let it cool in the pan on a wire rack for about 15-20 minutes. This is important! If you try to put the glaze on when it’s too hot, it will just melt and slide off. While the bars are cooling, prepare your glaze. In a small saucepan over low heat, melt the chocolate chips and butter together. Stir constantly until smooth and creamy. Remove from heat and stir in the corn syrup (if using) and vanilla extract. Once the bars have cooled for that initial 15-20 minutes, pour the warm glaze over the top and spread it evenly. The warmth of the bars will help the glaze set beautifully.
Step 9: Slice & Serve
Now, the hardest part: waiting! Let the bars cool completely in the pan. This is essential for the glaze to set properly and for the bars to hold their shape when you cut them. I usually let them cool for at least an hour or two, or even pop them in the fridge for a bit if I’m impatient. Once fully cooled, cut them into squares. I like to use a sharp knife dipped in hot water and wiped dry between cuts for really clean edges. Serve them chilled or at room temperature. They’re absolutely divine!
What to Serve It With
These Better Than Anything Bars are honestly spectacular on their own, but I love playing around with different ways to serve them to suit any occasion. For breakfast, they’re a fantastic treat! I usually cut them into smaller squares and serve them alongside a freshly brewed cup of coffee or a creamy latte. They feel decadent enough for a weekend brunch but are surprisingly satisfying for a weekday treat when you need a little something to get you going. For brunch, I like to present them a bit more elegantly. I might arrange them on a nice platter and add a few fresh berries on the side, like raspberries or blueberries, for a pop of color and freshness. A glass of bubbly or a mimosa pairs wonderfully with the sweetness. When serving them as a dessert, they truly shine. I’ll often serve them slightly warm, with a scoop of vanilla bean Ice Cream or a dollop of whipped cream. A drizzle of caramel sauce or a dusting of powdered sugar can make them look extra special for a dinner party. And for those cozy snacks moments? They’re perfect cut into modest squares and enjoyed with a big mug of hot chocolate or a comforting cup of herbal tea. They’re the ultimate comfort food, and my family traditions often involve these bars on movie nights or after a long day. They’re a guaranteed hit, no matter how you serve them!
Top Tips for Perfecting Your “Better Than Anything” Bars
I’ve made these bars more times than I can count, and along the way, I’ve picked up a few little tricks that I think really make a difference. So, here are my top tips to help you achieve Better Than Anything Bar perfection!
Zucchini Prep: While my recipe doesn’t explicitly call for zucchini, many variations do, and if you’re using one, the key is moisture removal. Grate your zucchini (use the larger holes of your grater) and then place it in a fine-mesh sieve. Sprinkle it with a little salt and let it sit for about 10-15 minutes. You’ll see water bead up. Then, press firmly with the back of a spoon or your hands to squeeze out as much liquid as possible. This prevents your bars from being soggy and helps them bake up perfectly. Always use fresh zucchini for the Best Flavor and texture.
Mixing Advice: The biggest mistake people make is overmixing the batter. Once you add the flour, mix only until *just* combined. A few streaks of flour are okay; they’ll disappear during baking. Overmixing develops gluten, which can make your bars tough and dense instead of tender and moist. For the filling, ensure your Cream Cheese is truly soft. If it’s cold, you’ll end up with lumps, no matter how long you beat it. Room temperature is your friend here!
Swirl Customization: When it comes to swirling, less is often more. You want distinct layers to show through, not a muddy mess. Use a butter knife or a skewer and make just a few gentle passes through the batters. Think of creating elegant marble patterns, not fully blending them. You can also play with the ratios of cake to filling if you prefer more of one than the other. For a really striking visual, you can add a few drops of food coloring to sections of the filling before swirling.
Ingredient Swaps: I’ve experimented a lot, and here are a few successful swaps. For the buttermilk in the cake, as I mentioned, milk with lemon juice or vinegar works wonderfully. You can also use sour cream or plain yogurt (about 1 cup) for extra moisture and a slight tang. For the chocolate chips in the glaze, milk chocolate or dark chocolate chips are fine, but adjust the sweetness accordingly. If you use dark chocolate, you might need a little more sugar or a sweeter butterscotch chips blend. For the filling, if you can’t find Cream Cheese, a good quality ricotta cheese can be a substitute, though the texture will be slightly different – less dense, more ricotta-like.
“I don’t know if I’ve ever eaten a better Better Than Anything Bars. The rub alone is wonderful, but the sauce??? Over the top!”
Baking Tips: Always preheat your oven thoroughly. An oven that isn’t hot enough will lead to uneven baking. Position your baking rack in the center of the oven for the most consistent heat. If your oven tends to bake hot on one side, rotating the pan halfway through baking can help ensure even browning. To test for doneness, a toothpick inserted into the center should come out with moist crumbs attached, not wet batter. A few moist crumbs are perfect; a completely clean toothpick might mean it’s slightly overbaked. Trust your instincts and how your oven behaves!
Glaze Variations: The glaze is so versatile! If you want a White Chocolate glaze, simply melt white chocolate chips with a little bit of butter or coconut oil. For a caramel glaze, you can use melted caramel candies with a splash of cream. If you’re not a fan of chocolate, a simple dusting of powdered sugar or a drizzle of your favorite fruit jam can also be delicious alternatives. The key is to make sure the glaze isn’t too hot when you apply it, so it sets nicely and doesn’t melt into the cake base too much.
Storing and Reheating Tips
One of the best things about these Better Than Anything Bars is how well they store, making them perfect for making ahead of time. This is a recipe I often make on a Sunday to have treats for the week!
Room Temperature: If you plan on finishing them within a day or two, storing them at room temperature in an airtight container is perfectly fine. Make sure the glaze has fully set before covering them. They’ll stay fresh and delicious for about 2-3 days this way. Keep them out of direct sunlight and away from heat, though!
Refrigerator Storage: For longer storage, or if your kitchen tends to be warm, the refrigerator is your best bet. Once completely cooled and the glaze is set, place them in an airtight container. They’ll stay good in the fridge for up to a week. The texture might firm up a bit in the fridge, but that’s nothing a little time at room temperature can’t fix. I usually let them sit out for about 15-20 minutes before serving if they’ve been refrigerated, or a quick zap in the microwave can help soften them if you’re in a hurry.
Freezer Instructions: Yes, you can freeze these Better Than Anything Bars! This is a lifesaver for those times you want a treat but don’t want to bake. Once the bars are completely cooled and the glaze is firm, cut them into individual portions. Wrap each bar tightly in plastic wrap, then place them in a freezer-safe bag or container. They’ll last in the freezer for about 2-3 months. To thaw, transfer the wrapped bars to the refrigerator overnight. Then, let them sit at room temperature for a bit before enjoying. They thaw beautifully and retain most of their lovely texture.
Glaze Timing Advice: The most important thing for storage is letting the glaze fully set before covering or freezing. If you’re refrigerating or freezing immediately after glazing, make sure the glaze is no longer liquid and has a bit of a skin on it. If you’re worried about the glaze sticking to the container or other bars when freezing, you can place a piece of parchment paper between layers. For bars you plan to freeze, I sometimes opt for a slightly simpler glaze that sets firmer, or even just a dusting of powdered sugar, as it can be less prone to cracking when frozen and thawed.
Frequently Asked Questions
Final Thoughts
So there you have it – my beloved “Better Than Anything” Bars! I really hope you’ll give these a try. They’re more than just a dessert to me; they’re a little piece of happiness, a reliably delicious treat that always brings smiles. The combination of that tender cake base, the luscious creamy filling, and the rich chocolate topping is just perfection in my book. It’s the kind of recipe that makes you feel like a baking rockstar, even if you’re a beginner. If you love decadent desserts but want something that’s surprisingly straightforward, these are for you. They’re perfect for sharing, but honestly, I wouldn’t blame you one bit if you wanted to keep them all to yourself! If you enjoyed this recipe, you might also love my Decadent Chocolate Lava Cakes or my Ultimate Brownie Recipes, which also deliver on that rich, comforting dessert experience. Happy baking, and I can’t wait to hear how your “Better Than Anything” Bars turn out! Don’t forget to leave a comment below and share any fun variations you try!
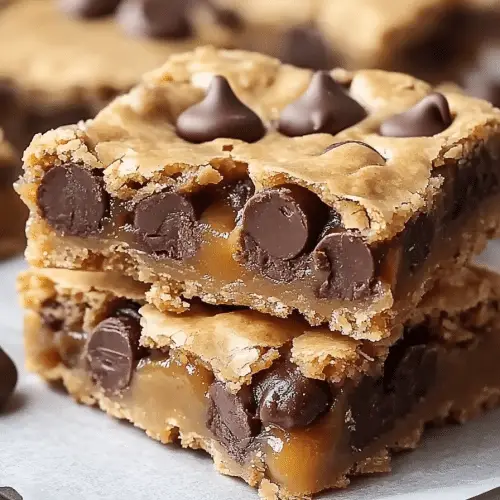
Better Than Anything Bars
Ingredients
Crust
- 2.5 cups crushed graham crackers
- 0.5 cups granulated sugar
- 0.625 cups unsalted butter, melted
Topping
- 1 large eggs beaten
- 1 cup caramel topping
- 2 cups semi-sweet chocolate chips
- 0.5 cups chopped pecans
Whipped Topping
- 8 ounces cream cheese, softened
- 1 cup powdered sugar
- 1 teaspoon vanilla extract
- 8 ounces whipped topping, thawed
Instructions
Preparation Steps
- Preheat oven to 350°F (175°C). Line a 9x13 inch baking dish with parchment paper.
- In a medium bowl, combine crushed graham crackers, sugar, and melted butter. Press evenly into the bottom of the prepared baking dish to form the crust.
- In a separate bowl, whisk together the beaten eggs and caramel topping. Pour this mixture evenly over the crust.
- Sprinkle the chocolate chips and chopped pecans over the caramel layer.
- Bake for 20-25 minutes, or until the edges are lightly golden brown and the caramel is set.
- While the crust is baking, prepare the whipped topping. In a large bowl, beat together the softened cream cheese, powdered sugar, and vanilla extract until smooth and creamy.
- Gently fold in the thawed whipped topping until well combined.
- Once the baked layer has cooled slightly, spread the whipped topping mixture evenly over the top.
- Chill in the refrigerator for at least 2 hours before cutting into bars and serving.


