Oh, hello there! I’ve got something truly special for you today, something that whispers of warm spices, flaky pastry, and that sweet, sticky hug of honey. It’s my absolute favorite way to make baklava, but in a form that’s just… easier. I’m talking about Baklava Cups! You know how sometimes you just crave that intensely rich, nutty, syrupy goodness of traditional baklava, but the thought of all those delicate layers feels a bit daunting? Yeah, me too. That’s exactly why I developed this shortcut. It’s the same incredible flavor profile, the same satisfying crunch, but without the marathon of phyllo folding. Seriously, this is the recipe I whip out when I want that “wow” factor without needing a whole afternoon. It’s like a little bite of heaven, perfectly portioned and surprisingly simple to pull off. Think of it as your secret weapon for impressing guests, or just treating yourself on a Tuesday night. It’s definitely my go-to when I want something festive but don’t want to spend hours in the kitchen.
Thank you for reading this post, don't forget to subscribe!What are Baklava Cups?
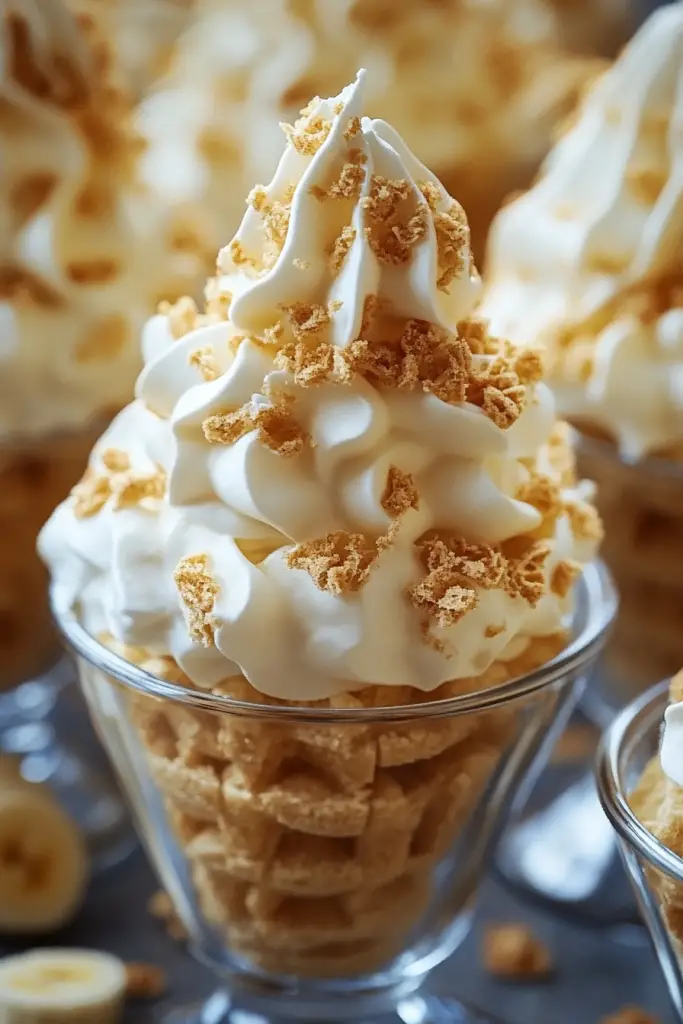
So, what exactly are these magical little Baklava Cups? Imagine all the glorious flavors and textures of classic baklava – that crisp, golden phyllo dough, the warm hug of cinnamon and nuts, and that glorious, shimmering honey syrup – but all nestled into convenient, individual cup-sized portions. Instead of meticulously layering sheets of phyllo in a big pan, we’re using a much more forgiving method. We gently press phyllo dough into muffin tins, creating little edible cups that are then filled with a fragrant nutty mixture, baked until golden and puffed, and then absolutely drenched in a luscious, spiced syrup. It’s essentially a deconstructed, de-fussy baklava that’s incredibly approachable for home bakers. It’s the same soul-satisfying dessert, just presented in a charmingly bite-sized way that’s perfect for parties or even just a delightful afternoon treat. They’re not as intimidating as a whole tray of traditional baklava, but they deliver all the same flavor punch!
Why you’ll love this recipe?
There are so many reasons why I’ve fallen head over heels for this Baklava Cups recipe, and I just know you will too! First and foremost, the FLAVOR is absolutely out of this world. We’re talking about that comforting, warm aroma of cinnamon and cloves mingling with toasted nuts, all enrobed in that sweet, sticky honey syrup. It’s pure bliss. But what I truly adore is the SIMPLICITY. If you’ve ever been intimidated by traditional baklava, this is your gateway recipe. The muffin tin does most of the work for you, making the phyllo shaping so much less finicky. It’s a lifesaver on busy days. And let’s talk COST-EFFICIENCY. Phyllo dough can sometimes be a bit pricey, and by using it this way, you get so many delicious servings from just a couple of packages. It feels so decadent but is surprisingly budget-friendly. Plus, the VERSATILITY is fantastic! You can customize the nut filling, play with the spice blend, or even experiment with different types of honey or syrup. They’re perfect for a special occasion, a holiday gathering, or even just a Simple Sweet craving. What I love most is that they *look* so elegant and impressive, but they’re genuinely easy to make. I’ve made them countless times for family gatherings, and they always disappear in minutes. My kids, who can be a little picky sometimes, absolutely adore these little cups – they’re just the right size for them!
How do you make Baklava Cups?
Quick Overview
Making these Baklava Cups is a wonderfully straightforward process. We’ll start by preparing a spiced nut filling. Then, we’ll gently press sheets of phyllo dough into a greased muffin tin, creating little wells. These cups are then generously filled with our nutty mixture and baked until they’re beautifully golden brown and wonderfully crisp. The final, crucial step is drowning them in a warm, aromatic honey syrup that soaks into every nook and cranny, creating that signature sticky-sweet magic. It’s a truly rewarding process where the aroma alone is worth the effort!
Ingredients
For the Main Batter (Phyllo Cups):
* 1 pound package phyllo dough, thawed according to package directions (usually overnight in the fridge, then a couple of hours at room temp) – make sure it’s fresh and pliable, not dry and brittle. If it cracks, don’t worry, it’s still usable!
For the Filling:
* 2 cups finely chopped walnuts (or a mix of walnuts and pistachios for an extra special touch!) – I like to give them a rough chop with a knife rather than a food processor to keep some texture.
* 1/2 cup granulated sugar
* 1 tablespoon ground cinnamon – good quality cinnamon makes a difference here!
* 1/2 teaspoon ground cloves – just a hint, you don’t want it overpowering.
* 1/4 teaspoon ground cardamom (optional, but it adds a lovely exotic note!)
* 1/4 cup unsalted butter, melted, plus more for greasing
For the Glaze:
* 1 1/2 cups honey – a good quality honey, like wildflower or orange blossom, makes this glaze sing.
* 1/2 cup water
* 1 strip lemon peel (about 2 inches long), removed with a vegetable peeler – this adds a subtle brightness.
* 1 cinnamon stick
* 2 whole star anise (optional, but adds a beautiful warmth)
“New family favorite! This Baklava Cups was so flavorful and ridiculously easy. Crowd-pleaser for sure.”
Step-by-Step Instructions
Step 1: Preheat & Prep Pan
First things first, let’s get our oven ready and our muffin tin prepared. Preheat your oven to 350°F (175°C). Now, generously grease your muffin tin. I like to use melted butter for this, making sure to get into every nook and cranny. You can use a pastry brush or even a paper towel dipped in butter. This step is crucial to ensure your beautiful Baklava Cups don’t stick!
Step 2: Mix Dry Ingredients
In a medium bowl, combine your finely chopped nuts, granulated sugar, cinnamon, cloves, and cardamom if you’re using it. Give it all a really good stir until everything is well distributed. You want to make sure those lovely spices are evenly coating all the nuts. The aroma at this stage is already promising!
Step 3: Mix Wet Ingredients
In a separate small bowl, melt your 1/4 cup of butter. You can do this in the microwave in 30-second increments or on the stovetop over low heat. Once melted, pour this into your dry nut mixture. Toss everything together with a fork until the nuts are lightly coated in butter. It should look a bit like damp sand, not soggy, just enough to help it bind together when baked.
Step 4: Combine
This step is about adding the nuts to the butter. I usually just pour the melted butter directly over the nut mixture and then stir it all together thoroughly with a fork. You want every bit of the nut mixture to be slightly moistened by the butter. This helps it hold its shape and get wonderfully crispy when baked.
Step 5: Prepare Filling
Actually, step 3 and 4 are essentially preparing the filling! We’ve combined the dry ingredients (nuts, sugar, spices) and then added the melted butter to bind it all together. So, this “step” is really just ensuring you’ve got a beautiful, fragrant nutty mixture ready to go. It should be loose enough to spoon easily but not wet.
Step 6: Layer & Swirl
This is where the magic happens with the phyllo! Unroll your thawed phyllo dough. Keep a damp kitchen towel handy to cover the sheets you’re not actively working with; phyllo dries out SO fast. Take one sheet of phyllo, brush it lightly with melted butter, then lay another sheet on top. Brush that one with butter. Repeat this process until you have about 4-5 layers of phyllo stacked together. Then, cut this buttered stack into squares that are roughly the size of your muffin cups (about 3-4 inches square is usually good). Gently press one buttered phyllo square into each muffin cup, allowing the edges to ruffle and extend slightly over the rim. Repeat with another layer of phyllo in each cup, tucking and ruffling it as you go. You want to create a sturdy little cup. Don’t worry if it’s not perfect; the rustic look is part of the charm! Once your cups are lined, spoon the nut filling generously into each one, pressing down slightly. You can also gently swirl some of the nut mixture into the top layer of phyllo for a pretty marbled effect before baking if you like, but it’s totally optional!
Step 7: Bake
Place your prepared muffin tin in the preheated oven. Bake for 20-25 minutes, or until the edges of the phyllo are beautifully golden brown and crisp, and the nut filling is fragrant. Keep an eye on them, as phyllo can go from golden to burnt very quickly! The exact time will depend on your oven.
Step 8: Cool & Glaze
While your Baklava Cups are baking, let’s make the syrup. In a small saucepan, combine the honey, water, lemon peel, cinnamon stick, and star anise (if using). Bring this mixture to a boil over medium heat, then reduce the heat and let it simmer gently for about 5-7 minutes. You want it to thicken slightly. Once simmering, remove from heat and let it steep for another 10 minutes or so to infuse the flavors, then strain out the solids. Once the Baklava Cups are out of the oven, let them cool in the muffin tin for about 5-10 minutes. This is crucial! Then, carefully remove them from the tin and place them on a wire rack set over a baking sheet (to catch drips). While the cups are still warm, begin spooning the warm syrup generously over each one. You want them to be absolutely drenched! The warm cups will absorb the syrup beautifully.
“The Baklava Cups turned out amazing. My kids asked for seconds. Saving this one!”
Step 9: Slice & Serve
Allow the Baklava Cups to cool completely on the wire rack, letting that glorious syrup soak in and thicken. This can take a couple of hours. Once they’re fully cooled, they’re ready to be enjoyed! They are best served at room temperature. You can serve them as is, or if you want to get fancy, a tiny dusting of chopped pistachios on top looks lovely. If you’ve made them in a mini-muffin tin, they’re perfect little two-bite treats!
What to Serve It With
These Baklava Cups are so incredibly versatile, they fit right in on almost any occasion. For a delightful BREAKFAST, imagine serving them alongside a strong, hot cup of coffee or a creamy latte. Their sweetness is a lovely counterpoint to a bitter brew. For BRUNCH, they look absolutely stunning arranged on a tiered stand. I love to pair them with fresh fruit like berries or figs, and a sparkling rosé or a mimosa is always a hit. As a special DESSERT, they are simply divine after a rich meal. Serve them with a dollop of Greek yogurt or a scoop of vanilla bean Ice Cream. A small glass of sweet dessert wine, like a Moscato or a late-harvest Riesling, is also a wonderful complement. And for those COZY SNACKS, they are pure comfort! Enjoy one (or two!) with a mug of herbal tea or a rich hot chocolate on a chilly afternoon. My family has a tradition of having them after our Christmas Eve dinner – they feel so festive and special, and everyone gets their own little perfect portion. They’re also fantastic to bring to potlucks because they travel so well and are always a guaranteed crowd-pleaser!
Top Tips for Perfecting Your Baklava Cups
Alright, let’s dive into some of the little secrets and tricks I’ve learned over the years to make these Baklava Cups absolutely perfect every single time. When it comes to the phyllo dough, the key is really working with it when it’s thawed but not overly warm or sticky. If your kitchen is very humid, phyllo can get a bit unruly. My trick is to always have a slightly damp (not wet!) kitchen towel ready to drape over the sheets I’m not currently using. This keeps them from drying out prematurely. If a sheet tears, don’t fret! Just butter it, layer it with another sheet, and press it into the muffin tin. The filling and syrup will hide most imperfections. For the nut FILLING, I can’t stress enough the importance of finely chopping the nuts. You don’t want big chunks; you want a texture that can easily pack into the phyllo cups. Using a mix of walnuts and pistachios adds a wonderful complexity and beautiful color variation. I often toast my nuts lightly for about 5-7 minutes at 350°F (175°C) before chopping them, which really intensifies their flavor. For the SWIRL effect on top, if you choose to do it, make sure you only gently swirl the nut mixture into the top layer of phyllo before baking. If you press too hard, you risk tearing the delicate dough. When it comes to the GLAZE, the consistency is everything. You want it warm when it hits the warm baklava cups. If your syrup cools too much, it won’t absorb properly. If it’s too hot, it might make the phyllo a bit too soggy. The lemon peel is non-negotiable for me; it adds a beautiful brightness that cuts through the sweetness. I’ve tried it without, and it just feels like something is missing. For BAKING, ovens really do vary, so start checking around the 20-minute mark. You’re looking for that deep golden brown color on the phyllo edges. If the tops are browning too quickly but the phyllo isn’t crisp yet, you can loosely tent the muffin tin with foil for the last 5-10 minutes of baking. Finally, for ingredient swaps, I’ve experimented with pecans in place of some walnuts, and they work beautifully, offering a slightly different nutty profile. I’ve also tried adding a touch of orange zest to the nut mixture, which is lovely, especially if you use orange blossom honey in the glaze!
Storing and Reheating Tips
So, you’ve made a beautiful batch of Baklava Cups and have some leftovers (which is rare in my house, but it happens!). Storing them properly is key to maintaining that wonderful crispness and syrupy goodness. For ROOM TEMPERATURE storage, this is actually my preferred method if they’re going to be eaten within a day or two. Once they’ve cooled completely after glazing, store them in an airtight container. You might want to place a piece of parchment paper between layers if you’re stacking them to prevent them from sticking together. They’ll stay delicious for about 2-3 days at room temperature. If you need to store them longer, REFRIGERATOR STORAGE is your best bet. Place them in an airtight container. The cold will make the phyllo a bit softer, but the syrup will still be lovely. They should keep well in the fridge for up to a week. To bring them back to their former glory, you can gently reheat them in a low oven (around 250°F or 120°C) for about 5-10 minutes to crisp up the phyllo slightly. This is especially good if you’ve stored them in the fridge. FREEZER INSTRUCTIONS are possible, though I usually find they don’t last long enough to warrant it! If you want to freeze them, make sure they are *completely* cooled and fully glazed. Wrap each individual cup tightly in plastic wrap, then place them in a freezer-safe bag or container. They should last for up to 2-3 months. To thaw, transfer them from the freezer to the refrigerator overnight. When it comes to the GLAZE timing, it’s best to apply it when the cups are warm and the glaze is warm. If you’re planning to freeze them, it’s often best to glaze them *after* thawing and gently reheating, rather than before freezing, to maintain the best texture.
Frequently Asked Questions
Final Thoughts
There you have it – my absolute favorite way to enjoy the incredible flavors of baklava without all the fuss. These Baklava Cups are truly a testament to how simple, comforting, and utterly delicious homemade treats can be. They’re perfect for when you want to make something special that feels decadent and impressive, but you also want to spend more time enjoying your company (or just relaxing!) rather than laboring in the kitchen. The way the phyllo gets so delightfully crisp and then soaks up that sweet, spiced syrup is just heavenly. If you’re someone who loves the taste of traditional baklava but has always been a little intimidated, please, please give these a try. I promise you won’t regret it! They’re proof that you can achieve amazing results with a little bit of creativity and a muffin tin. I’d be absolutely thrilled to hear how yours turn out, so please leave a comment below and tell me about your experience, any variations you tried, or how quickly they disappeared! Happy baking, my friends!

Baklava Cups
Ingredients
Main Ingredients
- 0.25 cup unsalted butter melted
- 1.5 cups chopped walnuts
- 0.5 cup granulated sugar
- 1 teaspoon ground cinnamon
- 0.5 cup honey
- 1 package phyllo dough thawed according to package directions
Instructions
Preparation Steps
- Preheat your oven to 350°F (175°C). Lightly grease a 12-cup muffin tin.
- In a medium bowl, combine the chopped walnuts, granulated sugar, and ground cinnamon.
- Carefully unroll the thawed phyllo dough. Cover the unused sheets with a damp kitchen towel to prevent them from drying out.
- Take one sheet of phyllo dough and brush it lightly with melted butter. Layer another sheet on top and brush with butter. Repeat this process until you have 4-5 layers.
- Cut the layered phyllo dough into squares large enough to fit into the muffin cups. Gently press each square into a muffin cup, allowing the edges to fan out.
- Spoon about 1-2 tablespoons of the walnut mixture into each phyllo-lined muffin cup.
- Bake for 20-25 minutes, or until the phyllo is golden brown and crispy.
- While the baklava cups are baking, gently warm the honey in a small saucepan over low heat. Do not boil.
- Once baked, remove the muffin tin from the oven. Immediately drizzle the warm honey over the hot baklava cups.
- Let the baklava cups cool in the muffin tin for at least 15-20 minutes before carefully removing them. This allows the syrup to soak in and set.


