You know, sometimes when I’m craving something truly special, something that feels like a warm hug on a plate but without all the fuss, my mind immediately goes to these baklava cups. They’re this little slice of heaven, a taste of pure indulgence that surprisingly doesn’t require a full afternoon of wrestling with sticky dough. I remember the first time I tried to make traditional baklava, it was a… well, let’s just say it involved a lot of patience, a fair bit of mess, and a few tears of frustration. But these baklava cups? They’re my secret weapon. They deliver all those rich, nutty, honey-drenched flavors you adore, but in a format that’s just so much more manageable. Honestly, if you’re looking for a dessert that wows without stressing you out, these are it. They’re like the sophisticated cousin of your favorite brownie, but with that irresistible Middle Eastern flair. Plus, the “cup” part just makes them so darn cute and easy to serve! My kids practically inhale them, and honestly, I can’t blame them.
Thank you for reading this post, don't forget to subscribe!What are Baklava Cups?
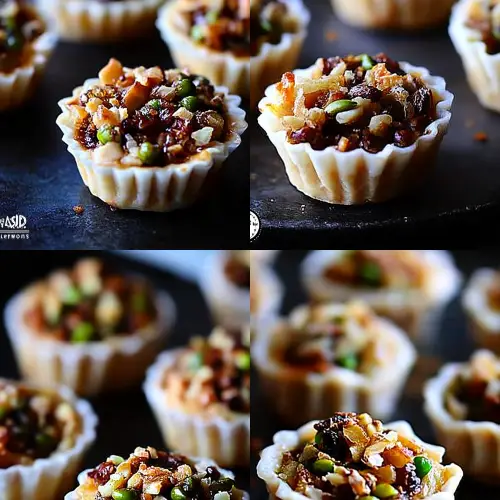
So, what exactly are these magical little treats? Think of them as a deconstructed, bite-sized version of classic baklava, but nestled neatly into muffin tins. Instead of layering sheets of phyllo dough in a big pan, we’re using those same delicate, crispy layers, but shaping them into little cups. Inside, you’ll find that wonderfully fragrant filling – usually a mix of finely chopped nuts like walnuts or pistachios, spiced with cinnamon and sometimes a hint of cloves, all bound together with a touch of sugar. And the best part? They get drenched in a warm, syrupy glaze, often infused with a splash of rosewater or orange blossom water, which just takes them to a whole other level of deliciousness. It’s essentially all the best bits of traditional baklava, but made super approachable for the home baker. No more wrestling with massive sheets of dough that want to tear no matter what you do! This way, you get that satisfying crunch, that rich nutty goodness, and that sweet, sticky finish in a perfectly portioned little package. It’s genius, really.
Why you’ll love this recipe?
What are some of the reasons why this recipe has become a staple in my kitchen, and I just know you’re going to fall in love withflavor is just out of this world. Imagine that crisp, shattering bite of phyllo pastry giving way to a warm, spiced nut filling, all coated in a sweet, fragrant syrup. It’s intensely satisfying, a perfect balance of sweet, nutty, and aromatic. And the texture? Oh my goodness, that contrast between the delicate layers of pastry and the hearty crunch of the nuts is just divine. What I absolutely adore is the simplicity compared to traditional baklava. Seriously, using muffin tins makes life so much easier. You get those beautiful, individual portions without the stress of trying to get perfectly even layers in a large pan. It’s practically foolproof! Then there’s the Cost-efficiency: What is the best way to measure cost-efficiency?. While it might seem fancy, the ingredients are surprisingly budget-friendly. Walnuts and sugar are usually pretty accessible, and phyllo dough is quite affordable. You get a lot of bang for your buck with this recipe. And finally, the versatility! These little cups are amazing for so many occasions. They’re perfect for parties because they’re easy to serve and everyone loves having their own little treat. They’re also fantastic for a cozy afternoon tea, or even as a little pick-me-up when you just need something sweet. They remind me a bit of my mini apple tarts, in that they’re small but pack a mighty flavor punch. Honestly, what I love most about these baklava cups is that they feel incredibly decadent and special, but they’re achievable even on a weeknight when you’re short on time but craving something truly delicious.
How to Make Baklava Cups
Quick Overview
Making these delightful baklava cups is surprisingly straightforward! We’ll start by preparing our muffin tins, then we’ll gently layer sheets of phyllo dough, brushing each one with melted butter to create those signature crisp layers. Next, we’ll fill these little pastry nests with a fragrant, spiced nut mixture. After a golden bake, they’ll be drizzled with a sweet, aromatic syrup. The whole process is designed to be manageable and rewarding, giving you those classic baklava flavors in an easy-to-handle cup. It’s a lifesaver when you want that impressive dessert without the usual baklava drama.
Ingredients
For the Main Batter (the crispy layers):
1 package (about 1 pound) phyllo dough, thawed according to package directions
1 cup (2 sticks) unsalted butter, melted (you might need a little extra for brushing)
Tip: It’s super important to thaw your phyllo dough in the refrigerator overnight. Don’t try to rush it at room temperature, or it can get sticky and hard to work with. Also, keep the unused sheets covered with a damp (not wet!) kitchen towel while you’re working to prevent them from drying out.
For the Filling:
2 cups finely chopped walnuts (or a mix of walnuts and pistachios)
1/2 cup granulated sugar
1 teaspoon ground cinnamon
1/4 teaspoon ground cloves (optional, but oh-so-good!)
Preparation Notes: I like to pulse my nuts in a food processor a few times, but be careful not to turn them into powder! We want some texture. You can also chop them by hand. Some people like to add a tablespoon of breadcrumbs here to help absorb some of the syrup, but I find it’s not always necessary.
For the Glaze:
1 1/2 cups granulated sugar
1 cup water
1 tablespoon fresh lemon juice
1 teaspoon rosewater or orange blossom water (optional, but highly recommended for that authentic floral aroma!)
Consistency Tips: You want the glaze to be syrupy but not too thick, almost like a thin honey. If it gets too thick, you can add a tablespoon or two of warm water. Flavor Options: Feel free to experiment! A tiny splash of vanilla extract or even a bit of citrus zest can be lovely too.
“The baklava cups turned out amazing. My kids asked for seconds. Saving this one!”
Step-by-Step Instructions
Step 1: Preheat & Prep Pan
First things first, preheat your oven to 350°F (175°C). I always like to get my oven going as soon as I start thinking about baking. Then, grab a standard 12-cup muffin tin. You don’t need to grease it; the butter from the phyllo will do the job beautifully. Just make sure it’s clean and ready to go.
Step 2: Mix Dry Ingredients
In a medium bowl, combine your finely chopped walnuts (or nut mixture), sugar, cinnamon, and ground cloves if you’re using them. Give it all a good stir with a fork until everything is well distributed. This is where all those lovely warm spices start to mingle. It should smell amazing even at this stage!
Step 3: Mix Wet Ingredients
In a small saucepan, combine the water, sugar, and lemon juice for the glaze. Stir gently over medium heat until the sugar dissolves completely. Bring it to a simmer, then let it bubble gently for about 5-7 minutes. You’re looking for it to thicken just slightly. Turn off the heat and stir in the rosewater or orange blossom water, if using. Let it cool; it will thicken more as it cools. Meanwhile, make sure your butter is melted and ready for brushing.
Step 4: Combine
This is where we start building our cups! Take one sheet of phyllo dough and lay it flat on your work surface. Brush it all over with the melted butter. Then, carefully lay another sheet of phyllo on top and brush it with butter. Repeat this process until you have about 4-5 layers of phyllo dough stacked on top of each other. Don’t worry if they’re not perfectly aligned; a little rustic charm is good! Now, cut this buttered stack into squares large enough to fit into your muffin cups. I usually aim for about 3×3 inch squares. Gently press each square into the muffin cups, letting the edges ruffle up a bit to create a lovely cup shape.
Step 5: Prepare Filling
Now that your phyllo cups are nestled in the muffin tin, it’s time to add that delicious filling. Spoon about 1-2 tablespoons of the nut mixture into each phyllo cup. Don’t pack it in too tightly; you want some breathing room for those flavors to develop.
Step 6: Layer & Swirl
This step is a bit more involved but crucial for that authentic baklava texture. Take another sheet of phyllo, butter it, then lay another on top and butter it. Repeat until you have about 3-4 layers. Cut these layered sheets into slightly smaller squares than your first batch, so they fit nicely over the filling. Gently place one of these smaller, buttered phyllo layers on top of the nut filling in each cup. You can tuck the edges down slightly or just let them lie flat. The butter will help them crisp up beautifully.
Step 7: Bake
Pop the muffin tin into your preheated oven. Bake for about 20-25 minutes, or until the tops are a beautiful golden brown and the edges are crispy. Keep an eye on them, as ovens can vary! The aroma that will fill your kitchen is absolutely heavenly. You’re looking for that deep, rich color that signifies perfect crispiness.
Step 8: Cool & Glaze
This is a crucial step for texture. As soon as the baklava cups come out of the oven, while they are still piping hot, immediately spoon the cooled syrup over them. The hot pastry will absorb the syrup much better, creating that wonderful moist-but-crispy texture. Let them sit in the muffin tin for at least 10-15 minutes to absorb all that delicious glaze before attempting to remove them. This allows the syrup to really seep in and do its magic.
“Made the baklava cups tonight and wow — perfect weeknight dinner. Will definitely make again!”
Step 9: Slice & Serve
Once they’ve had a chance to soak up the syrup and cool slightly (they’re best served warm, but not scorching hot!), you can gently loosen the edges with a thin knife or offset spatula and carefully remove them from the muffin tin. You can serve them as they are, or if you want to get fancy, sprinkle a few chopped pistachios on top for a pop of green. Slice and serve with coffee or tea and watch them disappear!
What to Serve It With
These baklava cups are so versatile, they fit right in wherever you need a touch of sweet elegance. For breakfast, imagine them alongside a strong cup of coffee. They’re not overly sweet before you’ve had your caffeine fix, and they offer a lovely little crunch to start the day. I sometimes just have one with my morning brew when I need a little treat. For brunch, they really shine. Arrange them on a tiered stand with other pastries and fruits for a beautiful presentation. They pair wonderfully with mimosas or a light sparkling wine. As dessert, they are the ultimate after-dinner delight. Serve them with a dollop of Greek yogurt or a scoop of vanilla bean ice cream for an extra layer of indulgence. They’re also fantastic with a rich espresso or a digestif. And for those cozy snacks I mentioned, they’re perfect with a cup of hot tea, especially on a chilly evening. My family loves them when we have movie nights; they’re easy to hold and share (or not share!). I’ve even served them with a side of fresh berries, and the tartness of the fruit cuts through the sweetness beautifully. It’s a taste of pure comfort and celebration, all rolled into one little cup.
Top Tips for Perfecting Your Baklava Cups
Over the years, I’ve picked up a few tricks that really make these baklava cups sing. For the phyllo dough prep, the most important thing is keeping it moist while you work. Always have a slightly damp kitchen towel covering the sheets you’re not actively using. If it dries out, it will crack and break, and that’s just frustrating. I learned that the hard way, let me tell you! When it comes to mixing advice, don’t overwork the nut filling. You want a nice texture, not a paste. Also, be gentle when pressing the phyllo into the muffin tins; you’re not trying to compact it, just shape it. For swirl customization, I sometimes like to add a little extra cinnamon or finely chopped nuts on top before baking for a more rustic look, or press a whole pistachio into the center of the filling before adding the top layer of phyllo for a decorative touch. In terms of ingredient swaps, if you don’t have walnuts, pecans are a fantastic substitute. For the syrup, if you’re not a fan of rosewater or orange blossom water, you can simply omit it or add a strip of lemon zest while it simmers, removing it before you glaze. When it comes to baking tips, keep a close eye on them. The tops can go from golden to burnt pretty quickly, especially if your oven has hot spots. Rotating the pan halfway through baking can help ensure even browning. For glaze variations, if you prefer a lighter sweetness, you can reduce the sugar in the syrup by about a quarter cup, but be aware it might make the glaze a little thinner. I’ve also tried adding a tiny bit of honey to the sugar syrup, which gives it a lovely depth of flavor. The key is that warm syrup applied to hot pastry – that’s what creates the magic. Trust me on this one!
Storing and Reheating Tips
Storing these beautiful baklava cups is fairly simple, but there are a few things to keep in mind to maintain their glorious crispiness. When they’re completely cooled, you can store them in an airtight container at room temperature for up to 3 days. They’ll start to soften slightly after the first day, but they’re still delicious. I usually place a piece of parchment paper between layers to prevent sticking. If you need to store them for longer, the refrigerator is an option. Place them in an airtight container, and they should keep for about a week. However, refrigeration can make them a bit softer. I find they are best brought back to room temperature before serving if they’ve been refrigerated. For freezer instructions, wrap them very well first in plastic wrap, then in a layer of aluminum foil, or place them in a freezer-safe container. They’ll keep in the freezer for up to 2-3 months. To thaw, let them come to room temperature in their packaging for a few hours. For glaze timing advice, I always recommend glazing them right after they come out of the oven. If you plan to freeze them, you can also under-bake them slightly (by about 5 minutes), let them cool completely, then freeze. Glaze them *after* they have thawed and been gently reheated in a low oven (around 300°F or 150°C for about 5-7 minutes) until warm and crisp again. This is my preferred method for freezing, as it keeps them from getting soggy.
Frequently Asked Questions
Final Thoughts
There you have it – my absolute favorite way to enjoy the incredible flavors of baklava without any of the pre-bake jitters! These baklava cups are a testament to how delicious and rewarding baking can be when you have a recipe that’s both impressive and achievable. They’re perfect for making a dessert table look incredibly sophisticated, or just for treating yourself to something truly special after a long day. The crunch of the phyllo, the warmth of the spices, the sweetness of the syrup – it’s a symphony of flavors and textures that just makes you happy. If you enjoyed these, you might also want to check out my recipe for [Link to another relevant recipe, e.g., Spiced Orange Cookies] for more delightful baked treats. I can’t wait to hear what you think of these baklava cups! Please leave a comment below with your thoughts, any variations you tried, or how they were received at your next gathering. Happy baking, my friends!
Baklava Cups
Ingredients
Phyllo Dough and Nuts
- 1 package phyllo dough thawed according to package directions
- 2 cups walnuts finely chopped
- 1 cup pistachios finely chopped
- 1 teaspoon ground cinnamon
- 0.5 teaspoon ground cloves
Butter Mixture
- 1 cup unsalted butter melted
Syrup
- 1 cup granulated sugar
- 0.5 cup water
- 0.25 cup honey
- 1 tablespoon lemon juice
- 1 stick cinnamon stick optional
- 3 whole cloves optional
Instructions
Preparation Steps
- Preheat your oven to 350°F (175°C). Lightly grease mini muffin tins.
- In a medium bowl, combine the chopped walnuts, pistachios, cinnamon, and cloves. Mix well.
- Unroll the thawed phyllo dough. Keep it covered with a damp cloth to prevent it from drying out. Take one sheet of phyllo and brush it generously with melted butter. Layer another sheet on top and brush with butter. Repeat until you have 4-5 layers.
- Cut the layered phyllo sheets into squares that fit into your mini muffin tin cups.
- Gently press the phyllo squares into the muffin tin cups, forming little cups. Brush the edges and inside of the cups with more melted butter.
- Fill each phyllo cup with about 1-2 tablespoons of the nut mixture.
- Bake for 20-25 minutes, or until the phyllo is golden brown and crisp.
- While the baklava cups are baking, prepare the syrup. In a small saucepan, combine sugar, water, honey, lemon juice, cinnamon stick, and cloves (if using).
- Bring the syrup mixture to a boil over medium heat. Reduce heat and simmer for 5-7 minutes, or until slightly thickened. Remove from heat and discard cinnamon stick and cloves.
- As soon as the baklava cups come out of the oven, pour the warm syrup evenly over them. Let them cool completely in the muffin tins, allowing the syrup to soak in.
- Once cooled, carefully remove the baklava cups from the muffin tins. Serve and enjoy!