You know, there are certain dishes that just become pillars in your kitchen. They’re the ones you can pull out of your hat when you’re exhausted, when unexpected guests arrive, or when you just need something comforting and delicious without a fuss. For me, that dish is, without a doubt, my go-to Baked Chicken breast. I know, I know, “baked chicken breast” might not sound like the most exciting phrase in the culinary world. It can sometimes conjure up images of dry, bland disappointments. But trust me, this isn’t that. This is the baked chicken breast that makes everyone at the table ask for seconds. It’s incredibly tender, bursting with flavor, and so ridiculously easy to make, it feels like a little bit of magic. I’ve spent years perfecting this simple recipe, and it’s become an absolute lifesaver on those busy weeknights when dinner needs to be on the table fast but still feel like a treat. It’s the perfect foundation for so many meals, a true workhorse in my kitchen, and I’m so excited to finally share it with you all.
Thank you for reading this post, don't forget to subscribe!What is the best recipe for baked chicken breast?
So, what exactly makes this Baked Chicken breast recipe so special? Think of it as the platonic ideal of chicken breast. It’s not overly complicated, it doesn’t require a million exotic ingredients, and it certainly doesn’t involve hours of marinating or complex techniques. It’s essentially a perfectly seasoned, oven-baked chicken breast that comes out incredibly moist and flavorful every single time. The magic lies in a simple yet effective combination of common pantry staples and a foolproof method that locks in all the juices. It’s the kind of dish that’s humble in its origins but delivers big on taste and satisfaction. It’s the reliable friend of the dinner table, the one you can always count on to be delicious, and something that even the pickiest eaters in my family devour without a second thought.
Why you’ll love this recipe?
There are so many reasons why this Baked Chicken breast recipe has earned a permanent spot in my recipe rotation, and I just know you’re going to fall in love with it too! First and foremost, let’s talk about the FLAVOR. Oh my goodness, the flavor! Even though it’s simple, the seasonings come together to create this beautiful savory, slightly herbaceous note that just sings. It’s not overpowering, but it’s definitely not boring. It has a depth that makes you wonder if you spent hours prepping, but you didn’t!
Then there’s the SIMPLICITY. This is where this recipe truly shines. You can have this prepped and in the oven in less than 15 minutes. Seriously! It’s the kind of meal that makes me feel like a culinary superhero on nights when I’m staring into the fridge at 5 PM with zero dinner plans. It’s also incredibly COST-EFFECTIVE. Chicken Breast is often on sale, and the ingredients needed are ones you probably already have in your pantry. This means you can whip up a healthy, delicious meal without breaking the bank.
And let’s not forget VERSATILITY! This Baked Chicken breast is a blank canvas. It’s amazing on its own, sliced over a big salad, diced into tacos, shredded for sandwiches, or even incorporated into pasta dishes. It’s the kind of recipe that can truly adapt to whatever you’re craving or whatever you have on hand. What I love most about this particular recipe is that it solves the dreaded “dry chicken breast” problem. I’ve experimented with so many methods, and this one consistently delivers that melt-in-your-mouth tenderness. It’s miles better than any store-bought rotisserie chicken, and honestly, it rivals anything you’d get at a restaurant, but made right in your own oven. It’s my go-to when I want a satisfying meal that’s also good for you.
How do I make a baked chicken breast?
Quick Overview
This recipe is all about minimal effort for maximum reward. You’ll simply season your chicken breasts generously, tuck them into a baking dish, and let the oven do all the heavy lifting. The key is a balanced seasoning blend and just the right baking temperature and time to ensure it cooks through perfectly without drying out. It’s a straightforward process that yields incredibly tender, flavorful chicken breast, ready to be enjoyed as is or incorporated into your favorite dishes. This is the kind of recipe that builds confidence in the kitchen.
Ingredients
For the Chicken Breast:
I always look for nice, plump chicken breasts, about 6-8 ounces each. It’s worth it to get good quality ones if you can, but honestly, any standard pack works. Make sure they’re relatively uniform in thickness for even cooking. If one is super thick and another is thin, you might want to pound the thicker one slightly so they cook at the same rate.
For the Flavor Boost (My Signature Seasoning Blend):
This is where the real flavor comes from! It’s a simple mix that I’ve tinkered with over the years.
- 1 tablespoon smoked paprika (this adds a wonderful depth and color)
- 2 teaspoons garlic powder (never onion powder, always garlic powder for me!)
- 1 teaspoon onion powder
- 1 teaspoon dried Italian herbs (or a mix of oregano, thyme, and rosemary)
- 1/2 teaspoon black pepper
- 1/2 teaspoon sea salt (or to taste, but don’t be shy with the salt!)
- 1/4 teaspoon cayenne pepper (optional, for a tiny kick!)
For Cooking:
A little bit of fat helps the seasonings adhere and keeps things from sticking.
- 2 tablespoons olive oil (or avocado oil, whichever you have on hand)
Step-by-Step Instructions
Step 1: Preheat & Prep Pan
First things first, preheat your oven to 400 degrees Fahrenheit (200 degrees Celsius). While the oven is heating up, grab a baking dish. An 8×8 or 9×13 inch dish works perfectly, depending on how many chicken breasts you’re making. You don’t need to grease it if you’re using enough oil on the chicken itself, but I sometimes like to give it a quick spray or a light brush of olive oil just for extra insurance. It helps with cleanup, which is always a win in my book!
Step 2: Mix Dry Ingredients
In a small bowl, combine all the ingredients for your signature seasoning blend: smoked paprika, garlic powder, onion powder, Italian herbs, black pepper, sea salt, and cayenne pepper (if you’re using it). Give it a good whisk with a fork or a small whisk until everything is thoroughly mixed. This ensures that every bite of chicken has a balanced amount of flavor. I usually make a big batch of this blend and keep it in a little jar in my spice cabinet for super quick meals later!
Step 3: Prepare Chicken Breasts
Pat your chicken breasts completely dry with paper towels. This is a crucial step! It helps the seasonings stick better and allows the chicken to get a slightly crispier exterior instead of steaming. If your chicken breasts are very thick, you can gently pound them to an even thickness using a meat mallet or the flat side of a heavy pan. Just place them between two pieces of plastic wrap or in a sturdy plastic bag and tap them until they’re about 3/4 inch thick all the way around. This helps them cook more evenly and prevents the thinner ends from drying out before the thicker middle is cooked.
Step 4: Season the Chicken
Drizzle the olive oil evenly over the chicken breasts in your baking dish, or place them in a bowl and toss them with the oil. Make sure each piece is lightly coated. Then, generously sprinkle your prepared seasoning blend all over the chicken. Don’t be shy here! Really rub the seasonings into the meat on all sides. I like to get my hands in there and make sure every nook and cranny is covered. This is where the flavor really starts to build.
Step 5: Arrange for Baking
Place the seasoned chicken breasts in a single layer in your baking dish. Make sure they aren’t too crowded; if they are, the chicken will steam instead of bake, and you won’t get that lovely slightly browned exterior. If you’re making a larger batch, you might need to use two dishes. This ensures even cooking and better texture.
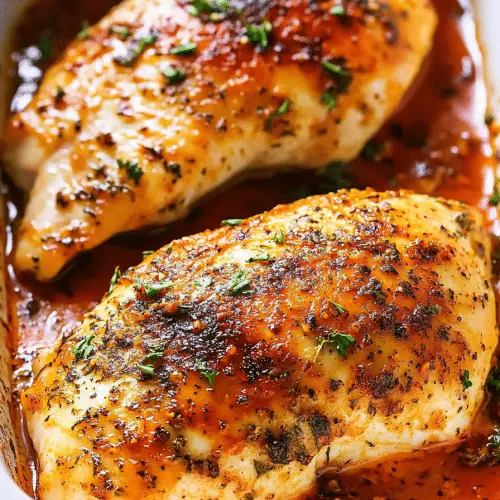
“Packed with flavor and so simple. Exactly what I wanted from this baked chicken breast!”
Step 6: Bake to Perfection
Pop the baking dish into your preheated oven. Bake for approximately 25-30 minutes. The exact time will depend on the thickness of your chicken breasts and your oven. The best way to tell if they’re done is to use a meat thermometer. You’re looking for an internal temperature of 165 degrees Fahrenheit (74 degrees Celsius) in the thickest part of the breast. If you don’t have a thermometer, you can poke the thickest part with a knife; the juices should run clear, not pink.
Step 7: Rest the Chicken
Once the chicken reaches the correct temperature, remove the baking dish from the oven. This is another crucial step for juicy chicken: let it rest! Tent the chicken loosely with foil and let it sit for at least 5-10 minutes. This allows the juices to redistribute throughout the meat. If you cut into it immediately, all that lovely moisture will just run out onto the plate, leaving you with drier chicken. This little bit of patience makes a world of difference.
Step 8: Slice and Serve
After resting, slice the chicken breast against the grain. You’ll see how incredibly moist and tender it is! Serve it immediately with your favorite sides, or let it cool completely if you’re planning to use it in salads or sandwiches later in the week.
What to Serve It With
This baked chicken breast is so versatile, it’s practically a chameleon in the kitchen! It’s a fantastic base for so many meals, and I love how it can transition from a quick weeknight dinner to something a little more special for a weekend brunch.
For Breakfast: While it might seem unusual, I absolutely love having some leftover baked chicken breast for breakfast. It’s fantastic diced into an omelet or scrambled eggs. A little bit of cheese, some chopped herbs, and some of this chicken? Heavenly! It makes for a really satisfying and protein-packed start to the day. I often serve it with a side of toast or some roasted potatoes.
For Brunch: For a more elegant brunch spread, I’ll slice the chicken thinly and arrange it fanned out on a platter with some fresh fruit, maybe some deviled eggs or a light pasta salad. It’s a lighter option than some other brunch meats, and it pairs beautifully with mimosas or a sparkling rosé. It feels sophisticated but is so easy to prepare.
As Dessert: Okay, this one is a stretch for “dessert” in the sweet sense, but hear me out! When I’m craving something savory after a meal, or if I’m making a grazing board, I’ll serve thin slices of this chicken with some cheeses, olives, and crackers. It’s a wonderful, lighter alternative to heavier appetizers and really rounds out a charcuterie board beautifully. It’s also surprisingly good alongside something slightly sweet, like a fig jam.
For Cozy Snacks: On days when I need a little pick-me-up, I’ll often just grab a slice of this chicken breast. It’s incredibly satisfying on its own. But if I want to make it a bit more of a snack, I’ll pair it with some crunchy crackers, maybe a dollop of hummus or a slice of avocado. It’s a much healthier option than reaching for chips, and it keeps me full for much longer. It’s also wonderful chopped up and added to a quick chicken salad sandwich for a satisfying mid-day bite.
One of my favorite family traditions is to make a big batch on Sunday and then use it for various meals throughout the week. We’ll have it as a main course on Sunday night with roasted veggies, then use leftovers for chicken tacos on Tuesday, and finally, I’ll dice up any remaining chicken for my daughter’s lunchbox sandwiches on Friday. It’s just so incredibly adaptable and always a hit!
Top Tips for Perfecting Your Baked Chicken Breast
I’ve learned a few things over the years of making this recipe countless times, and I’m happy to share my hard-won wisdom with you! These tips are what take my baked chicken breast from good to absolutely unforgettable.
Chicken Prep is Key: The absolute most important thing you can do is pat your chicken breasts completely dry with paper towels. I cannot stress this enough! If the surface is wet, the seasonings won’t adhere properly, and you’ll end up with a steamed, soggy chicken instead of a beautifully baked one. Also, don’t skip the step of pounding thicker chicken breasts to an even thickness. This guarantees that every single bite is cooked perfectly, preventing dry ends and undercooked centers.
Don’t Be Shy with Seasoning: When I say generously season, I mean it! Chicken breast can be a bit of a blank slate, so it needs a good amount of flavor to shine. Make sure to coat all sides, pressing the spices in slightly. I’ve found that using a blend of spices, like the one I’ve shared, is far more flavorful than just salt and pepper. The smoked paprika adds a wonderful color and subtle smokiness that makes it extra special.
Oven Temperature Matters: Baking at 400°F (200°C) is crucial. This higher temperature allows the outside to get a nice sear and caramelization while the inside cooks quickly, locking in moisture. If your oven tends to run hot or cool, an oven thermometer can be your best friend. It’s better to be slightly over 400°F than under when you’re aiming for this kind of result.
The Magic of Resting: This is a non-negotiable step for me. After the chicken comes out of the oven, tent it loosely with foil and let it rest for at least 5-10 minutes. During baking, the juices are pushed to the center of the chicken. Resting allows those juices to redistribute throughout the entire breast, ensuring every slice is incredibly moist and flavorful. Cutting into it too soon is like letting all the good stuff escape!
Ingredient Swaps: While I love my signature blend, feel free to experiment! If you don’t have smoked paprika, regular paprika works, but you’ll miss that smoky depth. You can also swap the Italian herbs for herbes de Provence or a simple mix of dried oregano and thyme. For a little heat, increase the cayenne or add a pinch of red pepper flakes. If you’re watching sodium, you can reduce the salt, but be aware it will affect the overall flavor intensity. Olive oil is my preference for its flavor, but avocado oil or even a neutral vegetable oil will work just fine.
Checking for Doneness: Rely on your meat thermometer! It’s the most accurate way to ensure your chicken is perfectly cooked and safe to eat. Aim for 165°F (74°C) in the thickest part. Overcooked chicken is the enemy of juiciness, so pulling it out as soon as it hits temperature is key. If you don’t have a thermometer, cut into the thickest part; the juices should run clear.
“The baked chicken breast turned out amazing. My kids asked for seconds. Saving this one!”
Batch Cooking Wisdom: I often make a double batch of this chicken breast on a Sunday. It’s so easy to do, and having cooked chicken ready to go for the week is a game-changer. It’s perfect for meal prep, ensuring you have healthy protein options readily available for lunches and dinners. Just make sure to store it properly once cooled.
Storing and Reheating Tips
One of the best things about this baked chicken breast is how well it stores and reheats, making it a fantastic option for meal prep or for having delicious protein on hand throughout the week. I’ve tested various methods, and these are my go-to strategies for keeping it as fresh and flavorful as possible.
Room Temperature: Once the chicken has finished its resting period, it can be left at room temperature for up to two hours before needing to be refrigerated. It’s not really designed to be eaten cold or at room temperature unless it’s part of a dish like a salad or sandwich that’s meant to be served that way. For safety and quality, always refrigerate leftovers promptly.
Refrigerator Storage: Once the chicken has cooled down completely (this is important to prevent condensation that can make it soggy), store it in an airtight container. I usually slice or dice it before storing, which makes it easier to grab for meals. It will stay fresh and delicious in the refrigerator for about 3 to 4 days. The quality is best within the first 3 days, but it’s still perfectly good for snacking or adding to dishes on the fourth day.
Freezer Instructions: If you want to store it for longer, the freezer is your best friend! Once the chicken is completely cooled, wrap individual portions tightly in plastic wrap, then place them in a freezer-safe bag or container. This double-layer protection helps prevent freezer burn. Properly stored, baked chicken breast can last in the freezer for up to 2-3 months. When you’re ready to use it, thaw it overnight in the refrigerator. It’s best to reheat it rather than eat it thawed from frozen.
Reheating Advice: The best way to reheat this chicken breast is to keep it moist. My favorite method is to add it back into a small oven-safe dish with a tablespoon or two of chicken broth or water, cover it tightly with foil, and reheat it in a 350°F (175°C) oven for about 10-15 minutes, or until heated through. You can also gently reheat it in a skillet over medium-low heat with a splash of liquid, or even in the microwave, covered, for short intervals, checking frequently to avoid drying it out.
Glaze Timing Advice: If you were to add a glaze (though this recipe is fantastic without one!), I’d recommend glazing it right before you serve it, not for storage. Glazes tend to get sticky and can alter the texture of stored chicken, especially in the freezer. For fresh chicken, if you want a glaze, apply it after reheating.
Frequently Asked Questions
Final Thoughts
I truly hope you give this baked chicken breast recipe a try. It might seem like a simple concept, but the care in preparation and the balance of seasonings make all the difference. It’s become such a staple in my home because it’s reliable, delicious, and makes busy weeknights so much more manageable. It’s proof that you don’t need fancy ingredients or complicated techniques to create something truly satisfying and wonderful for yourself and your loved ones. This is more than just a recipe; it’s a little piece of my kitchen that I’m so happy to share with yours.
If you’re looking for more easy and flavorful weeknight meals, be sure to explore my other chicken recipes, like my speedy sheet pan chicken and veggies or my creamy lemon herb chicken. They’re all designed with busy families and delicious results in mind! I can’t wait to hear what you think of this baked chicken breast. Please leave a comment below to let me know how yours turned out, any variations you tried, or even just to say hello! And if you loved it, sharing it with your friends would mean the world to me.
Happy baking!
baked chicken breast
Ingredients
Main Ingredients
- 4 each boneless, skinless chicken breasts
- 2 tablespoons olive oil
- 1 teaspoon paprika
- 0.5 teaspoon garlic powder
- 0.5 teaspoon onion powder
- 0.25 teaspoon dried oregano
- 0.25 teaspoon dried thyme
- 0.5 teaspoon salt or to taste
- 0.25 teaspoon black pepper or to taste
Instructions
Preparation Steps
- Preheat oven to 375°F (190°C).
- Pat the chicken breasts dry with paper towels.
- In a small bowl, combine the olive oil, paprika, garlic powder, onion powder, oregano, thyme, salt, and pepper.
- Brush the chicken breasts with the spice mixture, ensuring they are evenly coated.
- Place the chicken breasts in a baking dish.
- Bake for 20-30 minutes, or until the internal temperature reaches 165°F (74°C) and the juices run clear.
- Let the chicken rest for 5-10 minutes before slicing and serving.


