Imagine a cookie so colorful, so fun, and downright delicious that it feels like a little piece of fall straight from your childhood. That’s exactly what these candy corn cookies are to me — a nostalgic trip back to Halloween nights with glowing jack-o’-lanterns, costumes, and bags full of sweet surprises. I always make these when the weather starts to turn crisp and the leaves begin to crunch underfoot. Trust me, this one’s a lifesaver on busy nights when you want something sweet but don’t want to turn on the oven for hours. The smell alone — sugar, vanilla, a hint of buttery goodness — will fill your kitchen with cozy vibes and get everyone coming to see what’s baking. My kids ask for these all the time, especially around October. They’re perfect for sharing with friends or just hoarding in the cookie jar for yourself (no judgment here!). It’s honestly fascinating how a simple Cookie Dough transforms into something so fun and festive with just a few colorful candies. Once you try these, I promise, they’ll be your new go-to for fall baking—and maybe even year-round.
Thank you for reading this post, don't forget to subscribe!What is candy corn cookie?
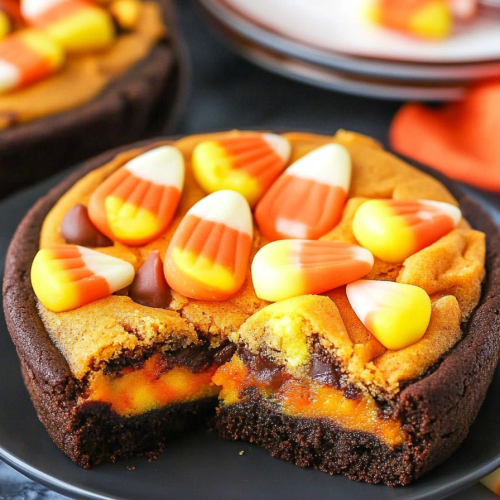
Think of candy corn cookies as a delightful blend of chewy, buttery cookie dough with the iconic orange, yellow, and white candy corn accents embedded right in. The name is pretty spot-on because these cookies look exactly like miniature candy corn, all swirled into a soft, tender treat. It’s essentially a Sugar Cookie mixture infused with vanilla, but the real magic happens when you press candy corn into the dough before baking. The candies soften but don’t fully melt, creating pockets of sweet, pastel-colored goo within each bite. They’re like edible Halloween decorations that you can eat! These cookies are a fun twist on classic sugar cookies, and their bright, cheerful colors make them a hit at parties, school bake sales, or any festive get-together. I love how simple they are to make — no complicated frosting or fondant needed, just a basic cookie base and some fun candy shaping. Honestly, they’re a cheerful burst of sweetness that everyone loves, kids and adults alike!
Why you’ll love this recipe?
What are some of the reasons why I keep coming back to this recipe?
- Flavor:The rich, buttery cookie paired with the sweet, slightly honey-flavored candy corn creates a perfect harmony. Plus, the vanilla in the
- Simplicity: No fancy techniques here — just mixing, pressing in candies, and baking. It’s a perfect project to do with kids or when you’re short on time but craving something fun.
- Budget-friendly: All the ingredients are pantry staples, and candy corn is usually on sale around Halloween, making these cookies affordable for large batches or last-minute treats.
- Versatility: Not only do they make fantastic holiday treats, but you can tweak the colors for different seasons or occasions, like red and green for Christmas or pastel for spring.
- 2 ½ cups all-purpose flour (I like unbleached for a richer flavor)
- 1 teaspoon baking powder
- ½ teaspoon salt
- ¾ cup unsalted butter, softened (trust me, don’t skip the butter — it’s the secret to a tender cookie)
- 1 cup granulated sugar
- 1 large egg
- 1 teaspoon vanilla extract (go for pure vanilla for depth)
- ¼ to ½ cup candy corn (more if you want extra bursts of color and sweetness)
- Optional: a handful of pastel M&Ms or sprinkles for extra fun
- 1 cup powdered sugar
- 2-3 teaspoons milk or cream (adjust for desired consistency)
- ½ teaspoon vanilla extract
- Optional: a tiny pinch of yellow or orange food coloring to tint the glaze
- For Breakfast: Pair them with a steaming mug of coffee or a glass of cold milk. They taste just decadent with a dollop of cream cheese or whipped butter on the side.
- For Brunch: Serve alongside fruity salads or a light yogurt parfait. These cookies double as a fun dessert or snack that kids (and grown-ups!) will love.
- As Dessert: Create a cute cookie platter for a Halloween party or fall gathering. Add a scoop of vanilla ice cream or a drizzle of chocolate sauce for an extra indulgence.
- For Cozy Snacks: Snuggle up with a warm blanket and a plate of these cookies on a chilly evening. I find they’re perfect alongside a cinnamon-spiked cider or hot chocolate to keep things cozy.
- Zucchini Prep: If you want to sneak a veggie in, swap out some of the flour with finely grated zucchini — just squeeze out the excess moisture first. It keeps the cookies moist but adds a little nutrition.
- Mixing Advice: Overmixing the dough makes the cookies dense and tough. Mix just until the ingredients are combined — you’re aiming for a soft, tender crumb.
- Swirl Customization: If you prefer a marbled look, scoop a bit of dough, press in some candies, then swirl a little more dough on top. Use a toothpick or skewer for gentle swirl patterns, but don’t OVERmix — just a gentle touch keeps it pretty.
- Ingredient Swaps: For a dairy-free version, use coconut oil instead of butter, or almond milk instead of regular milk in the glaze. I’ve tried it all, and they still come out delicious, though the texture shifts just a little.
- Baking Tips: Rotate your sheet halfway through baking for even browning. If your oven runs hot, drop the temperature to 345°F to prevent over-browning.
- Glaze Variations: Try adding a splash of lemon juice or a dash of orange extract to your glaze for extra zing. As for consistency, if it’s too thick, add a touch more milk; if too runny, a little more powdered sugar.
- Room Temperature: Keep them in an airtight container or a tightly sealed tin for up to 3 days. If they get a little soft, a quick 10-second zap in the microwave restores their chewy goodness.
- Refrigerator Storage: This isn’t necessary unless you’ve added any perishable toppings. If you do, store in a sealed container for up to a week. Just bring them to room temp before serving again.
- Freezer Instructions: Layer cookies with parchment paper and seal in a freezer-safe bag. They’ll keep for up to 3 months. Thaw at room temperature, then drizzle with glaze if needed.
- Glaze Timing: For best glaze adhesion, add on once cookies are completely cooled. If frozen, wait until fully thawed before gluing on the final layer of sweetness.
What I love most about this is how a simple cookie can become a conversation piece — you take one bite, and everyone’s eyes light up. Plus, they’re incredibly forgiving. I’ve tested this with slightly extra butter, cut down the sugar, and even swapped out some of the flour for Almond Flour — they all turn out delicious. They’re nostalgic but versatile enough to adapt to whatever you’ve got in the pantry. Honestly, once I started making these, I found myself sneaking a few even when there was no occasion, just because they’re irresistibly cute and tasty!
How to Make Candy Corn Cookies
Quick Overview
This recipe is all about simple, no-fuss baking. You start with a basic Sugar Cookie dough, which you chill briefly to make it easier to handle. Then, roll it into balls or shape into disks, gently press candy corn into the top or embed some within, and bake until just golden around the edges. The candies soften during baking, creating that charming layered look and irresistible sweetness. The best part? No need for complicated icing or decorating. These cookies come together quickly and look adorable on any tray. They’re perfect for when you want a festive treat with minimal effort but maximum wow factor.
Ingredients
For the Main Batter:
For the Filling:
For the Glaze:
“The Autumn Sweetness Best Candy Corn Cookies turned out amazing. My kids asked for seconds. Saving this one!”
Step-by-Step Instructions
Step 1: Preheat & Prep Pan
Set your oven to 350°F (175°C). Line a baking sheet with parchment paper or silicone baking mats — saves you from sticking and makes cleanup a breeze. If you’re feeling fancy, I sometimes lightly spray the sheet with non-stick spray, but honestly, parchment is perfect. Prepare all your ingredients so nothing gets left behind once you start mixing. This is a recipe that’s quick to assemble, so being organized helps.
Step 2: Mix Dry Ingredients
In a small bowl, whisk together the flour, baking powder, and salt. Doing this first ensures everything is evenly distributed and prevents clumps later. I always do this step first because it helps achieve a uniform cookie texture—no weird flour pockets here!
Step 3: Mix Wet Ingredients
In a larger mixing bowl, cream together the softened butter and sugar until light and fluffy — about 2-3 minutes with a handheld mixer or whisk. Then add the egg and vanilla, mixing until well combined. The mixture should look creamy and slightly pale. Trust me, this step makes all the difference in airy, tender cookies.
Step 4: Combine
Gradually add the dry ingredients to the wet, mixing on low speed or with your spatula just until combined. Be careful not to overmix; treat it like folding — you want just enough to blend everything. Overmixing can make the cookies tough, and nobody wants that.
Step 5: Prepare Filling
Gently chop the candy corn into smaller pieces if you prefer, but I like leaving some whole for visual appeal. For a richer flavor, toast a few to add a caramelized crunch. If you want extra fun, fold in some pastel M&Ms or sprinkles at this stage. Just a handful, enough to sprinkle some extra color and texture.
Step 6: Layer & Swirl
Using a cookie scoop or just your hands, portion out the dough onto the prepared baking sheet. Flatten each slightly with the back of a spoon or your fingers. Press a few pieces of candy corn into the top, pressing gently so they stay in place. For a more marbled look, you can gently swirl some candies into the dough before baking, but I prefer a nice layered effect — it’s super cute.
Step 7: Bake
Bake for 10-12 minutes, or until the edges are just turning golden. Every oven is different, so keep an eye out around the 10-minute mark. These cookies are soft when freshly baked but will firm up as they cool. The candy corn will soften but hold their shape, giving that signature look.
Step 8: Cool & Glaze
Let the cookies cool on the baking sheet for about 5 minutes before transferring to a wire rack. Once cooled slightly, whisk together your glaze ingredients. Drizzle or spread on top, adding more candy corn if you like a colorful finish. The glaze adds a sweet shine and extra layer of flavor, but it’s totally optional if you’re in a hurry.
Step 9: Slice & Serve
These cookies are best enjoyed at room temperature, but honestly, I’ve happily gobbled warm cookies right from the cooling rack. Serve them on a pretty plate, or layer them in a tin for gift-giving. Trust me, they disappear faster than you expect! My kids always ask for seconds, and I can’t blame them — they’re just so cheerful and tasty.
What to Serve It With
These candies corn cookies are so versatile that they pair well with anything from coffee to milk, making them perfect for various occasions:
“Made the Autumn Sweetness Best Candy Corn Cookies tonight and wow — perfect weeknight dinner. Will definitely make again!”
I love setting a little ‘cookie corner’ during my holiday parties, where these candy corn cookies sit near mugs of cider. They instantly brighten up the table and make everything feel festive and fun. Plus, they’re so cute that everyone wants to take a photo before diving in. Honestly, these cookies aren’t just treats—they’re memories in the making.
Top Tips for Perfecting Your Candy Corn Cookies
Everyone has their little tricks in the kitchen, and I’ve learned a bunch from baking these almost every fall. Here are some of my best tips:
One thing I’ve learned is that patience is key. Let the cookies cool completely before glazing or storage, or the glaze might slide off. Also, don’t be tempted to bake them too long — they’re perfect when they’re just starting to turn golden around the edges. Trust me, a little underbaking keeps them super soft inside.
Storing and Reheating Tips
To keep these cookies fresh and tasty, store them properly. They’re best enjoyed within a few days, but with the right care, they stay wonderful longer.
Honestly, these cookies are surprisingly hardy — a day or two in an airtight container, and they still taste fresh and chewy. If you find they’ve lost their oomph, pop them in the microwave for a few seconds to revive their softness. Or, better yet, bake up a new batch — they’re always worth it!
Frequently Asked Questions
Final Thoughts
This recipe for candy corn cookies has become one of my favorite holiday traditions. They bring a playful burst of color and sweetness that’s impossible to resist. Over the years, I’ve tweaked a few things — adding different candies, experimenting with glazes, even making a gluten-free version — and each time, they turn out just as delightful. It’s the kind of treat that instantly lifts the spirit, a little reminder that baking isn’t just about ingredients but about creating joy and nostalgia. Whether you’re baking for a party, a gift, or just to satisfy a sweet craving, these cookies never disappoint. Once you get the hang of it, I bet they’ll become a staple at your household, too. Happy baking! I’d love to hear how yours turn out or if you come up with your own fun twists. Feel free to leave a comment or share your photos — let’s keep the sweet ideas flowing!
candy corn cookies
Ingredients
Main Ingredients
- 1.5 cups all-purpose flour
- 0.75 cups unsalted butter
- 1 cups granulated sugar
- 1 large egg
- 1 tsp vanilla extract
- 0.5 cups candy corn
- 0.25 tsp orange gel icing color
- 0.25 tsp yellow gel icing color
Instructions
Preparation Steps
- Preheat oven to 350°F (175°C). Line baking sheets with parchment paper.
- In a mixing bowl, cream together the butter and sugar until light and fluffy.
- Add the egg and vanilla extract; beat until combined.
- Gradually add flour and mix until just combined. Fold in candy corn.
- Divide the dough into two portions. Color one with orange gel icing and the other with yellow gel icing.
- Pipe or spoon dough in small mounds onto prepared baking sheets, alternating colors to create a candy corn pattern.
- Bake for 10-12 minutes or until edges are lightly golden. Let cool on wire racks before serving.


