There’s something about this time of year — the crisp air, the tiny pumpkins popping up everywhere, and let’s be honest, the funky swirl of candy corn that somehow sparks childhood memories. I’ll admit, I’ve always had a soft spot for candy corn, and last fall, I decided to put a playful twist on one of my favorite desserts: cheesecakes. The result? These candy corn cheesecakes have become an instant hit at my house—and I swear, they disappear in minutes! They’re sweet, creamy, with just the right crunch of candy corn on top, and honestly, make me feel like I’ve brought a little bit of autumn magic onto my dessert plate. I love how simple they are to whip up — and trust me, you don’t need any fancy skills to get that beautiful layered look. Whether you’re looking for a fun treat for kids’ parties or just a nostalgic dessert to indulge in, these little slices of happiness never fail to brighten my day. Grab your apron — let’s make some adorable, delicious candy corn cheesecakes together!
Thank you for reading this post, don't forget to subscribe!What is candy corn cheesecake?
Think of candy corn cheesecakes as a charming, bite-sized version of your favorite classic American treat, upgraded into a creamy, luscious cheesecake. The name pretty much says it all: a cheesecake layered with the bright, fun colors of candy corn, topped with juicy swirls of candy for that extra festive touch. It’s essentially a no-fuss dessert that captures the essence of fall and Halloween feels—vivid orange, yellow, and white layers, with a smooth, velvety texture that melts in your mouth. The best part? They’re no-bake, so you don’t need to heat up the oven or fuss about water baths. It’s like a cute little jar of happiness you can pull out whenever you’re craving something sweet but don’t want to spend hours in the kitchen. Think of it as a cross between a popular cheesecake and a seasonal candy party — perfect for making ahead and sharing with family or friends. And if you’re like me, you’ll find yourself craving these long after the season has passed!
Why you’ll love this recipe?
What I love most about these candy corn cheesecakes is how easy they are to put together — no baking, no fussing, just a few simple steps that yield the most adorable and delicious results. They’re a total crowd-pleaser; my kids actually ask for seconds (yes, even the ones who are normally picky about their desserts!). The flavor? Think sweet, tangy cream cheese with a burst of fruity candy corn crunch on top — it’s nostalgic and makes me feel like I’m stealing a tiny piece of childhood every time I indulge. Plus, the ingredients are super budget-friendly, often stuff you already have in your fridge and pantry — cream cheese, sweetened condensed milk, graham crackers, and of course, candy corn. You can customize the toppings too—swap out candy corn for mini Reese’s, or add some chopped pecans for a bit of crunch. What really makes these stand out is their versatility. You can make individual jars for a fun party vibe or layer it all in a big dish for a family dessert. Honestly, I’ve made this countless times, and it never fails to bring smiles at the table. Plus, it’s perfect when you want a quick treat that looks super festive without spending hours in the kitchen.
How do you make candy corn cheesecakes?
Quick overview
This recipe is as simple as blending cream cheese with sweetened condensed milk, stirring in a splash of vanilla, and assembling your layers in little jars or a dish. The best part? No baking involved! You gently press crushed graham crackers or cookies into your base, pour in the luscious filling, swirl in some seasonal colors or toppings, and chill until set. It’s a foolproof process that’s great for beginner bakers or busy families who want a stunning dessert without the heat — especially perfect during fall when you’re already busy with pumpkins and costumes. Preparing ahead of time means all you need to do is decorate and serve. It’s easy, quick, and totally charming.
Ingredients
For the main cheesecake layer: For the main cheesecake layer: For the main cheesecake layer: For the main cheesecake layer: For the main
– 16 oz (450g) cream cheese, softened — go for full-fat for maximum creaminess.
– 1 can (14 oz) sweetened condensed milk — the magic ingredient that makes it super silky.
– 1 teaspoon vanilla extract — adds depth of flavor, trust me.
– Pinch of salt — just to balance everything out.
For the Crust:
– 1 ½ cups graham cracker crumbs — I like to pulse them in my food processor for even texture.
– ½ cup melted butter — or coconut oil if you want dairy-free.
– 2 tablespoons sugar — optional, depending on how sweet your graham crackers are.
“Made the Autumn Sweet Treats Simple Cheesecakes tonight and wow — perfect weeknight dinner. Will definitely make again!”
For the Topping & Decoration:
– Candy corn candies — a generous handful for topping.
– Optional extras: mini candies, sprinkles, chopped nuts for added texture and color.
Step-by-step instructions
Step 1: Preheat & Prep pan
If you’re using individual jars or cups, get them ready and lined in the fridge. If you prefer assembling in a single dish, line it with parchment or lightly spray it. No need to preheat the oven, since these are no-bake beauties. Just keep your ingredients handy and ready for action.
Step 2: Make the crust
Mix the graham cracker crumbs, sugar (if using), and melted butter until crumbly but holds together when pressed. Press the mixture firmly into the bottom of your jars or pan. I always do this with the back of a spoon or the bottom of a glass — makes it nice and even. Pop it in the fridge for about 15 minutes while you make the filling.
Step 3: Prepare the filling
In a big bowl, beat the softened cream cheese until smooth and creamy — I usually do this with a hand mixer on medium speed, so it’s fluffier. Slowly pour in the sweetened condensed milk and keep mixing until well combined and smooth. Add vanilla and a pinch of salt, then give it a quick stir. The texture should be silky and thick but pourable.
Step 4: Assemble the layers
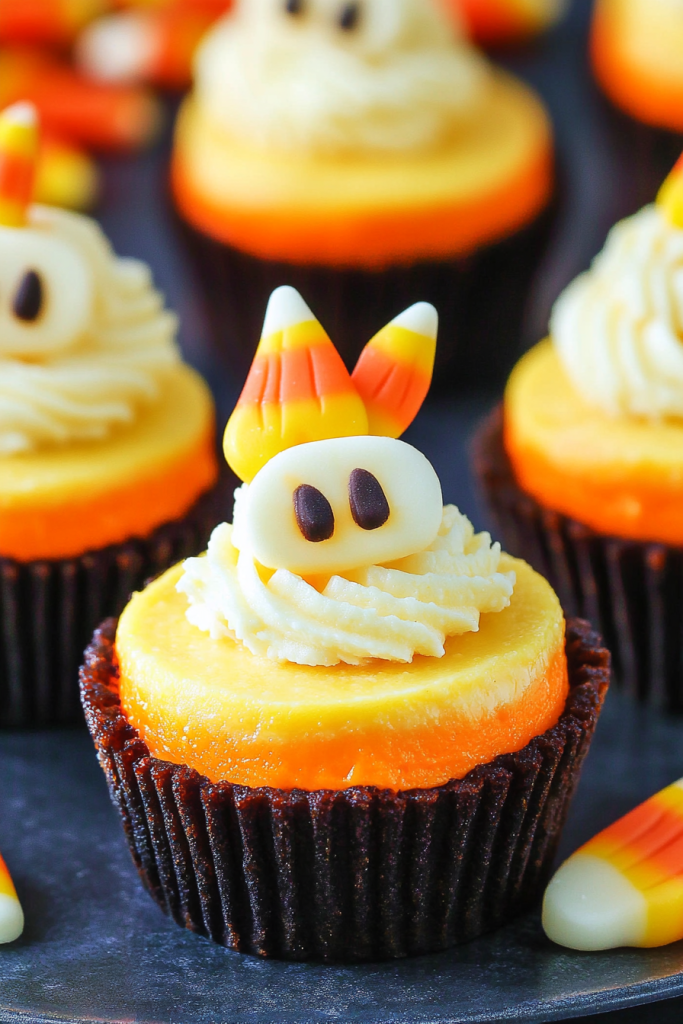
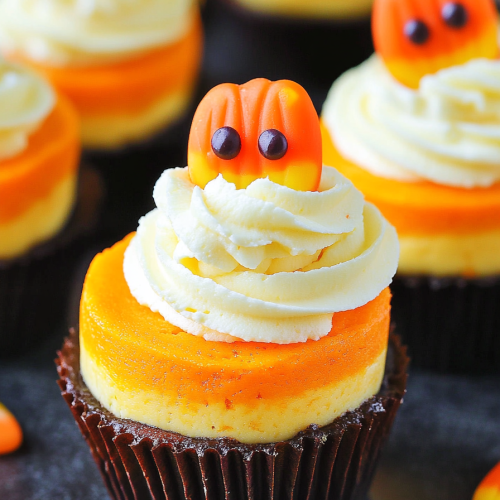
Pour or spoon the filling over the chilled crust. I like to do this in layers and then gently swirl with a toothpick or skewer for a fun marbled effect—think of those fancy layered cakes but way easier. Don’t overmix, or you’ll lose that pretty swirl! Sprinkle some candies on top, pressing them lightly into the filling for that natural look.
Step 5: Chill time
Pop everything into the fridge and let it set for at least 4 hours — overnight if you can wait! Trust me, this is key for a smooth, sliceable cheesecake. The longer it chills, the better it sets.
Step 6: Decorate & serve
Before serving, add the remaining candy corn candies on top for a bright, festive finish. If you’re feeling creative, splash some colored sprinkles or chopped nuts around the candies—it’s all about that whimsical fall vibe! Serve chilled, and watch everyone dive in. The moment you cut into it, you’ll be greeted with a creamy explosion and pretty swirls of orange, yellow, and white—courtesy of the candy corn and your clever swirling.
Step 7: Enjoy!
Slice carefully and serve with a little dollop of whipped cream or a drizzle of caramel if you like. Honestly, once you see how cute and easy these are, I bet they’ll become part of your fall tradition. They look just as adorable as they taste, and I love how everyone asks for the recipe!
“The Autumn Sweet Treats Simple Cheesecakes turned out amazing. My kids asked for seconds. Saving this one!”
What to serve it with
These candy corn cheesecakes are pretty much the star, but I love pairing them with a hot cup of pumpkin spice latte or a chamomile tea on the side. For a more indulgent treat, a scoop of vanilla ice cream or a drizzle of caramel sauce makes it even more special. During brunch, I might set a small platter of apple slices or cinnamon sticks beside them, because fall flavors just go hand in hand. If you’re serving these after dinner, a glass of muscat or dessert wine pairs beautifully with the creamy richness. And honestly? They’re perfect on their own, straight from the fridge — a little nostalgic bite that brightens up any gathering. I’ve even filled mini mason jars or cups for picnics and kid parties — they look adorable and are so easy to grab and go. My family loves how festive they look on the table, especially when decorated with mini candies and sprinkles. It’s like creating a small piece of harvest fun right in your kitchen!
Top tips for perfecting your candy corn cheesecakes
Over the years, I’ve learned a few tricks that make these even more delightful. First, when crushing your graham crackers, don’t skip the step of pressing them firmly into the pan — this keeps everything neat and prevents cracking when you slice. If your cream cheese isn’t softened enough, it can be a pain to mix smoothly; I always leave it out at room temperature for about 30 minutes before starting. For swirling the toppings, I recommend using a toothpick or skewer in gentle, swirling motions—bonus points for creating fun patterns like zigzags or star shapes. Want to swap out candy corn? Mini Reese’s or even chopped up candies like Reese’s pieces or M&Ms make a great replacement if you want a different flavor twist. When baking (or in this case, setting), keep your fridge cold and avoid opening the door too often — patience really pays off for that perfect slice. Finally, I tested adding a little fresh whipped cream between layers for extra creaminess — absolutely delicious. Trust me, a little extra effort here makes all the difference in presentation and flavor. Once you get the hang of swirling and layering, you’ll be surprised how professional these look — even if it’s your first time. Plus, experimenting with different toppings or flavors (mint, chocolate, or even pumpkin spice) can turn this into an all-year-round favorite in your household.
Storing and reheating tips
To keep these candies at their best, I recommend storing them in an airtight container in the fridge for up to 3 days. Honestly, they’re usually gone before that — but if you do need to save some for later, make sure to cover them well so no fridge odors sneak in. If you’re stacking multiple jars or slices, place baking parchment or wax paper between layers to prevent sticking. For longer storage, these can be frozen — just wrap each jar tightly with plastic wrap, then place in a freezer-safe container for up to 2 months. When you’re ready to enjoy again, let them thaw in the fridge overnight. A quick tip? If your cheesecake firmed up too much after chilling, a few seconds in the microwave (or at room temperature for a few minutes) can make it nice and creamy again. If you want to add fresh candy corn on top after freezing, wait until the cheesecake is fully thawed to prevent melting or sogginess. Reheating in the fridge or at room temperature helps preserve that silky texture, while freezing keeps the fun shape intact. Honestly, these are so fuss-free, they’re practically meant to be made ahead of time. Plus, they make great gifts wrapped up with a pretty ribbon — just remember to add candies fresh on top for that bright, festive look!
Frequently Asked Questions
Final thoughts
I honestly can’t get enough of these candy corn cheesecakes — they’re like a little slice of fall magic that you can whip up in no time at all. The combination of creamy cheese, crunchy candy, and adorable layered colors make them such a fun project for any get-together or quiet weekend treat. Plus, they’re versatile enough to adapt for other seasons, with different candies or toppings. From the moment I first made them, they’ve become a staple around here, especially during October and Halloween. And I promise, once you see how simple they are and taste how good they come out, you’ll be hooked, too! So why not give this recipe a try? I’d love to hear how yours turn out—drop me a comment or share your variations. Happy baking, and may your kitchen be filled with the irresistible smells of fall!
candy corn cheesecakes
Ingredients
Main Ingredients
- 1.5 cups Oreo crumbs
- 2 tablespoons butter
- 12 ounces cream cheese room temperature
- 0.5 cups sugar
- 2 tablespoons all purpose flour
- 0.5 cups sour cream
- 1.5 teaspoons vanilla extract
- 2 large eggs
- color Yellow gel icing color
- color Orange gel icing color
- 0.5 cups heavy whipping cream cold
- 5 tablespoons powdered sugar
- 0.5 teaspoons vanilla extract
- color Orange gel icing color
- pieces Ghost toppers
Instructions
Preparation Steps
- Preheat oven to 325°F. Add cupcake liners to a pan and spray with non-stick spray. Mix Oreo crumbs with melted butter and divide into cups, pressing into the bottoms. Bake for 5 minutes and let cool. Lower oven to 300°F. Beat cream cheese, sugar, and flour until smooth. Mix in sour cream and vanilla. Add eggs one at a time, scraping sides. Divide batter into three bowls; leave one plain, color the others yellow and orange. Layer batters into crusts, starting with yellow, then orange, then white. Bake for 15 minutes, then turn oven off and leave closed for 10 minutes. Cool cheesecakes in fridge. Whip heavy cream with powdered sugar and vanilla, tint with orange. Decorate cheesecakes with whipped cream and toppers.


