There’s something about fall that makes me want to curl up with a good book and a hot cup of coffee, right? The air turns crisper, leaves crackle underfoot, and suddenly, my home feels so much warmer — especially when I add a little extra charm to my reading nook. That’s when I pull out my favorite fall corner bookmarks. These little handmade treasures are more than just a practical way to mark your spot—they’re like tiny pieces of art that bring a cozy, personal vibe to every page. I’ve made dozens of them over the years, experimenting with colors, textures, and designs, and I swear, they’ve become a true reading ritual for me, and my family too. Plus, making them is surprisingly simple and super budget-friendly, which is just my style. Trust me, once you try these, you’ll find yourself wanting to make a batch for every season—especially autumn. It’s such a sweet way to sprinkle a little extra love into your reading time and share some magic with friends. So, grab your favorite fall colors, a few scraps of fabric, and let’s get cozy—these fall corner bookmarks are about to become your new favorite craft!
Thank you for reading this post, don't forget to subscribe!What is fall corner bookmarks?
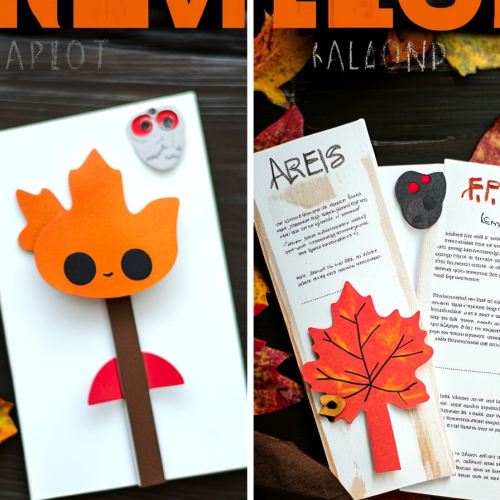
Think of fall corner bookmarks as tiny, decorative clips designed to sit snugly in the corner of your book pages. They’re essentially little pieces of crafty goodness that help you keep your spot without damaging your pages—perfect for those of us who don’t want to fold corners or use bulky bookmarks. The “fall” part of their name comes from their seasonal charm—think warm oranges, deep reds, cozy browns, and gorgeous gold accents. These bookmarks are usually made from a variety of materials like felt, paper, fabric, or even thin wood, often decorated with tiny leaves, acorns, pumpkins, or other autumn-inspired motifs. They’re really more than just functional—think of them as tiny works of art with personality. And because they sit right in the corner of your page, they’re super discreet but oh-so charming. I love how each of mine tells its own little seasonal story—you can swap them out depending on your mood or the book you’re reading. They’re perfect for giving your reading space a touch of fall magic, and I’ve honestly gifted so many of them during the holidays—everyone loves a handmade, keepsake bookmark!
Why you’ll love this recipe?
What I love most about making fall corner bookmarks is how fun, satisfying, and versatile they are. For starters, they’re endlessly customizable. I’ve made some with soft felt, others with pretty patterned paper, and a few with tiny embroidered details—I swear, there’s no limit to what you can do. Plus, they’re ridiculously easy to whip up, even if you’re not “crafty” by nature. I’ve tested these with kids helping out, and honestly, it’s a delightful project for all ages, especially on crisp autumn days when you just want to unplug and create something cozy. These little markers are also budget-friendly—most of the supplies are scraps I already had or inexpensive materials from the craft store. And the best part? They’re so cute and practical that I always do this when I want a quick gift or a personal touch on someone’s holiday book package. My kids ask for these all the time, and I love seeing how proud they are when their bookmarks sit perfectly in the pages of their favorite stories. Plus, they make your books feel even more special—kind of like giving them a warm, seasonal hug. Honestly, once you start making these, I bet you’ll be hooked—because they blend creativity, practicality, and a little piece of fall magic into every one.
How do I make a fall corner bookmark?
Quick Overview
Creating your own fall corner bookmarks is a simple, rewarding process. You only need a few basic supplies like felt, paper, or fabric, along with some small decorative bits such as leaves, acorns, or berries. The idea is to cut your chosen material into a small square or triangle, decorate it with seasonal embellishments, and then affix a tiny backing or pocket to hold the corner of your page. I love making these because they come together quickly—most take about 15-20 minutes once you’ve got your supplies. And the best part? You can easily customize each one to match your favorite autumn colors or themes, making every bookmark a little piece of fall in itself. Plus, I’ve picked up a few tricks over the years, like using hot glue carefully to keep everything secure or layering different textures for extra charm. Trust me, once you see how adorable and functional they are, you’ll want to make a whole set for yourself and as gifts. It’s one of those little projects that feels so cozy to do, especially when the house smells like cinnamon and pumpkin.
Ingredients
For the main material:
– Felt sheets in autumn hues (orange, deep red, mustard yellow, brown)
– Patterned scrapbook paper or cardstock
– Thin fabric or burlap for rustic charm
– Small felt or fabric leaves, acorns, or pumpkins (these can be bought premade or DIY-ed)
– Hot glue gun and glue sticks
– Scissors
– Double-sided tape (optional, for layered effects)
– Small embellishments like buttons, berries, or tiny pinecones (optional but adorable)
For Decorations & Embellishments:
– Mini stickers or stamps to add details
– Thread or embroidery floss for a stitched look
– Thin gold or silver drape (for a little sparkle)
– Ribbon or twine for hanging or extra flair
For Finishing Touches:
– Clear sealant spray (to protect paper or fabric)
– Glitter or metallic accents (for a bit of glam)
“Made the Autumn Corner Bookmarks Kids Can Craft tonight and wow — perfect weeknight dinner. Will definitely make again!”
Step-by-Step Instructions
Step 1: Preheat & Prep Pan
Haha, no oven needed here! Just grab your workspace and set out all your supplies. Make sure your scissors are sharp—and I mean really sharp—because clean cuts make all the difference in those tiny corners. If you’re using felt or fabric, it’s best to iron it beforehand to smooth out wrinkles. And if you’re decorating with glitter or paint, lay down some newspaper or a craft mat for easy cleanup. Take a deep breath, because this part is all about having fun. No stress allowed—these bookmarks are all about adding some fall joy into your day.
Step 2: Mix Dry Ingredients
Here, you’ll mostly just gather your materials—felt, paper, embellishments. I like to spread everything out so I can see all my options and pick the prettiest shapes and colors. If you’re layering different papers or textures, cut them into small squares or triangles about 2-3 inches wide. That’s the perfect size to sit nicely in the corner of a book without sticking out too much. This step is basically the gift-of-choice moment—you get to dream about how your finished bookmarks will look!
Step 3: Mix Wet Ingredients
If you’re adding glue or adhesive, this is the moment. I prefer hot glue because it dries quickly and holds tight — just a dot or two is all you need. For fabric or felt, small pieces of double-sided tape work great for temporary positioning before sealing. If you want to add tiny stitched details, a needle and embroidery floss are your best friends here. Keep in mind, less is more—overstuffed bookmarks can lose their charm and sit awkwardly in your books.
Step 4: Combine
Assemble your main shapes first—like a layered triangle of patterned paper topped with a felt leaf. Use your hot glue sparingly, pressing each piece into place. Wrap small details like berries or acorns onto the main piece, securing with a dab of glue. This is where your creativity really shines—mixing textures, colors, and motifs to match your fall mood. Remember, imperfect edges add charm—so don’t stress if everything isn’t perfectly symmetrical.
Step 5: Prepare Filling
If you’re making a slightly more dimensional bookmark, you might want to add a tiny foam backing or a piece of stiff card to give it some extra sturdiness. For a more rustic look, I’ve used burlap or woven fabric for the backing—just cut a small square, glue it behind your main piece, and voilà! If decorating with tiny embroidered details or sequins, now’s the time to add them gently, one by one.
Step 6: Layer & Swirl
Place your main decorative piece on top of the backing—if you used one—and press gently. For a whimsical touch, you can create a swirl effect by twisting some thread into a loose spiral and gluing it into position. For a more polished look, aim for neat edges and balanced embellishments. It’s all about making it feel cozy and inspired by fall—think of it as a little autumn landscape sitting perfectly on your book corner.
Step 7: Bake
No baking needed here! But if you’re attaching paper or fabric that might lift, a quick heat press with an iron (on low, with a cloth in between) can help set everything nicely. Make sure all glue is dry before handling or clipping into your book. A good rule of thumb: wait at least 30 minutes, or until you see no more shiny glue spots. Patience pays off in craft projects like this.
Step 8: Cool & Glaze
If you want a little extra shine or protection, lightly spray your bookmarks with a clear sealer or spray gloss. This helps keep everything intact—even if you toss your book in a bag or the corner of your couch! Just be sure to do this outside or in a well-ventilated spot. Wait until everything’s dry before moving on to the final step.
Step 9: Slice & Serve
Once fully dry, give your bookmarks a gentle trim if needed—sometimes the sides can get a little jagged from crafting. Now, carefully clip each one onto the corner of your favorite fall read. The best part? Watching how those tiny decorations peek out as you turn each page. I love the little surprises they bring, especially when the leaves flutter down outside the window and I’m lost in a good story.
“I don’t know if I’ve ever eaten a better Autumn Corner Bookmarks Kids Can Craft. The rub alone is wonderful, but the sauce??? Over the top!”
What to Serve It With
These fall corner bookmarks are all about cozy reading vibes, so pairing them with the right treats just amplifies the magic. For a fun family afternoon, I usually brew a fresh pot of cinnamon-spiced chai or a pumpkin latte—trust me, the smell alone makes everything cozier. I love slipping one of these bookmarks into a hardcover novel on a lazy Sunday morning or gifting a set to friends at Thanksgiving with a handwritten note. They’re also perfect accompaniments when you’re hosting a book club—encourage everyone to make their own bookmarks, then swap stories over APPLE CIDER and warm cookies. When it’s time for dessert, a slice of warm apple pie or spiced biscotti feels just right—naturally, with a side of hot tea or a mug of spiced cider. These simple pleasures are what make fall so special. I honestly think these bookmarks just bring an extra layer of warmth—kind of like the blanket that’s been folded over the arm of your reading chair all season. My family always fusses over which one goes in which book, and I love that they’ve become part of our seasonal traditions. So, gather your favorite fall-inspired snacks and let your imagination run wild—creating these little corner treasures is as soothing as the crackle of a fireplace on a chilly evening.
Top Tips for Perfecting Your Fall Corner Bookmarks
Crafting the perfect fall corner bookmark might seem simple, but here are some tips I’ve learned over the years that’ll save you time and boost your style points:
- Pick thick, sturdy felt or cardstock: Thin paper or flimsy fabric can flop easily—go for something that holds its shape so your bookmark sits proudly.
- Match your colors with the season: Think deep reds, warm oranges, mustard yellows, and cozy browns. Using a color palette that echoes the fall landscape makes it look professional and intentional.
- Layer your embellishments for depth: For example, glue a tiny fabric leaf over a paper leaf for a dimensional effect—this adds visual interest and makes each one unique.
- Embrace imperfection: Some of my favorite bookmarks have slightly crooked stitches or uneven edges—those little quirks give them charm.
- Use quality glue sparingly: A small dollop of hot glue is enough—too much will make your embellishments stiff or cause lumps.
- Seal for durability: A quick spray of sealer protects your decorations from years of love, especially if you’re giving them as gifts.
- Mix textures: Combining soft felt, shiny paper, and rough twine creates a delightful contrast that really embodies fall’s cozy aesthetic.
- Personalize with favorite motifs: Include tiny embroidered initials, family symbols, or favorite quotes to make each bookmark truly yours.
Every time I make these, I learn a little more—what works, what doesn’t, and how to make them even cuter. The trick is to enjoy the process, not get too caught up in perfection, and remember that adding your personal touch is what makes each one special. Don’t be afraid to experiment—sometimes the best ideas come from a playful mistake or a surprise color combination!
Storing and Reheating Tips
Once you’ve crafted a lovely batch of fall corner bookmarks, you’ll want to keep them safe so they stay looking perfect. Store them in a cool, dry place, preferably in a small craft box or an envelope to prevent crushing. If you want to keep your bookmarks pristine for years, consider wrapping each one in tissue paper and placing them in a container with a snug lid—this keeps dust and moisture out. For longer-term storage, you can also tuck them into plastic sleeves or zip-top bags, especially if you plan to gift them later. They’ll stay colorful and cheerful for seasons to come! When it’s time to use them, I like to gently press or re-fluff any felt pieces with my fingers. If your bookmarks get a little flattened, a quick press with a warm iron can help restore their shape, just make sure to use a cloth barrier so you don’t melt any embellishments. If you want to refresh the look, adding a tiny dab of glitter glue or a new bow can give them a whole new vibe. And if you’re like me and love changing your décor as the seasons shift, swapping out those seasonal toppers is a fun way to keep your collection feeling fresh and inspiring. Honestly, these bookmarks are so sturdy—they become treasured keepsakes, pulling out all year long, and I love how they turn simple books into little moments of seasonal magic!
Frequently Asked Questions
Final Thoughts
There’s just something so charming about handmade fall corner bookmarks—these tiny little keepsakes capture the spirit of the season perfectly. They’re simple to make, surprisingly versatile, and add a warm, personal touch to any book. Whether you’re creating them as a peaceful afternoon project, gifting them to a fellow book lover, or decorating your own reading cozy corner, these bookmarks are a wonderful way to celebrate fall’s beauty. I love how each one feels like a little piece of autumn magic, waiting to sit snugly in a page and bring a smile. So, grab your favorite fall colors, some scrap paper or felt, and start crafting—you might just find yourself with a new favorite hobby! I’d love to hear which designs you try or see your own creative twists—don’t forget to leave a comment below or share your photos. Happy baking, I mean crafting, and happy fall reading!
fall corner bookmarks
Ingredients
Main Ingredients
- 4 sheets colored construction paper
- 1 pair scissors
- 1 glue stick adhesive
Instructions
Preparation Steps
- Cut the colored paper into a square shape measuring 4x4 inches.
- Fold the square diagonally to create a triangle.
- Fold the triangle's corners towards the center to form a pocket.
- Secure the folds with glue to hold the shape.
- Let the glue dry for 2 minutes before use.


