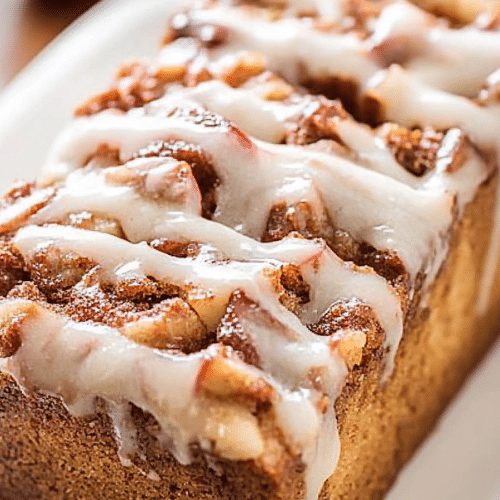
You know those recipes that just feel like a warm hug on a chilly evening? The ones that smell like childhood and make your kitchen feel instantly cozier? Well, this apple fritter bread is exactly that for me. It’s not just a baked good; it’s a memory, a comfort, and frankly, one of the best things I’ve ever pulled out of my oven. Forget those dry, crumbly quick breads that leave you feeling a little let down. This apple fritter bread is moist, tender, bursting with warm apple spices, and has that irresistible, slightly gooey, cinnamon-sugar swirl that just screams “eat me.” It’s like taking your favorite apple fritter, the kind you get at a local bakery, and transforming it into a loaf that’s ridiculously easy to make at home. Seriously, if you’ve ever loved an apple fritter, you are going to be obsessed with this apple fritter bread. I’ve tried so many variations over the years, but this one is *the* one. It’s the one my family requests constantly, the one I bring to potlucks, and the one that disappears faster than you can say “second slice.”
Thank you for reading this post, don't forget to subscribe!What is Apple Fritter Bread?
So, what exactly *is* apple fritter bread? Think of it as the ultimate mashup of two beloved treats. It’s a quick bread – meaning it uses chemical leaveners like baking powder or baking soda, so there’s no yeast or complicated rising involved, making it super accessible even for beginners. But here’s the magic: instead of just being a simple batter, it’s infused with the soul of an apple fritter. We’re talking chunks of tender apple baked right in, and then, the pièce de résistance, a generous swirl of Cinnamon Sugar that caramelizes slightly as it bakes, giving you those irresistible pockets of spiced sweetness. It’s not quite a cake, not quite a loaf, but something perfectly in between, designed to be enjoyed warm with a cup of coffee or tea. It’s the kind of baked good that makes people ask, “Did you buy this?” and when you proudly say “No, I made it!” you get instant hero status. It’s essentially a shortcut to fritter bliss in loaf form.
Why you’ll love this recipe?
Let’s be real for a second. There are a lot of apple recipes out there, and a lot of quick bread recipes too. So why this one? What makes this apple fritter bread stand out from the crowd and earn a permanent spot on your recipe card? For starters, the flavor is just out of this world. It’s got that perfect balance of sweet apples, warm cinnamon, and a hint of nutmeg that just makes you feel all cozy inside. The texture is another huge win. It’s unbelievably moist and tender, thanks to a few simple tricks (which I’ll share later!), and you get those delightful pockets of Gooey Cinnamon sugar throughout. It’s so satisfyingly soft, it practically melts in your mouth. And the smell while it’s baking? Oh my goodness. It’s enough to draw everyone in from around the house, guaranteed.
But it’s not just about the taste and aroma. This recipe is genuinely simple to pull off. You don’t need any fancy equipment, and the steps are straightforward. I’ve made this on busy weeknights when I needed a little something sweet to lift my spirits, and it’s always a lifesaver. Plus, it’s incredibly budget-friendly! Apples are usually pretty affordable, and the rest of the ingredients are pantry staples. You can make an absolutely stunning, delicious apple fritter bread without breaking the bank.
And the versatility! This isn’t a one-trick pony. It’s perfect for a lazy weekend breakfast, a delightful addition to a brunch spread, or even a lovely, comforting dessert. I’ve even cut off a slice for a late-night snack – don’t judge! It’s that good. Honestly, what I love most about this recipe is that it’s foolproof. Even if you’re new to baking, you’re going to nail this. It’s incredibly forgiving, and the results are always impressive. It’s the kind of recipe that makes you feel like a baking rockstar, and that’s pretty special in my book.
How do I make Apple Fritter Bread?
Quick Overview
Making this apple fritter bread is a breeze! It involves mixing up a simple batter, preparing a sweet cinnamon-apple filling, and then layering them together in the pan before baking. The key is not to overmix the batter and to get that beautiful swirl. It’s a process that takes maybe 20 minutes of active prep time, and then the oven does the rest of the magic. The result? A moist, flavorful, and stunning loaf that’s way better than anything store-bought. You’ll be amazed at how easy it is to achieve such fantastic results.
Ingredients
For the Main Batter:
You’ll need all-purpose flour, granulated sugar, baking powder (for that lift!), salt (to balance the sweetness), cinnamon (because, apples!), and a touch of nutmeg to really bring out the apple flavor. For the wet ingredients, we’ll use eggs for richness, melted butter (or oil for extra moisture), milk (whole milk gives the Best Flavor, but I’ve tested this with almond milk and it actually made it even creamier!), and pure vanilla extract for that classic warmth. Make sure your eggs are at room temperature – they’ll incorporate much better into the batter!
For the Filling:
This is where the apple fritter magic really happens! We’ll use diced apples – Honeycrisp, Gala, or Fuji are my favorites because they hold their shape well and have a lovely sweet-tart balance. You can use Granny Smith if you prefer a tangier bite. You’ll also need more cinnamon and sugar (Brown Sugar adds a lovely caramel note here) to create that irresistible swirl. I sometimes add a tiny pinch of cloves or allspice if I’m feeling fancy, but it’s totally optional. The apples should be peeled and diced into small, bite-sized pieces.
For the Glaze:
A simple glaze is the perfect finishing touch. It’s just powdered sugar whisked with a little milk (or lemon juice for a tangier flavor!) and a splash of vanilla extract. You want it pourable but not too thin. The goal is a delicate drizzle that adds a touch more sweetness and a beautiful sheen. If it’s too thick, add a tiny bit more liquid; if it’s too thin, add more powdered sugar.
Step-by-Step Instructions
Step 1: Preheat & Prep Pan
First things first, let’s get our oven preheated to 350°F (175°C). This is crucial for even baking, so don’t skip it! Then, grab a standard 9×5 inch Loaf Pan. You’ll want to grease it really well and then lightly flour it. I find that using butter or non-stick cooking spray works best for greasing, and then just a tablespoon or two of flour dusted around, tapping out any excess. This ensures your beautiful apple fritter bread doesn’t stick, making it easy to remove later.
Step 2: Mix Dry Ingredients
In a large bowl, whisk together your all-purpose flour, granulated sugar, baking powder, salt, cinnamon, and nutmeg. Whisking them together really well helps to distribute the leavening agents evenly, ensuring a nice, even rise. You want to see no streaks of baking powder or salt. This step might seem simple, but it’s important for the texture of your final loaf.
Step 3: Mix Wet Ingredients
In a separate medium bowl, whisk together your eggs, melted butter (make sure it’s cooled slightly so it doesn’t scramble the eggs!), milk, and vanilla extract until they’re well combined and smooth.
“Packed with flavor and so simple. Exactly what I wanted from this Apple Fritter Bread Easy Recipe!”
Step 4: Combine
Now, pour the wet ingredients into the bowl with the dry ingredients. Using a spatula or wooden spoon, gently fold them together until *just* combined. Be careful not to overmix! A few little streaks of flour are okay. Overmixing develops the gluten in the flour, which can lead to a tough, dense loaf. We want tender and moist, remember?
Step 5: Prepare Filling
In a small bowl, toss your diced apples with the additional cinnamon and Brown Sugar. Make sure the apples are evenly coated. This mixture will form the delicious, spiced swirls throughout your bread. The brown sugar will help it caramelize beautifully during baking.
Step 6: Layer & Swirl
Pour about half of the batter into your prepared loaf pan and spread it out evenly. Sprinkle about half of the cinnamon-apple mixture over the batter. Then, pour the remaining batter on top, followed by the rest of the apple mixture. Now, take a knife or a skewer and gently swirl it through the batter a few times to create those gorgeous marbled patterns. Don’t over-swirl, or the colors will just blend together – we want distinct swirls!
Step 7: Bake
Pop the loaf pan into your preheated oven. Bake for about 50-65 minutes. The exact time will depend on your oven, so start checking around 50 minutes. It’s done when a wooden skewer or toothpick inserted into the center comes out clean, or with just a few moist crumbs attached (no wet batter!). If the top starts to brown too quickly, you can loosely tent it with aluminum foil.
Step 8: Cool & Glaze
Once baked, let the apple fritter bread cool in the pan for about 10-15 minutes. This is important for it to set up. Then, carefully invert it onto a wire rack to cool completely. Once it’s fully cooled – and this is key, don’t glaze a warm loaf, it will just melt off! – whisk together your powdered sugar, milk, and vanilla for the glaze. Drizzle it generously over the top of the cooled loaf. You can make it as thick or as thin as you like!
Step 9: Slice & Serve
Once the glaze has set slightly, it’s time to slice into this masterpiece! Use a serrated knife for the cleanest cuts. Serve slices warm or at room temperature. It’s absolutely divine on its own, but trust me, a little dollop of whipped cream or a scoop of vanilla Ice Cream takes it to a whole new level for dessert!
What to Serve It With
This apple fritter bread is so versatile, it feels right at home at any time of day. For a relaxed breakfast, I love serving it warm with a mug of good strong coffee. The sweetness of the bread is just the perfect counterpoint to a rich, dark roast. Sometimes, if I’m feeling a little indulgent, I’ll add a smear of butter, but honestly, it’s so moist on its own, it doesn’t really need it.
When it comes to brunch, this loaf is a showstopper. Arrange a few thick slices on a pretty platter, perhaps with some fresh berries on the side for a pop of color and freshness. It pairs wonderfully with a mimosa or even a sparkling cider. It’s elegant enough for guests but easy enough that you won’t be stressed out in the kitchen.
And as for dessert? Oh, this is where it truly shines. Serve a warm slice with a scoop of good quality vanilla bean Ice Cream, or a dollop of lightly sweetened whipped cream. A drizzle of caramel sauce over the top is also divine. It’s the perfect cozy end to a meal, especially on a cool evening.
For those moments when you just need a comforting snack, this apple fritter bread is your answer. Grab a slice, curl up with a good book and a cup of tea, and just enjoy. It’s simple, it’s satisfying, and it feels like a little treat just for you. My kids also love it with a glass of cold milk after school. It’s a little taste of heaven without being overly fussy or complicated. I’ve also found that it’s fantastic toasted the next day, especially if you’ve only eaten half the loaf!
Top Tips for Perfecting Your Apple Fritter Bread
Over the years, I’ve learned a few tricks that help make this apple fritter bread absolutely perfect every single time. First off, when it comes to the apples, don’t be afraid to dice them pretty small. If the chunks are too big, they can sometimes sink to the bottom or make it hard to get an even slice. I aim for about a half-inch dice. Also, make sure you don’t use apples that are too mushy when cooked, like Red Delicious. They tend to break down completely and can make your bread watery. My go-to apples are Honeycrisp, Fuji, or Gala – they strike that perfect balance of sweetness and firmness.
When you’re mixing the batter, remember the golden rule: do NOT overmix. As soon as you don’t see any dry flour streaks, stop stirring. A few lumps are perfectly fine! Overmixing is the quickest way to a tough, chewy loaf, and we definitely don’t want that. Gentle folding is key here. It’s like giving the batter a gentle hug, not a wrestling match.
The swirl is where you can really have fun with this! When you’re swirling the cinnamon-apple mixture into the batter, don’t go crazy. Just a few gentle passes with a knife or skewer is enough to create beautiful ribbons of flavor. You want distinct layers of batter and filling, not a muddy brown color. Think elegant marbled effect, not a uniform blend. Sometimes I’ll swirl in an ‘S’ shape, other times a zig-zag, just to keep things interesting!
As for ingredient swaps, I’ve had success using a neutral oil like vegetable or canola oil instead of melted butter for the batter, which can make it even moister. If you’re dairy-free, you can absolutely use a plant-based milk like almond or oat milk, and I’ve found the results are still fantastic. For the apples, if you’re feeling adventurous, you could even add a handful of chopped walnuts or pecans to the filling for extra crunch. Just be sure to add them to the dry ingredients if you do!
Baking is always a little bit of an art, isn’t it? Every oven is different. My best advice is to start checking for doneness around the 50-minute mark. A wooden skewer is your best friend here – if it comes out clean, you’re golden. If it has wet batter, give it another 5-10 minutes. If the top is browning too quickly, a loose tent of aluminum foil will save the day. You don’t want the outside to be dark and burnt while the inside is still raw!
“I don’t know if I’ve ever eaten a better Apple Fritter Bread Easy Recipe. The rub alone is wonderful, but the sauce??? Over the top!”
Finally, the glaze! Consistency is key. If it’s too thick, it’s hard to drizzle nicely. If it’s too thin, it’ll just run off the bread. Aim for something like a thick honey consistency. A little trick I learned is to add the liquid *very* slowly, a teaspoon at a time, until you reach the perfect drizzling consistency. And remember, wait until the bread is *completely* cool before glazing, otherwise, you’ll have a sticky mess. Patience is a virtue, especially when it comes to a perfect glaze!
Storing and Reheating Tips
One of the best things about this apple fritter bread is how well it stores. If you manage to have any leftovers (which is rare in my house!), you can keep it at room temperature for up to 2-3 days. Just make sure it’s in an airtight container or well-wrapped in plastic wrap to keep it from drying out. The flavors actually meld and deepen overnight, making it even more delicious on day two!
If you think you’ll need longer than a few days, or if your kitchen is particularly warm, I recommend refrigerating it. Store it in an airtight container in the fridge for up to a week. The texture might firm up a little bit in the fridge, but don’t worry, it’s easily fixed. When you’re ready to enjoy a slice from the fridge, just let it sit at room temperature for about 15-20 minutes, or give it a quick zap in the microwave for about 10-15 seconds. It’ll be almost as good as fresh!
And for the ultimate make-ahead option, this apple fritter bread freezes beautifully! Once it’s completely cooled and you’ve glazed it (or even before glazing, if you prefer to add it after thawing), wrap it tightly in a layer of plastic wrap, followed by a layer of aluminum foil. This double-wrapping is key to preventing freezer burn. It will keep well in the freezer for up to 3 months. To thaw, simply unwrap it and let it come to room temperature on the counter, which usually takes a few hours. If you froze it before glazing, you can whip up a fresh batch of glaze and drizzle it on once it’s thawed.
A little note on the glaze and storage: I usually prefer to glaze the bread *after* it’s completely cooled. If you plan on freezing it, you might want to hold off on the glaze until after it’s thawed and brought back to room temperature. This ensures the glaze stays nice and fresh and doesn’t get weird textures from freezing and thawing. Just whip up a quick glaze right before serving for the best results. Or, if you’re going to eat it within a day or two, glazing it beforehand is totally fine and still delicious!
Frequently Asked Questions
Final Thoughts
So there you have it – my absolute favorite apple fritter bread recipe! I genuinely hope you give this a try. It’s the kind of recipe that brings joy to the kitchen, fills your home with an incredible aroma, and most importantly, tastes utterly divine. It’s proof that you don’t need to be a pastry chef to create something truly special. This loaf is wonderfully moist, packed with tender apples and that irresistible cinnamon swirl, and it’s just so satisfying to make.
If you love this apple fritter bread, you might also enjoy some of my other spiced baked goods, like my classic cinnamon swirl coffee cake or my moist banana bread. They all share that same comforting, homemade goodness.
I can’t wait to hear what you think of this apple fritter bread! Please leave a comment below and let me know how yours turned out. I love seeing your creations and hearing about any tweaks you might have made. Happy baking, and enjoy every delicious bite!
Apple Fritter Bread
Ingredients
Apple-Cinnamon Mixture
- 1 large apple or 2 small, peeled and diced
- 1 tablespoon granulated sugar
- 1 teaspoon cinnamon heaping
Cinnamon-Brown Sugar Mixture
- 0.25 cup light brown sugar packed
- 1 teaspoon cinnamon heaping
Bread
- 1 large egg
- 0.33 cup granulated sugar
- 0.25 cup canola or vegetable oil
- 0.25 cup sour cream or Greek yogurt lite okay
- 1 teaspoon vanilla extract
- 1 cup all-purpose flour
- 1 teaspoon baking soda
- 0.5 teaspoon salt or to taste
Glaze
- 1 cup confectioners' sugar
- 2.5 tablespoon cream or milk about 2 to 3 tablespoons, or as necessary for consistency
Instructions
Preparation
- Preheat oven to 350°F (175°C). Spray an 8x4-inch loaf pan with floured cooking spray, or grease and flour the pan; set aside.
Apple-Cinnamon Mixture
- To a small bowl, add the diced apple, 1 tablespoon granulated sugar, and 1 heaping teaspoon cinnamon. Stir to combine; set aside.
Cinnamon-Brown Sugar Mixture
- To a separate small bowl, add the 0.25 cup light brown sugar (packed) and 1 heaping teaspoon cinnamon. Stir to combine; set aside.
Bread Batter Assembly
- To a large bowl, add the large egg and 0.33 cup granulated sugar, and whisk vigorously until smooth and combined, about 1 minute.
- Add the 0.25 cup canola or vegetable oil, 0.25 cup sour cream or Greek yogurt, and 1 teaspoon vanilla extract. Whisk until smooth and combined.
- Add the 1 cup all-purpose flour, 1 teaspoon baking soda, and 0.5 teaspoon salt. Stir until just combined; do not overmix.
- Turn half the batter out into the prepared loaf pan, smoothing the top lightly with a spatula. Note that there isn’t a lot of batter, so ensure you don't add more than half.
- Evenly sprinkle half the apple mixture over the batter in an even, flat layer; set the remainder aside.
- Evenly sprinkle half the cinnamon-brown sugar mixture over the apples; set the remainder aside.
- Add the remaining batter, smoothing the top lightly with a spatula, making sure to push it into all corners.
- Evenly sprinkle the remaining apple mixture on top.
- Evenly sprinkle the remaining cinnamon-brown sugar mixture.
Baking and Cooling
- Place the loaf pan on a baking sheet (as insurance against overflowing apple juice) and bake for about 40 to 48 minutes (I baked 43 minutes), or until the top is domed, set, and a toothpick inserted in the center comes out clean or with a few moist crumbs but no batter. Note that if you go too far down, you'll hit juicy apples. The apples on top will be juicy with slight bubbling. In the last 10 minutes of baking, tent the pan with foil (loosely drape a sheet of foil over the pan) to prevent excessive browning on the top and sides of the bread before the center cooks through.
- Allow the loaf pan to cool on top of a wire rack for at least 30 minutes (I cooled overnight in the pan) before turning it out onto the rack to cool completely before glazing.
Glaze
- In a small bowl, add the 1 cup confectioners' sugar and slowly drizzle in the cream or milk, whisking until smooth and combined. Add milk as necessary for desired consistency (about 2.5 tablespoons).
- Evenly drizzle the glaze over the bread before slicing and serving. Extra glaze can be spread on the cut surface of the bread like you’d spread butter on toast; or you can halve the glaze recipe if you’re not a glaze person. Glazed items can be kept at room temperature, but if you're concerned, drizzle glaze only over the portion of bread you plan to consume immediately.


