Oh my goodness, where do I even begin with these mini cannoli cups? Honestly, they’re the kind of dessert that just makes your day brighter. I remember the first time I tried making them, I was a little intimidated, thinking cannoli were just for fancy bakeries. But this recipe? It’s like a warm hug from my Nonna. It’s the perfect answer when that sweet craving hits, you know, that late-night one that whispers, “Just a little something sweet, please!” And the best part? They look so impressive, but they’re surprisingly straightforward. If you’ve ever loved the classic cannoli but wished for a bite-sized version that’s less fussy, then these mini cannoli cups are about to become your new best friend. They’re like the popular kid in class, but with a heart of gold and a truly delightful personality.
Thank you for reading this post, don't forget to subscribe!What are mini cannoli cups?
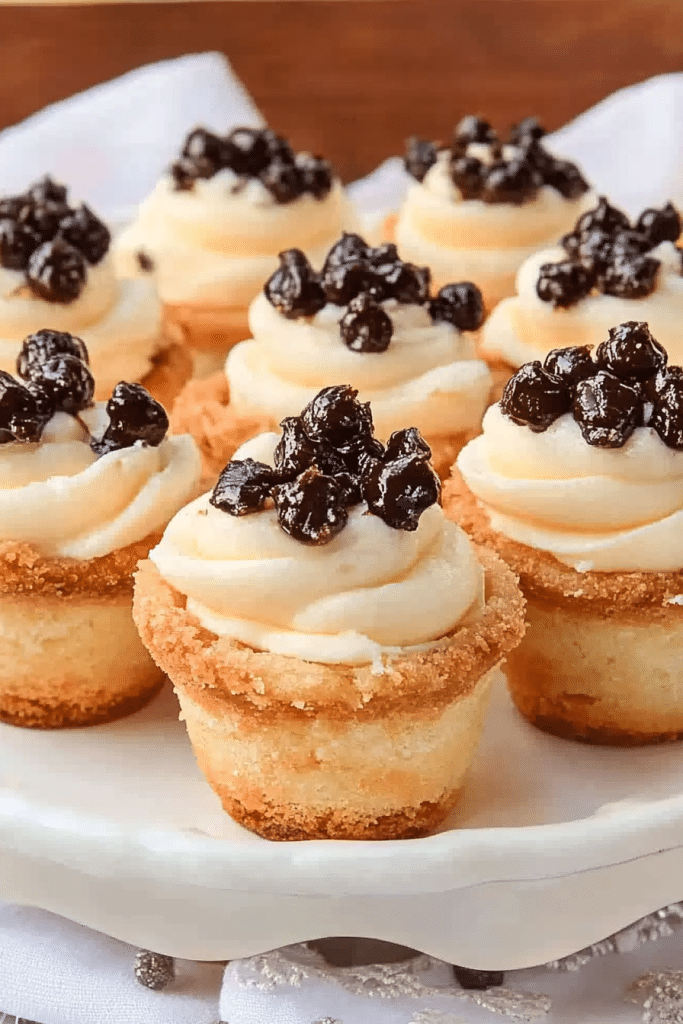
So, what exactly are these little wonders? Think of them as the adorable, more manageable cousins of the traditional cannoli. Instead of those big, crisp pastry shells you have to carefully fill and try not to break, these mini cannoli cups are baked right into a muffin tin, creating perfect little edible cups. They’re made from a simple, delightful batter that bakes up with a slightly crisp edge and a wonderfully tender center. Once they’re baked and cooled, we fill them with a creamy, dreamy ricotta filling that’s usually lightly sweetened and flavored with a hint of vanilla or citrus. They’re essentially all the incredible flavor and texture of a classic cannoli, just in a super-cute, super-easy-to-eat package. It’s the best of both worlds, really, and it makes them perfect for parties, a special treat, or even just because!
Why you’ll love this recipe?
Honestly, I could gush about these mini cannoli cups for ages, but let me hit you with the highlights. First off, the flavor is just out of this world. That slightly sweet, tender pastry cup pairs so perfectly with the rich, creamy ricotta filling. It’s a texture party in your mouth – a little bit of crispness, a whole lot of smooth. And the simplicity? Oh, the simplicity! I’ve made other desserts that felt like a marathon, but this one? It’s surprisingly forgiving and comes together way faster than you’d expect. My kids actually ask for these all the time, and I can whip them up without feeling completely overwhelmed. They’re also incredibly budget-friendly, using common pantry staples for the most part, which is always a win in my book. What I love most, though, is their versatility. You can dress them up or down. Serve them plain for a simple afternoon snack, or get fancy with chocolate chips, fruit, or a dusting of powdered sugar for a dessert that looks like it came from a high-end bakery. They truly are a lifesaver when you need something special without a ton of fuss. They remind me a bit of my classic chocolate chip cookies, in that they’re universally loved and disappear in minutes, but these feel a bit more elegant.
How do I make mini cannoli cups?
Quick Overview
This recipe is all about creating a beautiful, slightly crisp little cup from a simple batter, baking them until golden, and then filling them with a luscious, creamy ricotta mixture. You’ll mix up a basic dough, spoon it into a greased muffin tin to form the cups, bake them until they’re just right, and then whip up your filling while they cool. Once cooled, a simple spooning of that delicious filling into each cup, maybe a little drizzle or dusting, and you’re done! It’s a straightforward process that delivers incredibly delicious results without any complicated techniques.
Ingredients
For the Main Batter:
You’ll need all-purpose flour – about 1 and 1/2 cups. Make sure it’s fresh! I always use the spoon-and-level method for flour; just gently spoon it into your measuring cup and level off the top with a straight edge. No packing it down! You’ll also need baking powder, just a teaspoon, to give them a little lift. A pinch of salt, about 1/4 teaspoon, to balance the sweetness. For sweetness and structure, we’ll use granulated sugar, 1/2 cup. And the fat that makes them tender? Unsalted butter, softened, 1/4 cup (that’s half a stick). Make sure it’s truly softened, not melted. For richness and to bind everything, we’ll need one large egg. And for that lovely flavor and moisture, 1/4 cup of milk. I’ve tested this with almond milk and it actually made it even creamier, so feel free to experiment!
For the Filling:
The star of the show here is ricotta cheese. You want whole milk ricotta, drained. This is super important! I usually drain mine in a fine-mesh sieve over a bowl in the fridge for at least an hour, or even overnight if I can remember. This gets rid of excess water, which is key to a thick, luscious filling that won’t make your cups soggy. You’ll need about 15 ounces of this drained ricotta. For sweetness, we’ll use powdered sugar, about 1/3 cup, sifted to avoid lumps. Vanilla extract is a must, 1 teaspoon, for that classic flavor. A tiny pinch of cinnamon is my secret weapon for warmth, about 1/4 teaspoon, but totally optional if you’re not a fan. Some people love adding mini chocolate chips or some finely chopped candied orange peel to their filling, which is a fantastic idea!
“New family favorite! This mini cannoli cups was so flavorful and ridiculously easy. Crowd-pleaser for sure.”
For the Glaze:
This is really optional, but it adds a nice finishing touch. A simple glaze made from powdered sugar, about 1/2 cup, mixed with a tablespoon or two of milk until it reaches a drizzly consistency. You can also add a splash of vanilla extract to the glaze too. Some people prefer to just dust them with powdered sugar, which is equally lovely.
Step-by-Step Instructions
Step 1: Preheat & Prep Pan
First things first, preheat your oven to 375°F (190°C). You’ll need a standard muffin tin for this. I highly recommend greasing your muffin tin really well. You can use baking spray, butter, or a combination of butter and flour. Make sure to get into all the nooks and crannies of those cup molds. This is crucial to ensure your mini cannoli cups pop right out without sticking. I usually give each cup a good spray or a brush of butter.
Step 2: Mix Dry Ingredients
In a medium-sized bowl, whisk together the all-purpose flour, baking powder, salt, and granulated sugar. Give it a good whisk to make sure everything is evenly distributed. This ensures your leavening agents and sugar are spread throughout the batter, which leads to a more consistent rise and texture. Don’t skip this step!
Step 3: Mix Wet Ingredients
In a separate bowl, whisk together the softened butter and the egg until well combined and creamy. Then, gradually whisk in the milk and vanilla extract until everything is smooth and emulsified. Make sure your butter is softened enough to incorporate easily; if it’s too cold, it might make little butter pockets.
Step 4: Combine
Now, pour the wet ingredients into the bowl with the dry ingredients. Using a spatula or a wooden spoon, mix until *just* combined. It’s really important not to overmix here! A few streaks of flour are okay. Overmixing develops the gluten in the flour, which can lead to tougher, denser cups. We want tender, delicate little cups, so gentle is the name of the game.
Step 5: Prepare Filling
While your batter is resting for a moment, let’s get that glorious filling ready. In a medium bowl, combine the drained ricotta cheese, sifted powdered sugar, vanilla extract, and optional cinnamon. Beat with a whisk or a hand mixer on low speed until everything is smooth and creamy. Be careful not to overmix, as this can sometimes make the ricotta watery. If you’re adding mini chocolate chips or candied peel, gently fold them in now.
Step 6: Layer & Swirl
This is where we form our little cups! Spoon about 2 tablespoons of batter into each greased muffin tin cup. You don’t want to overfill them, as they will puff up as they bake. Aim for about halfway to two-thirds full. Once the batter is in, you can gently smooth the top of each with your spoon or spatula. This helps create a nice, even base for our filling later.
Step 7: Bake
Pop your muffin tin into the preheated oven. Bake for about 18-22 minutes, or until the edges are golden brown and a toothpick inserted into the center comes out clean. The exact time will depend on your oven, so keep an eye on them after about 16 minutes. You want them cooked through but not dry or crispy. They should have a lovely golden hue.
Step 8: Cool & Glaze
Once baked, let the mini cannoli cups cool in the muffin tin for about 5-10 minutes. This allows them to firm up a bit. Then, carefully invert the muffin tin onto a wire rack to remove the cups. Let them cool completely on the wire rack. While they’re cooling, you can prepare your glaze if you’re using one. Whisk the powdered sugar and milk until smooth and drizzly. Once the cups are totally cool, you can gently spoon or pipe the ricotta filling into each one. If you’re glazing, drizzle a little over the filling or the edges of the cups.
“The mini cannoli cups turned out amazing. My kids asked for seconds. Saving this one!”
Step 9: Slice & Serve
These are best served shortly after filling so the cups retain their crispness. You don’t really “slice” them in the traditional sense, but you can garnish them! A light dusting of powdered sugar is always beautiful. Or, you could sprinkle a few mini chocolate chips on top, or even a tiny bit of finely chopped pistachios. They’re perfect as they are, small and delightful!
What to Serve It With
These mini cannoli cups are so wonderfully versatile! They’re not just for dessert, though they absolutely shine there. For a lovely breakfast or brunch treat, I love to pair them with a fresh pot of coffee. Imagine a leisurely weekend morning, sunlight streaming in, and you’ve got these little beauties next to your mug. For a slightly more elegant brunch spread, I’ll arrange them on a tiered stand with some fresh berries and perhaps a mimosa. They add that perfect touch of sweetness without being overwhelming. As a dessert, they’re just phenomenal. They’re fantastic after a hearty Italian meal, offering a sweet, light finish. I often serve them alongside a fruit salad or a small scoop of gelato. And for those cozy snack moments? Oh, these are perfect! When you just need something a little special, perhaps with a warm cup of tea or a glass of milk. My family has a tradition of making these on the first day of spring – it just feels celebratory and light. Honestly, they fit into any occasion, from casual family gatherings to more formal dinner parties. They’re always a crowd-pleaser!
Top Tips for Perfecting Your Mini Cannoli Cups
After making these dozens of times, I’ve picked up a few tricks that really make a difference. First, about the ricotta: draining is non-negotiable! If you skip this, your filling will be runny and your cups will get soggy faster. I usually put my ricotta in a sieve lined with cheesecloth or a coffee filter, cover it, and let it drain in the fridge for at least a few hours, or overnight if I can. For mixing the batter, I can’t stress enough: don’t overmix! Just stir until you don’t see huge dry flour spots. A few little lumps are fine. Overmixing will give you tough cups, and nobody wants that. When you’re spooning the batter into the muffin tin, I find it’s best to not fill them completely to the brim. About two-thirds full is usually perfect. They’ll puff up nicely. If you want to get creative with the swirls, you can add a tiny bit of cocoa powder or food coloring to a portion of the filling and swirl it gently with a toothpick for a marbled effect. It’s purely aesthetic but looks so pretty! For ingredient swaps, if you don’t have milk, a plant-based milk like almond or soy works well. For the sweetener, you could try a tiny bit less powdered sugar if you prefer a less sweet filling, or even a touch of honey, though it will change the flavor profile slightly. When baking, ovens can be tricky! If your oven tends to run hot, you might want to reduce the temperature by 10-15 degrees or keep a closer eye on them. A toothpick test is always the most reliable way to check for doneness.
Storing and Reheating Tips
This is a big one, and it’s all about timing! For the best texture, these mini cannoli cups are absolutely best enjoyed the day they are made, ideally within a few hours of filling. If you’re making them for a party, I recommend baking the cups a day in advance and storing them in an airtight container at room temperature. Then, fill them just before serving. If you have leftover filled cups, they’re okay at room temperature for a few hours, but I wouldn’t leave them out much longer than that because of the dairy filling. For longer storage, refrigerate the filled cups in an airtight container. They should be good for about 1-2 days, but the pastry might soften a bit over time. I haven’t found a great way to reheat them once filled, as the heat will melt the filling and make the cup soggy. If you happen to have unfurled baked cups, you can store them in an airtight container at room temperature for a couple of days and fill them as needed. If you freeze the baked cups (unfilled!), wrap them tightly in plastic wrap and then in foil. They should last for about a month. Thaw them completely at room temperature before filling. Honestly, though, they’re so quick to make, I usually just whip up another batch if I run out!
Frequently Asked Questions
Final Thoughts
I really hope you give these mini cannoli cups a try. They’re one of those recipes that just brings a smile to my face every time I make them, and seeing the joy they bring to others is even better. They’re the perfect balance of impressive and achievable, delivering all the classic cannoli flavors in a delightful, bite-sized package. If you love this recipe, you might also enjoy my classic Italian biscotti or my no-bake lemon cheesecake bars for more delightful treats. Don’t be afraid to experiment with the filling or toppings – that’s part of the fun! I can’t wait to hear how yours turn out and what your favorite variations are. Happy baking, and enjoy every delicious bite!

Mini Cannoli Cups
Ingredients
For the Cannoli Shells
- 2.5 cups all-purpose flour
- 0.25 cup granulated sugar
- 0.5 teaspoon salt
- 0.25 cup unsalted butter, cold and cubed
- 0.5 cup Marsala wine or white wine
- 1 tablespoon egg white, lightly beaten (for sealing)
- vegetable oil for frying about 3-4 cups
For the Ricotta Filling
- 2 cups whole milk ricotta cheese, drained
- 0.5 cup powdered sugar
- 1 teaspoon vanilla extract
- 0.25 cup mini chocolate chips optional
For Garnish
- powdered sugar for dusting
- candied orange peel or chopped pistachios optional
Instructions
Prepare the Dough
- In a large bowl, whisk together flour, sugar, and salt.
- Cut in the cold butter using a pastry blender or your fingertips until the mixture resembles coarse crumbs.
- Gradually add the Marsala wine, mixing until a shaggy dough forms. Do not overmix.
- Turn the dough out onto a lightly floured surface and knead gently for a minute until it just comes together. Wrap in plastic wrap and chill for at least 30 minutes.
Shape and Fry the Shells
- Divide the dough into small portions and roll each thinly (about 1/16 inch thick). Cut into circles or squares (about 3 inches).
- Drape the dough pieces over cannoli forms (or create your own forms using foil and dowels). Seal the edges with a bit of egg white.
- Heat vegetable oil in a deep pot or Dutch oven to 350°F (175°C).
- Carefully fry the cannoli shells until golden brown and crisp, turning occasionally. This should take about 2-3 minutes per shell.
- Remove from oil and drain on paper towels. Once cool enough to handle, carefully slide them off the forms.
Make the Filling and Assemble
- In a medium bowl, combine the drained ricotta cheese, powdered sugar, and vanilla extract. Mix until smooth and creamy.
- Fold in the mini chocolate chips, if using.
- Spoon or pipe the ricotta filling into the cooled cannoli shells just before serving to prevent them from becoming soggy.
- Dust with powdered sugar and garnish with candied orange peel or chopped pistachios, if desired.