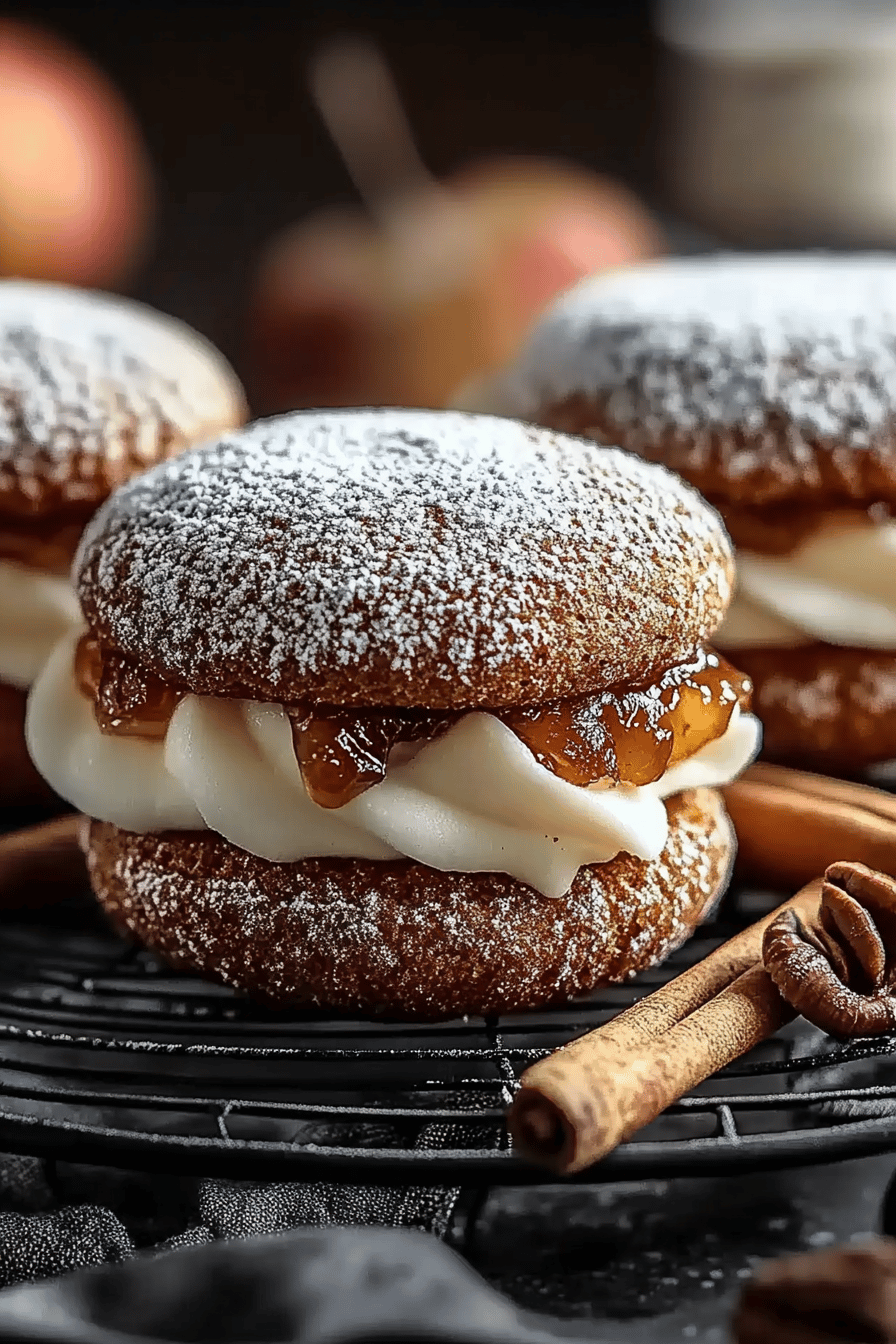
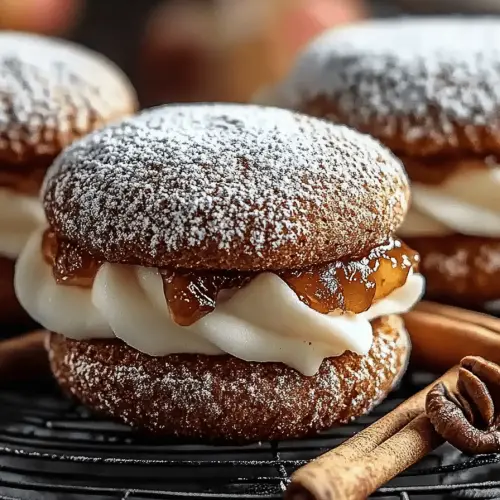
Oh, these apple cider whoopie pies! Just thinking about them makes me feel all warm and fuzzy inside. It’s funny, you know, sometimes a recipe just clicks with you, and this one… well, this one is practically a member of the family now. It brings me back to crisp autumn days, the smell of woodsmoke in the air, and my grandma’s kitchen always filled with the most comforting aromas. These aren’t just any whoopie pies; they’re like little edible hugs, bursting with that cozy, sweet-tart goodness of fresh apple cider. If you’ve ever loved a classic chocolate whoopie pie, get ready, because this apple cider version is about to steal your heart. It’s that perfect sweet treat when you’re craving something homemade but don’t want to spend hours in the kitchen. Seriously, they’re THAT good and surprisingly simple!
Thank you for reading this post, don't forget to subscribe!
What are Apple Cider Whoopie Pies?
So, what exactly are apple cider whoopie pies? Think of them as the quintessential fall dessert, but with a delightful twist. They’re essentially two soft, cake-like cookies sandwiched together with a creamy, luscious filling. The “whoopie” part comes from the playful way they’re made – like little clouds of pure joy. What sets these apart, though, is the star ingredient: apple cider. We’re not just adding a splash; we’re infusing the cookie dough itself with the rich, slightly tangy essence of good quality apple cider. This gives them a depth of flavor that’s just… *chef’s kiss*. It’s like a warm hug from an apple orchard in every single bite. They’re not as dense as a cookie, nor as light as a cupcake, but somewhere perfectly in between, creating that signature chewy-yet-tender texture that we all adore.
Why you’ll love this recipe?
Honestly, there are so many reasons why I keep coming back to this apple cider whoopie pie recipe. First off, the flavor is just out of this world. That subtle hint of apple cider in the cookie, combined with the creamy vanilla bean filling and a whisper of cinnamon in the cookies? It’s pure autumnal magic. It tastes like fall in its most delicious form, and it’s not overly sweet, which I really appreciate. Then there’s the simplicity. Even if you’re not a seasoned baker, you can absolutely nail these. The steps are straightforward, and the ingredients are mostly pantry staples. My kids actually ask for these all the time, especially when school starts and we’re all craving something sweet and comforting after homework. They’re also surprisingly cost-effective to make, especially if you can get a good deal on apple cider. And the versatility! You can enjoy them as a special breakfast treat, a delightful afternoon snack, or the perfect ending to any dinner. What I love most about these apple cider whoopie pies is that they have that nostalgic charm of childhood baking, but with a sophisticated flavor profile that adults truly appreciate too. They’re a guaranteed crowd-pleaser, and the smiles they bring are priceless.
How do I make Whoopie Pies?
Quick Overview
Making these apple cider whoopie pies is a breeze, really! We’ll whip up a soft, flavorful cookie dough by combining our dry and wet ingredients, then pipe or spoon them onto a baking sheet to get that signature round shape. While they bake up into little cakelets, we’ll whip together a dreamy, creamy filling. Once the cookies cool, it’s just a matter of pairing them up and filling them generously. It’s a process that feels both rustic and elegant, and the result is always spectacular. You’ll be amazed at how easily these come together, even on a busy weeknight when you need a little pick-me-up.
Ingredients
For the Main Batter:
2 ½ cups all-purpose flour: This is our base. I usually use unbleached all-purpose flour for a slightly better texture, but any good quality flour will do. Make sure to spoon and level it rather than scooping directly from the bag to avoid packing too much in!
1 ½ teaspoons baking soda: This is what gives our cookies that nice rise and slightly chewy texture. Don’t skip it!
½ teaspoon salt: Balances the sweetness and really makes all the flavors pop.
1 teaspoon ground cinnamon: Just a little warmth to complement the apple cider.
½ teaspoon ground nutmeg: Adds another layer of cozy spice. Freshly grated is amazing if you have it!
1 cup (2 sticks) unsalted butter, softened: Make sure it’s truly softened, not melted. This is key for a tender cookie.
1 cup granulated sugar: For sweetness and structure.
½ cup packed light brown sugar: Adds moisture and a lovely caramel note.
2 large eggs, at room temperature: Room temperature eggs incorporate better into the batter.
1 teaspoon vanilla extract: Always vanilla. It just makes everything taste better!
1 cup apple cider (good quality, unfiltered preferred): This is the magic ingredient! Use a cider you love the taste of on its own. Unfiltered often has more flavor.
For the Filling:
8 ounces cream cheese, softened: Full-fat cream cheese will give you the best, creamiest results.
½ cup (1 stick) unsalted butter, softened: Again, make sure it’s soft.
3 cups powdered sugar, sifted: Sifting is non-negotiable here if you want a super smooth filling. I promise it’s worth the extra minute!
1 teaspoon vanilla extract: To enhance that classic creamy flavor.
2-4 tablespoons milk or heavy cream (optional, for consistency): If your filling is too stiff, a splash of milk or cream will smooth it right out.
For the Glaze (Optional but highly recommended!):
½ cup powdered sugar: For the base of our simple glaze.
1-2 tablespoons apple cider or milk: Just enough to get a pourable consistency.
A pinch of cinnamon (optional): For an extra touch of spice.
Step-by-Step Instructions
Step 1: Preheat & Prep Pan
First things first, let’s get our oven preheated to 375°F (190°C). Then, grab a couple of baking sheets and line them with parchment paper or silicone baking mats. This is one of those little steps that makes cleanup so much easier and prevents any sticking disasters. If you don’t have parchment, a well-greased and floured pan will work in a pinch, but parchment is my go-to for consistency.
Step 2: Mix Dry Ingredients
In a medium bowl, whisk together the flour, baking soda, salt, cinnamon, and nutmeg. Whisking them together ensures everything is evenly distributed, which is super important for consistent baking. You want to avoid little pockets of baking soda or clumps of spices!
Step 3: Mix Wet Ingredients
In a large bowl, or the bowl of your stand mixer fitted with the paddle attachment, cream together the softened butter, granulated sugar, and light brown sugar until light and fluffy. This usually takes about 3-4 minutes. Then, beat in the eggs one at a time, making sure each is fully incorporated before adding the next. Stir in the vanilla extract and the apple cider. Don’t worry if the mixture looks a little curdled at this stage; it’s normal!
Step 4: Combine
Gradually add the dry ingredients to the wet ingredients, mixing on low speed until just combined. Be careful not to overmix! Overmixing can lead to tough cookies, and nobody wants a tough whoopie pie. Stop mixing as soon as you no longer see streaks of flour. The batter will be thick and soft, almost like a very soft cookie dough.
Step 5: Prepare Filling
While the cookies are cooling (or before you start the dough, if you like to get ahead!), let’s make that heavenly filling. In a large bowl, beat the softened cream cheese and softened butter together until smooth and creamy. Gradually beat in the sifted powdered sugar until the frosting is light and fluffy. Stir in the vanilla extract. If the filling seems too thick, add milk or cream, one tablespoon at a time, until it reaches your desired consistency. You want it spreadable but not runny.
Step 6: Layer & Swirl
This is where the fun part really begins! You can pipe or spoon mounds of batter onto your prepared baking sheets, leaving about 2 inches between them. I like to use a cookie scoop (about 1.5 to 2 tablespoons) to ensure uniform size, but two spoons work just as well. Aim for round, relatively flat mounds. They’ll spread a bit as they bake.
Step 7: Bake
Bake for 9-12 minutes, or until the edges are lightly golden and the centers are set. You want them to be soft and a little springy to the touch, not firm like a traditional cookie. Overbaking will make them dry and crumbly, which is the enemy of a good whoopie pie! Let them cool on the baking sheets for a few minutes before transferring them to a wire rack to cool completely.
Step 8: Cool & Glaze
Once your cookie cakes are completely cool, it’s time for the best part! Take two cookie cakes and spread a generous dollop of filling on the flat side of one. Then, gently top with the flat side of another cookie cake. If you’re adding the glaze, whisk together the powdered sugar, a tablespoon of apple cider or milk, and cinnamon (if using) until smooth. Drizzle it over the filled whoopie pies for an extra touch of sweetness and visual appeal. It’s like the cherry on top, but better!
Step 9: Slice & Serve
These are best served at room temperature, but you can gently chill them if you prefer a firmer filling. They’re perfect for eating out of hand, but if you’re feeling fancy, you can slice them in half or quarters to share. Honestly, though, they’re so good, I rarely cut them!
What to Serve It With
These apple cider whoopie pies are so versatile, they fit in anywhere! For breakfast, I love serving them with a strong cup of coffee. The warm spices and the hint of apple cider are just divine to wake up to. They’re a bit more decadent than your average pastry, but if you’re having guests, they make a fantastic addition to a brunch spread. I often serve them alongside fresh fruit salad and maybe some bacon. They look so pretty on a platter! As a dessert, they’re a showstopper. Imagine serving them after a cozy dinner of roasted chicken or a hearty stew. They’re sweet enough to satisfy a dessert craving but not so heavy that they’ll weigh you down. And for those moments when you just need a little comfort? A single apple cider whoopie pie with a glass of cold milk is pure bliss. My family has a tradition of making these for our fall movie nights, and they always disappear in minutes. They’re just that perfect little treat that feels special without being fussy.
Top Tips for Perfecting Your Apple Cider Whoopie Pies
I’ve made these apple cider whoopie pies more times than I can count, and I’ve learned a few tricks along the way that I think will really help you achieve perfection. First, when it comes to the apple cider, don’t skimp on quality! A really good, unfiltered cider makes a noticeable difference in flavor. If your cider is very watery, you might want to reduce it slightly by simmering it on the stovetop for about 10-15 minutes until it’s thickened a bit. This concentrates the flavor and prevents the batter from becoming too thin. For the batter, remember that word I keep repeating? Don’t overmix! Seriously, this is the most crucial step for tender cookies. Mix until *just* combined, and you’ll be rewarded with soft, cake-like results. If you’re worried about uniformity, using a cookie scoop is a lifesaver. It ensures all your whoopie pies bake evenly and makes pairing them up much easier.
Now, for the filling. Make sure your cream cheese and butter are truly softened to room temperature. This is key for a smooth, lump-free filling. If you try to beat cold cream cheese, you’ll end up with a lumpy mess, and nobody wants that! Sifting the powdered sugar is also non-negotiable if you want that silky-smooth texture. Trust me on this one; it’s worth the extra minute. As for variations, if you’re not a huge fan of cream cheese, you can try a Swiss meringue buttercream or even a spiced whipped cream for the filling. Some people love adding a bit of chopped toasted pecans or walnuts to the cookie batter for extra crunch and flavor. And if you want to amp up the apple flavor, you could even add a tablespoon or two of finely grated fresh apple (squeeze out all the excess moisture first!) to the cookie dough.
Baking time can vary slightly depending on your oven. My best advice is to watch them closely. You want them to be set but still look very soft in the center. They’ll continue to firm up as they cool. If they look a little too pale, a minute or two longer might be needed, but err on the side of underbaking for a wonderfully moist cookie cake. For the glaze, get the consistency right by adding the liquid slowly. You want it to be thick enough to coat, but thin enough to drizzle. A little practice with the drizzling can make them look super professional!
Storing and Reheating Tips
One of the best things about these apple cider whoopie pies is how well they store. If you happen to have any leftovers (which is rare in my house!), you can keep them at room temperature for about 2-3 days in an airtight container. I like to use a container with a tight-fitting lid, or I’ll cover the plate with plastic wrap. If your kitchen is particularly warm, or if you prefer a firmer filling, the refrigerator is your best friend. They’ll stay fresh in the fridge for up to a week. Just make sure to let them come to room temperature for about 20-30 minutes before serving for the best texture and flavor. For longer storage, you can absolutely freeze them! I usually freeze the filled whoopie pies on a baking sheet until they’re firm, then transfer them to a freezer-safe bag or container. They’ll keep for about 2-3 months. To thaw, simply transfer them from the freezer to the refrigerator overnight. I don’t usually reheat them, as they’re best served at room temperature or slightly chilled, but if you did want to warm them up slightly, I’d suggest a very brief stint in a low oven (around 250°F/120°C) for just a few minutes.
A quick note on the glaze: If you plan on storing them for more than a day or two, I’d recommend glazing them just before serving. The glaze can sometimes become a bit sticky or melty if stored for too long, especially in warmer conditions. If you’re freezing them, it’s definitely best to add the glaze after thawing.
Frequently Asked Questions
Final Thoughts
I truly hope you fall in love with these apple cider whoopie pies as much as my family and I have. They’re more than just a recipe; they’re a little bit of comfort, a reminder of simpler times, and a whole lot of deliciousness all rolled into one. That perfect blend of soft cake, creamy filling, and that subtle, warming apple cider flavor just can’t be beat. They’re proof that sometimes, the most wonderful treats come from straightforward ingredients and a little bit of love. If you enjoy these, you might also love my Spiced Pear Muffins or my Classic Apple Crumble – they all capture that same cozy fall spirit! Please, if you make these, come back and leave a comment or a rating. I absolutely love hearing about your baking adventures and seeing your beautiful creations. Happy baking, and I can’t wait to hear how yours turn out!

apple cider whoopie pies
Ingredients
Main Ingredients
- 2.5 cups all-purpose flour
- 1 teaspoon baking soda
- 0.5 teaspoon ground cinnamon
- 0.25 teaspoon ground nutmeg
- 0.5 teaspoon salt
- 0.5 cup unsalted butter, softened
- 1 cup granulated sugar
- 1 large egg
- 1 teaspoon vanilla extract
- 0.75 cup apple cider
Cream Cheese Frosting
- 4 ounces cream cheese, softened
- 0.5 cup unsalted butter, softened
- 2 cups powdered sugar
- 1 tablespoon milk
- 0.5 teaspoon vanilla extract
Instructions
Preparation Steps
- Preheat oven to 375°F (190°C). Line baking sheets with parchment paper.
- In a large bowl, whisk together flour, baking soda, cinnamon, nutmeg, and salt.
- In a separate bowl, cream together softened butter and granulated sugar until light and fluffy.
- Beat in the egg and vanilla extract until well combined.
- Gradually add the dry ingredients to the wet ingredients, alternating with the apple cider. Mix until just combined. Do not overmix.
- Drop rounded tablespoons of batter onto the prepared baking sheets, about 2 inches apart.
- Bake for 10-12 minutes, or until edges are lightly golden and a toothpick inserted into the center comes out clean.
- Let the cookies cool on the baking sheets for a few minutes before transferring them to a wire rack to cool completely.
- While the cookies are cooling, prepare the frosting. In a medium bowl, beat together cream cheese and softened butter until smooth.
- Gradually beat in the powdered sugar until smooth and creamy. Stir in the milk and vanilla extract.
- Once the cookies are completely cool, spread frosting on the flat side of one cookie and top with another cookie to form a sandwich.